My Teaching Library (review)

Disclaimer: I received a FREE copy of this product through the HOMESCHOOL REVIEW CREW in exchange for my honest review. I was not required to write a positive review, nor was I compensated in any other way.

When you’re homeschooling a wide age range of students, I don’t think you can have too many subscriptions to homeschool help services. This is why I was open to reviewing My Teaching Library when asked. I knew that there would be plenty here that we would be able to use. For this review, I’ll be talking about the Download Club, to which I received a one-year membership.

My Teaching Library is a site that has a huge range of resources for kids PreK-12, and this makes it different from other services, and makes it different from what I thought it would be. I expected it to be mostly worksheets, but it’s so much more than that! You can browse their offerings by age/grade, subject, or newest resources. They have options for all your regular subjects (math, language arts, etc), but also some that can be harder to come by, like foreign languages (American Sign Language, French, or Spanish). In addition to standard things you’d use for your students, they also have classroom posters, printable diplomas, games, flashcards, and more. Let’s dig a little deeper into what we used in our home.

91E580DD-E153-467B-89E0-873C9AEA46C9
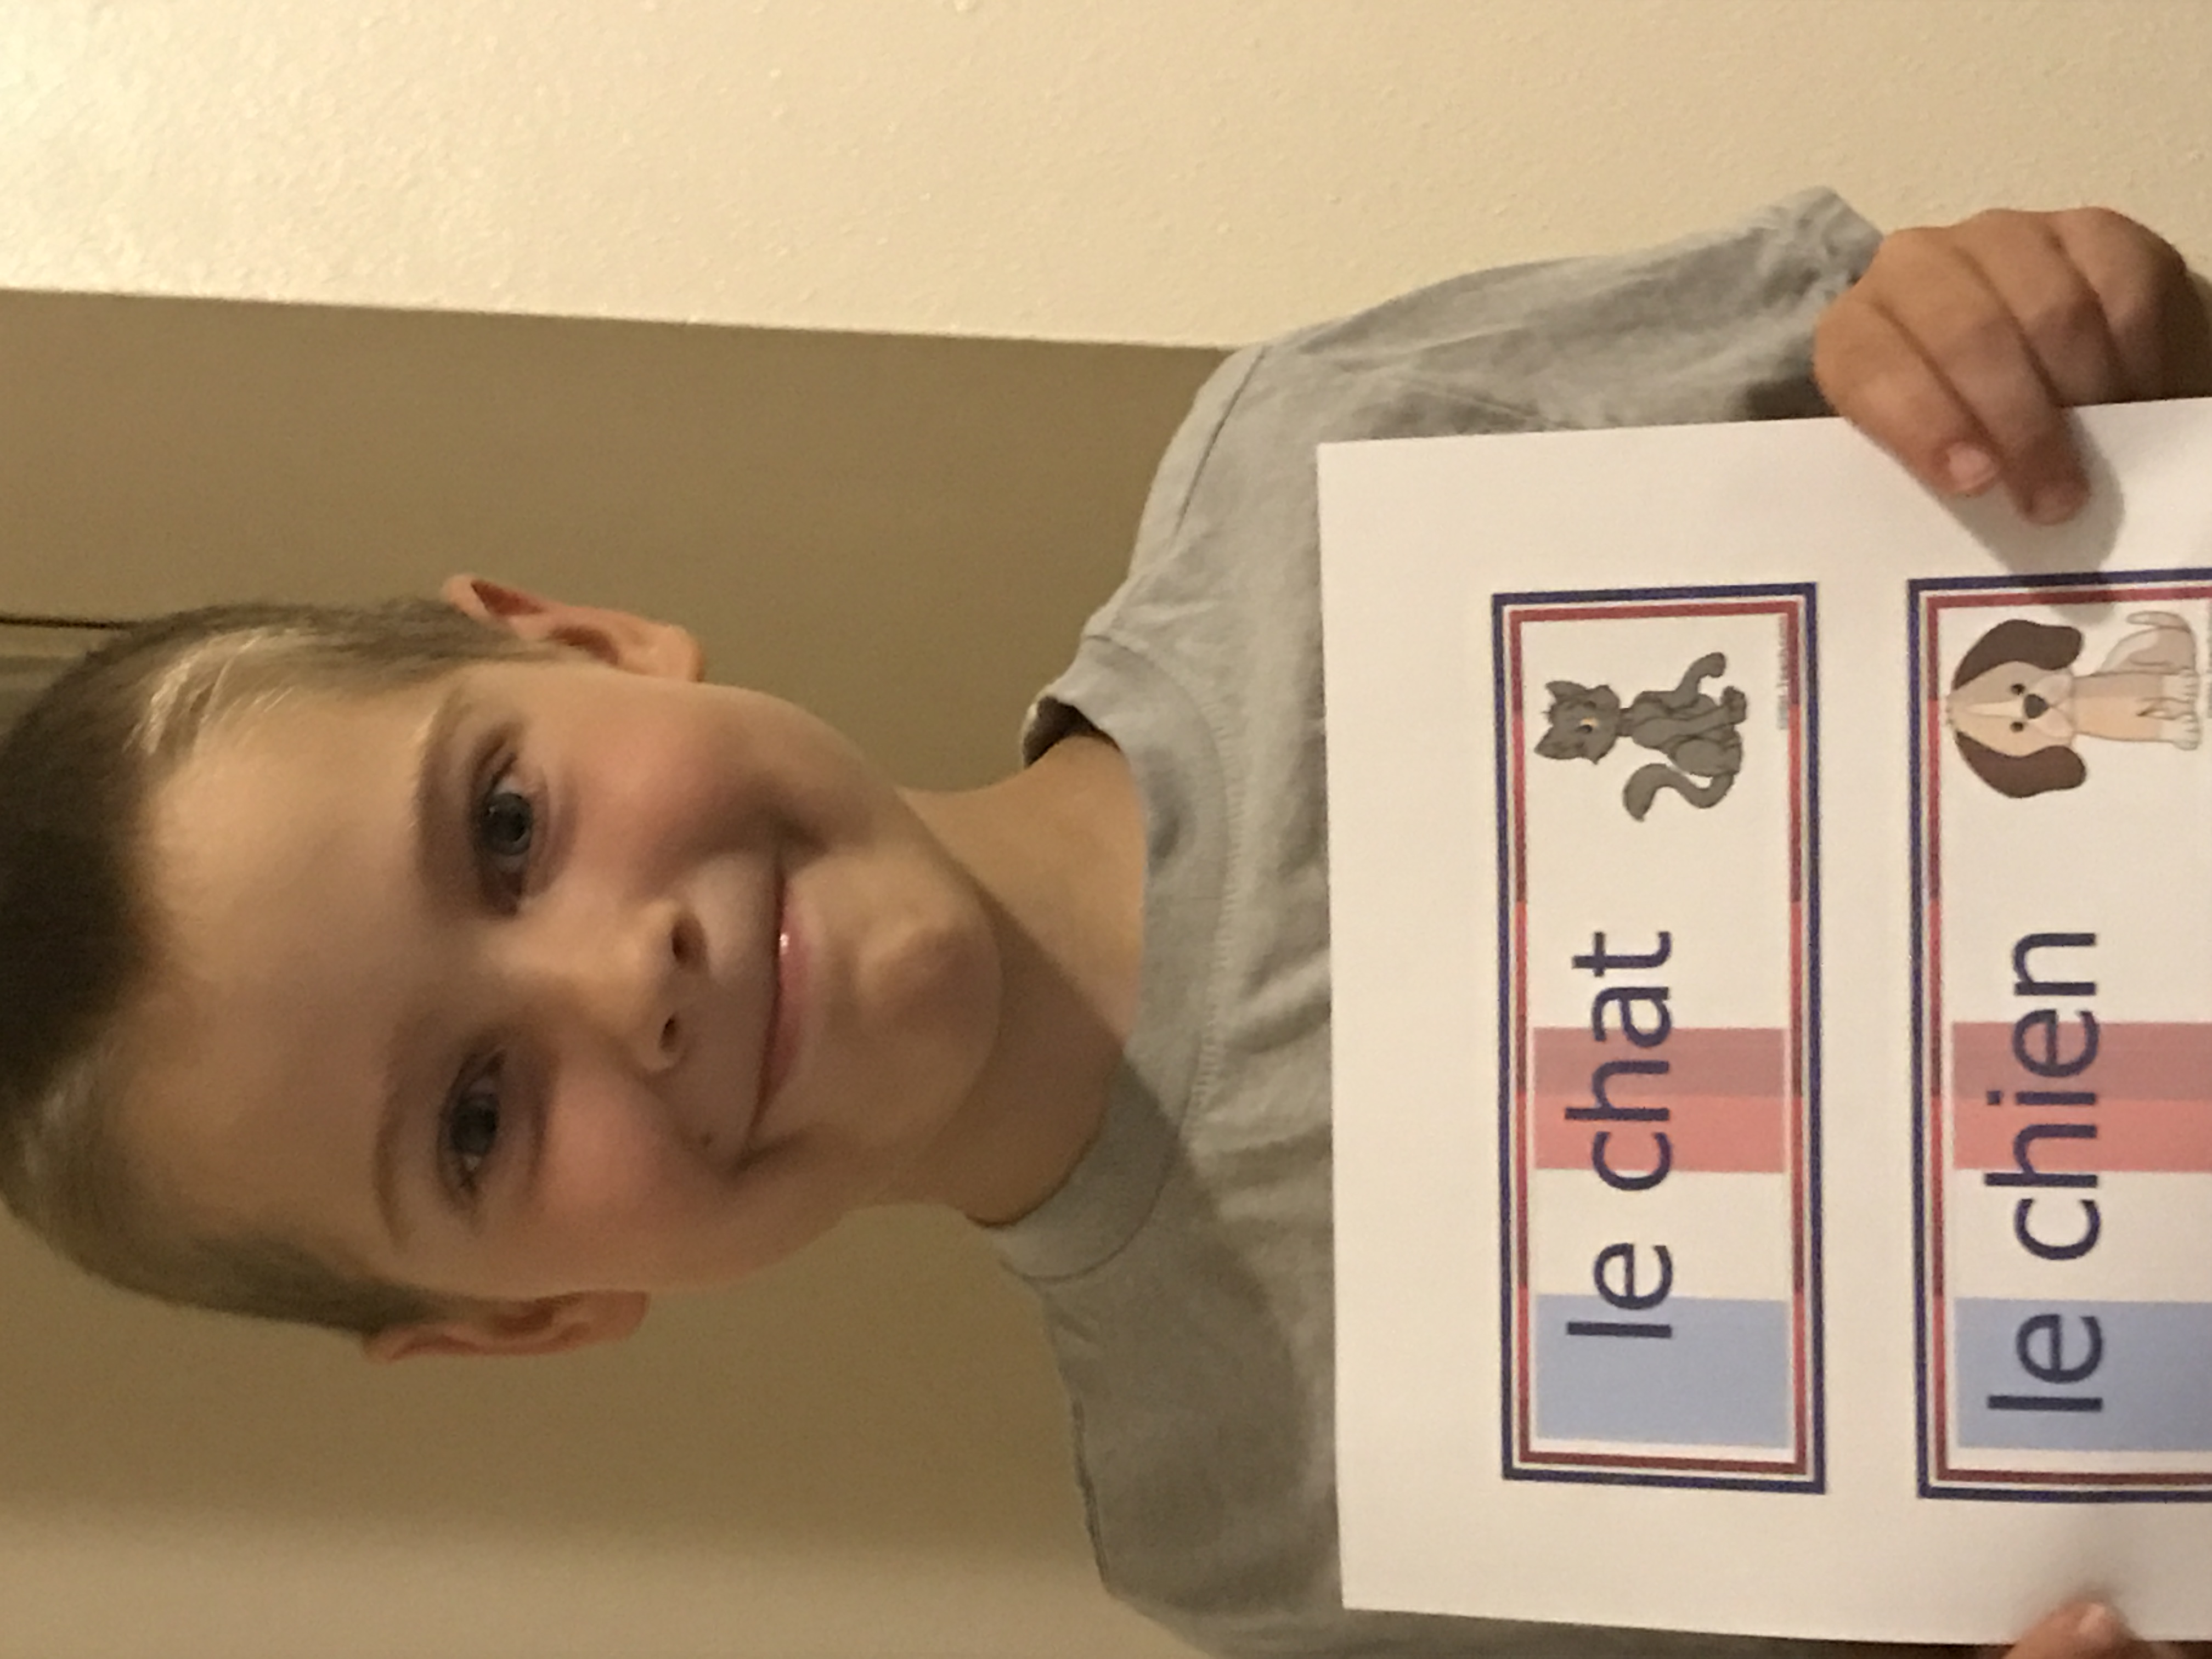
I was immediately drawn to the French curriculum. We used to use Rosetta Stone to learn French, but that was on an old computer that has since died, and we haven’t put it on my new laptop yet. And besides that, sometimes paper things work better for younger kids. So I downloaded from the French archives: animal names, family vocabulary, months of the year and days of the week, basic weather terms, number words 0-20, and the colors poster.

MTL 1
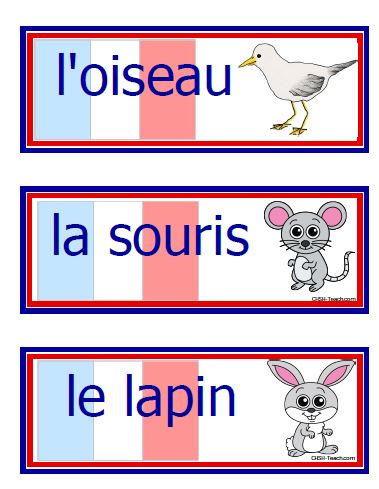
Some of the items were flashcards and others were posters. All follow the model of “show, don’t translate,” though. The animal flashcards, for example, name the animal in French and offer a picture. None of them have the English name for the animal. The same goes for all of them. The main difference between the posters and the flashcards is that the flashcards have definition lines to cut; the posters are a series of images with a common border.

One thing that threw me off a little bit at first was that when you click “download,” the files don’t go to your computer straightaway like a normal download. From the point you click download, they go to your downloads folder within the site itself. You have to then go to your account screen, then to downloads, and download “again,” at which point it will go onto your computer. I think I would prefer to have it be a traditional download instead; I don’t see the purpose behind having to go to a different page to download the files properly. Or at least give the first “download” a different name, like “add to your dashboard” or something.

The Download Club is available for $45 a year, or for $225 you can buy lifetime access. It allows you unlimited downloads to every single one of their worksheets, flashcard sets, and unit studies. If you’re not sure you want to commit fully to that, you can also buy things a la carte. The French PDFs we used range from $1-$3 each. They have full textbooks available in many subjects (including upper grades science and math) for a wide price range. There is quite literally everything you could possibly need available for one price – and it covers ALL of your children! What could be better than that?

I am super excited about all of the different options available on My Teaching Library. This will definitely become something I go back to again and again for resources.

Make sure to head over to the Homeschool Review Crew blog for more reviews.

Blessings,

ladybug-signature-3 copy

Simply Coding (review)

Disclaimer: I received a FREE copy of this product through the HOMESCHOOL REVIEW CREW in exchange for my honest review. I was not required to write a positive review, nor was I compensated in any other way.

If you’re interested in having your kids learn some basic computer coding, the Coding for Kids Annual Membership from Simply Coding might be for you. Designed for kids 11-18, the course includes interactive content, videos, chat help from the staff, and projects. Mentors are available for chat help from 9am-6pm central time M-F, and they offer email support on the evenings and weekends.

Through the course, which costs $149 per year for one student or $229 for a family account for up to 3 students (there’s a 10-day free trial if you’re unsure it’s something your kids will be interested in), youth learn to code their own video games, websites, and apps. The course includes roughly 300 hours of content. While appropriate for beginners (so long as they know how to type – though not required, it does make it easier), Simply Coding goes above and beyond other entry-level coding curricula out there.

Simply Coding aims to give kids real-life coding experience in their younger years. A lot of kids want to (or think they want to) work in IT and coding as adults, but few of them know what that really means in regards to the dedication and training necessary. Simply Coding gives them a taste of the dedication required for a fraction of the price of a college course – or worse, an entire degree that they then don’t want to use. And with Simply Coding, the student has something to actually show for their work at the end – something that, if they were right and they do want to go into IT as a career – just might give them a resume piece for college applications.

The entire course is actually made up of 9 courses, totaling nearly 3 high school credits. You can see the breakdown in the graphic below:

coding 1

There is lots more information on Simply Coding on the Homeschool Review Crew Blog today, including other reviews linked up there. I highly encourage you to check that out!

Blessings,

ladybug-signature-3 copy

Wisdom Wonder Project (review)

Disclaimer: I received a FREE copy if this product through the HOMESCHOOL REVIEW CREW in exchange for my honest review. I was not required to write a positive review, nor was I compensated in any other way.

6CD64D1A-1390-4CA7-8E1C-F2EABB98910C

Wisdom Wonder Project is a subscription based, classical education curriculum for kids preschool through 2nd grade. What started as a group of parents who couldn’t find a classical school near them and therefore started their own has become a full curriculum for younger students available for purchase worldwide. For the month of September, Dragonfly and I have been using their Little Wonders Preschool set. This is for kids in preschool or kindergarten.

How It Works

Wisdom Wonder Project is, as I mentioned, a subscription product. You can choose a monthly subscription or an annual one. Each month, you go in and download the curriculum to your computer; there’s no need to log in every day. Little Wonders is a three-piece set: literature, Little Masters (art), and block play. 

Kindergarten literature is just what it sounds like… Each month, your kit includes everything you need for your child’s first literature lessons. There are four books highlighted each month, which gives you a full week to spend with each one. With each book, you read the book each day and then do activities based on the book. For example, with Harold and the Purple Crayon, there are loads of activities involving purple things (making purple play-doh that is lavender scented, buying purple fruits and veggies from the store and eating them, etc).

4AACE4A3-0E9C-4BC6-9E44-39A438681A88I had a hard time getting hold of most of the books for this month of study (almost none of them were available in my library system), but I was able to find A Sick Day for Amos McGee, and we read that a few times. Dragonfly really had a lot of fun with the sandpaper coloring activity in that unit. Because I had an ebook version of the story instead of a hardcopy, I had Scorpion (14) draw an elephant for Dragonfly to color. (The curriculum instructed you to photocopy one of the pages for this activity.) We had some sandpaper on hand, so we popped that underneath the drawing and let him color away. This gave his elephant a “real feel” texture, which he loved.

Little Masters is the art curriculum, and it’s titled such because each month focuses on a “master.” September is Alexander Calder. The packet includes a brief biography, and it’s there that I read that he is credited as the creator of the mobile. For this reason, the main focus of the month is learning about shapes. One of the activities in this vein was to let your child help make a sandwich of his choice – Dragonfly chose peanut butter – and then cut it into the shape of his choice. We first talked about the shape of the bread (rectangle), and then he chose to have it cut into triangles, and he shared one of them with his baby brother.

The third component is Block Play. This includes another book, and after reading it, you use physical things (beyond paper and pencils) to create aspects of the book. For example, you’re instructed to help your child build a skyscraper, or create a road. Basically, it gives your child a chance to wiggle a bit and explore with their hands while still learning.

I loved the idea of the Wisdom Wonder Project, but I wish they used more mainstream books that were easily found at the library. That made it difficult to really get into the curriculum as well as I wish we could have. That said, I will continue to download the kits each month (I received a yearlong subscription), and we will use the ones that are readily available to us.

Wisdom Wonder Project also has curriculum for kids in 1st and 2nd grade, as well as a video math program using Singapore Math. Click through to read more about that on the Homeschool Review Crew blog.

Blessings,

ladybug-signature-3 copy

Ruby: my entry to the Great Caron Cake Off

I read about the Great Caron Cake Off first on Repeat Crafter Me, and I was immediately excited. Let me give you a quick run down, and then I’ll show you what I made for the contest. 

Caron Cakes were introduced five years ago. The original yarn is a wool-acrylic blend wound into a cake shape instead of a skein (hence the name) and was popular with crocheters and knitters right away. Since then, they have created many more varieties of Caron Cakes, all of which are available exclusively at Michael’s craft stores. Since this year is the fifth anniversary of the Caron Cake, Michael’s is hosting a contest using the yarn. The task was to create something – anything – using any one of the Caron Cake yarns. It could be knit, crocheted, or crafted. 

I have been wanting to design my own knit and crochet patterns for a while (I did the pig a few months ago and that was enough to make me want to do more and more!), so this contest was the perfect opportunity to try something. I went to Michael’s to look at the Caron Cake selection (I don’t go there often because it’s about an hour away), and I absolutely adored the Latte Cakes I found. It’s an acrylic-nylon blend (which as I’ve mentioned before are super soft) and has a beautiful, fluffy texture thanks to the loose strands, or “eyelashes,” all over it. As a mom of boys, it would have made the most sense to get a brown or blue cake and turn it into a sweater or blanket. But I just couldn’t shake the feeling that I wanted to use the “Strawberry Flambé” color (gray and pink) to make a toddler dress. So I bought two of the pink cakes (they were buy one, get one half off that day) and brought them home. 

I thought I wanted to crochet the dress, but after two or three attempts that didn’t work out, I realized why: I don’t have any experience crocheting garments. I’ve knit countless sweaters and diaper covers, but I tend to use crochet for toys and blankets – not clothes. So I went back to knitting instead, and this is the dress I came up with:

877CD6E9-529F-4EDA-8523-AF32C019C8FB

In the interest of full disclosure, I used the Flax sweater pattern for my measurements. While I’ve knit loads of sweaters, I’ve never designed one, so it made sense to start mostly from scratch instead of fully. I made a lot of modifications to the pattern (literally all I used from that one was the cast on number and the depth of the yoke measurement), so I’m still comfortable calling it my own creation.

I started by casting on the designated number (68) using the tubular cast on method. This gives a super stretchy neck hole. I worked the top ribbing in rows, and only joined in the round after the neck edge was done.

When it came time to start making the top larger rapidly to accommodate the shoulders, I used the yarn over method for my increases to give a lacy, open, girly feel for the dress. When I did the body-sleeve split, I knit for about 2 inches and then moved in to the waistband and skirt of the dress (rather than knitting all the way to the hips as I would have done for a sweater). I chose to go with short sleeves for this dress, so using my double pointed needles I added one row of plain knit and 6 rows of ribbing to the arm holes left when I did the sleeve separation. I was conscientious about the yarn color here, making sure the edges of the sleeves would match the shoulder portion.

I wanted a clear separation between bodice and skirt, so I did a narrow band of garter stitch (about an inch), and even though I was using self-striping yarn, I cut it here so I could get a clean line for that belt. I cut the yarn again after the belt as I headed into the skirt. The first row after the belt, I doubled my stitches by doing a KFB (knit front and back) increase into every stitch to give a good start to the skirt. 


A close up of the cables on the skirt

A close up of the cables on the skirt

I literally had a restless night the night before I started this project because I was thinking up ideas for my dress, and one of those ideas was to include cables on the skirt. I’ve knit plenty of cables before, but never really studied how they work, so I went with a simple 3 over 3 twist pattern. I wanted a super flowy, twirly skirt, so I knew I needed to slowly increase the stitch count to get the shape I wanted. In order to mimic the lacy quality of the bodice, I opted for yarn over increases again. This method leaves you with “on purpose” holes in the fabric. Instead of increasing every other row like I did on the top, I increased every third row; this is when I did the cable twists, so it was easier to keep track of where I was: increase and cable in the same row, then work two rows plain. 

I initially considered adding a crocheted border to the sleeves and bottom, but when I bound off, I didn’t think it needed it after all. I did, however, crochet a little flower and attach it to the waistband with a pearl button. The dress also closes with a matching pearl button at the back of the neck. (I didn’t add in a specific buttonhole; the pearls are small enough to slip through the stitches as they sit.)

I hope to have the official pattern written up (and maybe tested by other knitters) in the coming weeks. When that’s done, I’ll post it here. 

Blessings,

ladybug-signature-3 copy

Mystery Project

I recently quit Instagram. Probably temporarily (I didn’t delete my account, but I did remove the app from my phone), but for now it’s gone.

Before I did, however, I saw a post from a mom-owner business called Pixel Hooker. They create corner-to-corner (sometimes abbreviated C2C) crochet “graphgans.” A graphgan is an afghan created using squares of color (made with double crochets) to make a picture, usually done in the C2C style. The post was advertising a promotion they’re running, in which you download the free pattern and make the blanket. There’s no picture of the blanket included (unlike most other graphgans). Instead, it’s a row by row list of the colors to crochet. The reward for completing the mystery blanket is one free pattern from their store. 

I’ve always wanted to try making a graphgan, so I bought the yarn needed and started making the blanket. It’s one of three projects I have going right now, so even though it’s been a couple of weeks, I’m not done yet. But here’s what I’ve got so far.

6B8BB669-B027-4349-97A7-4C6DF80EFD6F

Any thoughts on what it might be? For a while I was thinking it was going to be a bee, but now I’m not so sure. I’m excited to finish up and see! Stay tuned for the reveal when I finish. And make sure to check out Pixel Hooker; they’ve got some amazing patterns that I’m excited to try out in the future!

Blessings,

ladybug-signature-3 copy

Yarn Thoughts: Yarn Bee 44th Street (and what I made)

I’m starting a new series using my primary interest as inspiration: yarn. I’ll be offering my thoughts on various yarn that I use, both good and bad. Each one will include project(s) that I’ve made as well as my thoughts on the yarn itself.

For my birthday in July, my father-in-law got me some yarn (perfect gift!). The first thing I did was look at the label because it wasn’t yarn I’d ever seen before and I loved the feel of it from the very beginning. It’s from Yarn Bee (Hobby Lobby’s brand), and the line is called 44th Street.

IMG-5885

Let’s start by looking at the label. It’s listed as a 3 weight yarn (or DK), and there are 540 yards and 100 grams (3.5 oz) per ball. It’s sold in cake format (a cylinder shape), which is my very favorite. The fiber is 70% acrylic and 30% polyamide. A quick Google search tells me that polyamide is basically a type of nylon. The yarn is available in 10 colors and costs $4.29 (US) when it’s regular price. Of course, being Hobby Lobby, it goes on sale frequently. When I needed more to finish my project (more on why in a minute), I was able to pick it up for $3 apiece.

IMG-5888Because yarn cakes are flat on the top and bottom, they sit easily on the floor beside you while you knit or crochet, with little bouncing around.  As far as artificial fibers go, acrylic-nylon blends are some of the softest yarns you can buy in my opinion. 

When I first pulled the yarn out of the gift bag, I was super excited. It was in the middle of a party (I threw a surprise party for my husband’s 40th birthday, and because our birthdays are only two days apart, my FIL brought gifts for both of us), and I was basically useless after that! I don’t go to Hobby Lobby very often (it’s only in the last couple of years that they started opening stores out west where I live), so I’d never tried any of their yarns. I’d heard a lot about them, but never tried one. And when I pulled the 44th Street out of the bag, I was immediately in love. I couldn’t wait to knit a sweater for myself using the yarn… which brings me to the next part of my review: How does it work up?

IMG-5890The first thing I noticed when I actually started pulling yarn up from the cake to start knitting (the day after the party) was that it was very thin, even for a 3 weight yarn. It felt more like a 2 weight yarn to me. I was willing to admit that maybe I was wrong because I rarely use anything but standard worsted weight yarn, but I have used other DK yarns in the past, and this felt a lot thinner than those to me. I started knitting anyway, but just with a test swatch. I know what my gauge is when working with worsted (4 weight) yarn, but not so much with the DK. So it was really important to know that whatever I made was going to fit – it’s no fun to spend a month making a sweater and then not be able to wear it in the end. I knew that I wanted to make a sweater for myself with this yarn, so I chose the Strange Brew pattern (the same one I used to make my kids’ sweaters earlier this summer). I opted to work bottom-up, which meant that I could start knitting a sleeve straightaway and not bother with a standalone swatch. Once I got a few inches up, I could stop to measure; if it was the right gauge then I was good to keep going and I’d already started the project. If not, it wasn’t so much knitting that I’d wasted loads of time – and yarn.

Turns out, my gauge was much too tight for the sweater project, even using knitting needles much larger than what was recommended both in the pattern and on the yarn label. Sad. So I decided to make a series of shawlettes with my yarn instead. There were several patterns on Ravelry, and I had enough yarn to make four of them. But that’s not what I wanted to make, so I was unhappy with the project even though there was absolutely nothing wrong with what I was making. I looked at other people’s opinions of this yarn (the consensus is that it’s too thin to be classified as a 3 weight) and how they overcame the “problem.” The answer was to hold two strands together and knit as if they were just one. So ripped out the shawlette and tried this method. It’s one I’ve used before, but only to make a marled effect with the yarn, not simply for making it thicker. I started a new sleeve, this time with two strands together. I measured it when I’d gotten up a few inches, and to my excitement, the gauge was right! I was off to the races with my sweater.

IMG-5887Because I had to knit with two strands together, I went through twice as much yarn as I would have otherwise. This meant that I needed to go back to Hobby Lobby and pick up more yarn to go with what I already had, but because they were having a 30% off sale, I was able to get all of the supplemental yarn needed for $15 (and I have quite a bit left over).

The colors I used were camel (for the main body), shale (the dark brown), and ruby (red).

Final thoughts? I really liked this yarn a whole lot. It’s a little disappointing that they label it a 3 when it’s clearly not. That distinction really matters when you’re trying to plan out a project. But knowing what I know now, I can work with the knowledge I’ve got. Some projects would be just fine with a single strand of this; others will use two strands together. Either way is A-okay with me.

Bottom line: Would I buy this yarn again? Definitely, especially when it’s on sale.

Blessings,

ladybug-signature-3 copy

Reading Eggs (review)

Disclaimer: I received a FREE copy of this product through the HOMESCHOOL REVIEW CREW in exchange for my honest review. I was not required to write a positive review, nor was I compensated in any other way.

You might recall that Dragonfly, my 4-year-old has been learning to read this summer. He’s super excited, and I want to encourage that hunger to learn, so I was really interested to have him review Reading Eggs from Blake eLearning Inc. I’d heard of Reading Eggs before (if you’ve homeschooled little kids for any length of time, you probably have too), but never really tried it, so this was an adventure for both of us. 
31B9411C-55FE-4678-9584-14558401851E

When you set up the account, there’s one log-in for your family, but each child has their own “map” within the account. When you get logged in, you choose the student and where you want them to work. There are 4 levels of reading: Reading Eggs Jr (ages 2-4), Reading Eggs (ages 3-7), Fast Phonics (ages 5-10), and Reading Eggspress (ages 7-13). We also got access to Math Seeds. I had Dragonfly start at the beginning of Reading Eggs. I probably could have (maybe even should have) had him start partway up since he’d learned quite a bit previously, but it made sense to me at the time to start at the beginning since the program was an unknown quantity to us. 

Reading Eggs is available as a website (on a phone, tablet, or computer) as well as an app (phone or tablet). I didn’t realize at first that there was an app available, so we used the website. When I learned about the app, though, I downloaded it right away to my iPad. I was able to log in using the same credentials as the site, and all of Dragonfly’s progress was there. That was great, because now we don’t need to log in every single time anymore. Since then, we have used the app exclusively. 

The program itself is really fun. Each lesson consists of about 10 different activities/games, all centered around a specific letter or sight word. The first activity always introduces the sound with a fun song, usually sung by mascot Sam the Ant. Then the letter (or word) pops up in different places on the screen and the student clicks or taps on them. The final activity of each lesson is reading a book that focuses on the letter of the day. This is usually a little 4-8 page booklet that has single words, each beginning with the letter. There is an option to have the book read to you, which you can turn off with a little toggle switch at the top of the screen. We always left it on.

The games in between the first and last one each time vary somewhat. I never really counted them, but there seemed to be about 10-12 total games on an (approximate) 8-game rotation. This means that the games get repeated a lot, just with different letters. But don’t take that to mean that it was boring or repetitive, because it definitely wasn’t. And even if it was, kids at this age thrive with repetition anyway. But even for me, as the teacher/monitor, it still felt pretty fresh each day. Obviously, there were some games that I liked better than others (and my preferences were usually based on what was easier for him to succeed at!), but all of the games were fun and really pushed the letter sound of the day. Let’s take a quick look at a few of the games.

Listen for the sounds: The child sees two pictures and has to determine which one has the sound of the day in it (for a single letter, the sound should be at the beginning; for another type of sound, it just has to be in the word).

A415D448-DC88-497F-B12F-648B8EBF62A0Picture Match: There are six pictures taking up most of the screen, and six words down below. When you click on a word, it is read to you and you drag the word to the correct pictures. This is done twice with the same words, but they get mixed up between.

Word Blending: Sounds are shown, each in a bubble. The sounds are read, then blended into a word, and the child repeats.

Frog Hop: There are many iterations of this game, but the concept is the same. The sound or a word with the sound is shown amongst two others and your child chooses the correct one. They do this ten times to get the frog all the way across the pond.

A129A32D-FE8E-468D-A2AC-41107506CD7ADot to Dot: Touch the spots in order to create the letter of the day.

Word building: The final sound(s) are shown along with a picture and three possible starting sounds. The child chooses the correct one.

Letter Grid: In a 6×6 grid, there are 6 of the letter of the day (in different fonts). The child finds them all. The game is repeated with the capital version of the letter.

This is just a small sampling of the different games; as I mentioned, they go on something of a rotation from lesson to lesson. With each game, the child is allowed 3 mistakes. If they succeed with fewer than three errors, they can move on. With the third error, they are automatically restarted on the game.

At the end of the lesson, your child is awarded with some sort of creature that hatches from an egg on their map. This creature is based on the letter of the lesson (Pram Lamb for the “am” sound, for example). Each lesson took Dragonfly about 20 minutes to complete.

So what did we think? We love it! Dragonfly is always asking to do Reading Eggs. Seriously, not a single day goes by when he doesn’t ask to do a lesson (even the weekends). That’s a raving review if ever there was one!

Blessings,

ladybug-signature-3 copy


Make sure to hit the Homeschool Review Crew blog for more Reading Eggs reviews!