Dollar Tree Welcome Sign

I created a new welcome sign for my front door this year and thought I’d share it here, including how I made it.

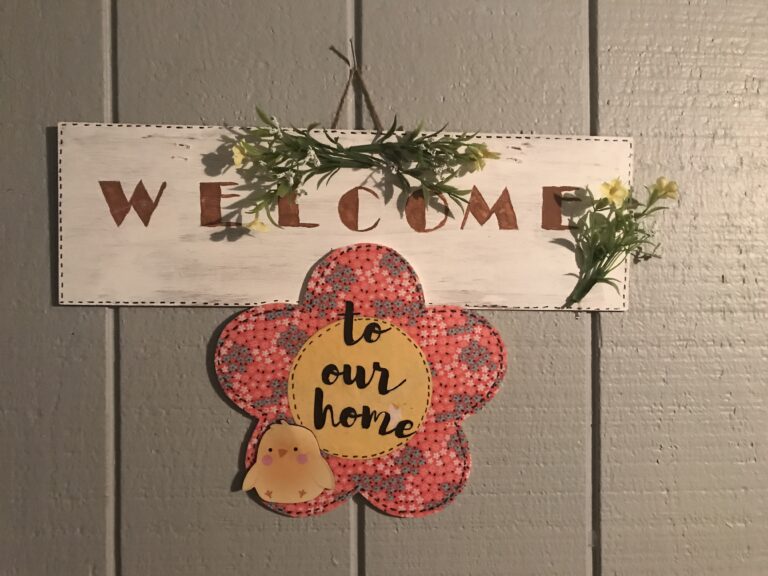
I started with one of the standard Dollar Tree rectangular signs. The one I picked up said “Easter Joy,” with the O being a foam chick hot glued on. I started by removing the chick from the front of the sign and setting it aside, as well as taking off the ribbon hanger. Then I flipped the sign over to the back and painted it with Apple Barrel (acrylic paint) in the color Nutmeg. When that dried, I went over it with white paint, allowing a bit of the brown to show through.

I also found a cute wood flower cutout from Dollar Tree and some pretty pink fabric. I removed the twine hanger from the flower and saved it for later. Then I used some Mod Podge glue to attach the fabric to the flower. When it had fully dried, I used an Exacto knife to trim around the edges of the flower. This works much, much better than trying to get close enough with scissors.

With both pieces (the painted and the decoupaged) done, I went to work with the words. I got on the computer and printed out the letters W E L C M and E for Welcome in a font that I liked. I made it pretty big (around 200 point, if I remember correctly). I had the idea to use the chick for the O, but that didn’t work out in the end (the sizing was all wrong). Then, using a technique I’d seen from Krafts by Katelyn on YouTube, I scribbled over the letters on the back of the paper, then placed it right side up on my sign and traced the outline of the letters. This left a very pale outline of the letters from the pencil scribbles on the back of the paper, which allowed me to paint over them very easily, with my painted letters looking just like the font I’d chosen. I painted the letters using the same Nutmeg brown that I used for the base coat on my sign.

I got back on the computer and found another font that I liked and typed out “to our home.” I printed that out and then very carefully cut it out with scissors. I used the Exacto knife to cut out the little bits from the insides of the letters as needed. I also jumped onto Pixabay.com (a free picture site) and found a pretty yellow background. I printed that out too, and then found a little bowl in my kitchen that was a good size to fit inside the flower. I cut out the yellow texture and glued that onto the flower using Mod Podge, and while the top coat was still wet I attached my “to our home” words and added another coat of glue on top of those also. I let the flower dry completely.

With my main pieces now done, I used a bit of hot glue to attach the flower to the bottom center of the rectangle. I considered putting the flower off to one side, but then I realized that it wouldn’t hang straight if I did, so I put it in the middle. I added the little chicken that I’d pulled off the front of the sign as well as the twine from the flower for hanging, and I was done… I thought.

I hung my sign up for a few days, and while I liked it, I didn’t think it was quite ready. It was too plain. So I brought it back inside and grabbed a Sharpie marker, which I used to add “stitches” to the edges of all the main pieces – the rectangle, the flower, and the center of the flower. That helped a lot, but it still needed something else. So I found some faux flowers I’ve had for a while (a freebie from JoAnn’s months and months ago). I cut of the stems of those using wire cutters and superglued them to the top (I was out of hot glue by this point). Now it’s done, and I’m really happy with how it looks!

Blessings,

The Crafty Classroom (review)

Disclosure: I received this product free through the Homeschool Review Crew.

Kindergarten is such a fun age! Kids are excited to learn, and the learning they do is so laid back that it’s just a great time to be a parent. To enhance Dragonfly’s kindergarten experience, we have had the pleasure of reviewing the Tracing Bundle from The Crafty Classroom. Dragonfly loves to trace stuff, so this was a great fit for him. The Tracing Bundle comes with two files: Editable Name Tracing Pack and Tracing Bundle C. I want to talk about the latter first.

Tracing Bundle

This file is a 297-page printable PDF with loads and loads of things for your child to trace. Dragonfly and I looked over it together and he picked a few pages he wanted to trace. I also chose a couple that I wanted him to work on to help him in his early penmanship. Then I printed them all out and stuck them in a folder to distribute to him slowly. Each day we worked on these (about 3x a week), I gave him one of “his” pages and one of “my” pages. His were mostly shapes and pictures; mine were mostly words and numbers.

The Tracing Bundle includes things like the uppercase and lowercase alphabet, numbers, colors, shapes, days of the week, months of the year, seasons, and sight words. Then there are images – dogs with bones, seashells and waves, and more. As you move through the pack, the emphasis changes to drawing the shapes in the right order – for your square, starting in the upper left corner, going straight down, then to the right, then up, and back to the left. This guidance is helpful for “pre-writing,” encouraging children to do things in the right order. That way, when they’re ready to write letters, they understand the concept of doing things in the right order.

Editable Name Tracing Pack

This one was really cool! The very first page of this PDF is the instructions on how to edit it properly. (The main thing is that it has to be opened in Adobe Acrobat, not a web browser or other program.) Then you scroll through until you get to this page:

As you can see, there are three choices here. Each one is attached to a theme. Pick the one you want, and type in your child’s name(s), and the PDF will pop those names into the appropriate pages for printing

This gives you the same types of tracing pages, but all entirely personalized. This is fantastic for kids from around 3-4 and up who are learning to write their names. I wish I’d had this for my older kids! You can bet I’ll be using it next year with Bumblebee, though, as well as working with Dragonfly sooner with it. What a fantastic resource for helping kids to write their name!

Final Thoughts

I am super glad we got to review the Tracing Bundle. It has been really great to have something simple for Dragonfly to work on while I’m doing more intense work with the bigger kids. He adores writing and drawing, as I mentioned before, so he’s been happy as a clam with these pages, and I’m happy to print out as many of them as he can work through.

The Crafty Classroom has offered a variety of different products to the Homeschool Review Crew members, so make sure to check out more reviews by clicking through.

Blessings,

Excellence in Literature (review)

Disclosure: I received this product free through the Homeschool Review Crew.

My oldest son has been working on writing a novel with his girlfriend, so I thought he might benefit from the Excellence in Literature Handbook for Writers from Everyday Education. The PDF e-book is over 400 pages long and has tons of valuable information for writers from middle school on up.

From Ballet Boy:

The part of the book that I used was Pointers and Tips on how to write what’s considered a “good” essay from a logical perspective. It included information on how to structure sound arguments, and thus how to fulfill the purpose of an essay. It touched on the fact that an essay is not meant to deliver facts so much as it to convey a convincing point of view, or to sell an idea.

The author discusses the weakness of starting your essay with something that is a trivial or obvious claim. For example, if your essay is about Hamlet and your opening sentence says “Hamlet was the Prince of Denmark and he dies at the end of the play,” that neither conveys new information to the reader nor takes a stand about anything. Another weak sentence starter it gives as an example is “The French Revolution, which started in 1789, brought about many changes.” This, too, is a fact that can be checked by any reputable source and therefore can’t be the topic of an essay. It’s only something that can guide you toward a sound and logical argument.

This is not to say that an essay shouldn’t have the facts in it. But the mistake people often make in writing essays is that they get hung up on the facts, myself included. Then their essay becomes the answer sheet to a trivia game instead of someone trying to convince you of a point or position. This renders the essay redundant.

Moving over to the novel I’m writing, I have started using some of these same principles to create a more engaging story, one that is less concerned about delivering facts and descriptions (talking about the time of day and how the wind blows) and is more about invoking concern, emotion, and feeling in myself and my future readers.

Recently I was writing a scene where my two main characters are interacting with each other, and one of them is injured, lying on a couch. Instead of having a description of the room that they’re talking in, I have different characters interact with their surroundings. For example, instead of describing that the couch has lots of pillows on it, I have one of my characters grab a pillow and move it slightly to better support his head. And instead of describing how the room has a soft rug (or carpet), I instead talk about how their feet sink into the soft ground whenever they take a step.

All in all, I’d say this is a very good resource that I would recommend to a beginner or someone who intends to write anything of importance, whether a thesis statement in grad school or a fantasy novel for teenagers.

Make sure to read more reviews from the Homeschool Review Crew!

Blessings,

Tomato Plus Soup (recipe)

We’ve been eating a lot of soup for lunch recently, and I wanted tomato soup one day. Problem was, I didn’t have any canned tomato soup. I did, however, have lots of canned tomato products and boxes of broth, plus some veggies in the fridge. So I came up with this recipe.

I’ve made tomato soup in the past, but only blended recipes. Unfortunately, I wasn’t careful enough that day and ended up covered in hot soup. Not fun, and not something I wanted to repeat, so I left the vegetables intact – and in fact embraced that aspect by including diced tomatoes as well as the sauces. This aspect is where the soup got its name. When I served it, my husband said, “It’s like tomato soup, plus.”

I hope if you try it, you like it. 

80692887-0FD5-418C-BAEE-71E19677CF59

Tomato Plus Soup 

1 medium onion, chopped 

2 carrots, peeled and sliced 

2 stalks celery, chopped

1 can (15 oz) tomato sauce

1 can diced tomatoes (14.5 oz)

2 cans (6 oz each) tomato paste 

1 box (32 oz) vegetable broth 

1 tablespoon dried basil

1 teaspoon dried thyme

1 tablespoon dried parsley

2-3 teaspoons sugar, to taste (this keeps it from tasting like spaghetti sauce)

Saute the veggies in a bit of oil until the onion begins to soften, about 3-5 minutes. Add in the remaining ingredients and bring to a simmer. Let soup cook 15 minutes or more to give the herbs time to soften. Serve with your favorite grilled cheese sandwich!

Blessings,

ladybug-signature-3 copy

Blazers Blanket

I recently finished up a blanket showcasing the logo of my favorite NBA team, the Portland Trail Blazers.


48D4CB1B-DE3E-4853-AE82-12E2A8885769

For this blanket, I looked in Google images for a pixel graph, then I stitched it up using the corner-to-corner method. I set it aside for a while then to work on other projects (including the Mickey Mouse blanket and some of the sampler squares). One of my sampler squares caught my attention as a wonderful design – so easy and somehow outrageously satisfying – and knew that I wanted to use it for the border of the blanket. It was a simple half double crochet, chain 1 repeat. Perfect for TV or audiobook time!

B133BC95-C3E7-4112-A118-31BB387A2CA5As a bonus, once I finished the blanket and posted a picture on Instagram, an old friend contacted me and commissioned a blanket for her son. It will be a similar design, but with his favorite team. 

Have you ever stitched anything in honor of someone else?

Blessings,

ladybug-signature-3 copy

SchoolhouseTeachers.com review (2021)

Disclosure: I received this product free through the Homeschool Review Crew

ST.com review 2021

Once again, I am taking part in the Homeschool Review Crew in 2021. The year is starting now, with a review of the Ultimate PreK-12 Annual Membership from SchoolhouseTeachers.com!

In case you’re unaware of SchoolhouseTeachers.com, it is the homeschooling curriculum home of The Old Schoolhouse magazine, and it is awesome! There is way more on there than I could ever write about in a single post, so I’m going to go over just a little bit of what we’ve been using.

history of hanukkahSince it was the beginning of December when we first got started with this year’s review, I started by doing the History of Hanukkah study with my younger kids (Grasshopper, 8, and Dragonfly, 5). Hanukkah ran from December 11-18 last year, so we did the history study in the week leading up to it. The unit study included an 18-minute video, a 65-slide ebook/powerpoint presentation, a 2-page student comprehension worksheet, and a printable dreidel game. I took a couple of days to read the ebook to the kids and we discussed the content as we went. When we’d finished, they watched the video, and we felt they were ready to celebrate Hanukkah!

Moving forward, I’m super excited to explore the School Boxes for my kids. These are full curricula, designed like the “box sets” you can get from other companies, except they are entirely digital. I’ve never had the ease of a full curriculum for any of my kids (except when we reviewed one last year, but we stopped using it for a variety of reasons), and I really love the idea of not having to piece-meal a curriculum. SchoolhouseTeachers.com has school boxes for all grades, Kindergarten through 12th, and when I say it’s a full curriculum, I really mean it! Check out the topics available:

K school box

K English sample pageAnd that’s just for Kindergarten! Each of those topics has a downloadable teacher’s guide. The guide tells you everything you need in order to teach the subject, from a list of the supplies to a weekly curriculum guide to keep you on track to the specific links for the lessons on the main site that you need to teach the lessons. It really is all-inclusive!

I didn’t look at all of the school boxes, just the ones I needed for my kids (K, 3rd, 9th, and 11th grades), and they are all just as amazing. The 3rd grade box is the same as the Kindergarten box, but it also has “History-classical” as an option. The 9th grade box includes math, literature, writing, spelling, science, traditional and classical history, and art. The 11th grade box includes the same subjects as 9th grade plus geography.

My teens are largely self-sufficient in their schooling when given the proper assignments, so I will be sending these PDFs to their emails (along with my login information so they can access the website) and keeping track of what they’re doing through regular checking in. I am so grateful to have access to these complete curriculum resources!!

But what if you don’t need a full box curriculum? That’s okay too! SchoolhouseTeachers.com is a fantastic place for “filling in the gaps,” which is how we’ve used it in the past. They have hundreds of classes for students of every age, in every subject imaginable. Even if you just want something for a short-term unit study, they have it! You really can’t go wrong with a membership.

SchoolhouseTeachers.com is also a fantastic place for printable planners. The main planner available this year is the Smart Mama planner, which includes a interactive budget to help you track household expenses and is otherwise completely customizable. It has the ability to help you make transcripts for your older kids complete with including your digital signature in case you need to send those transcripts off to someone.

Other members-only benefits include the option to get a FREE tote bag (just pay S&H) as well as a free print subscription to The Old Schoolhouse magazine (as long as your membership stays active).

If you sign up by the end of the month (Jan. 31, 2021), you can get access to every single thing on the site for $139 a year, $16 a month, or $24.95 a quarter (automatically renewing in all cases). It’s normally $224.97 for the annual subscription, so it’s a substantial savings this month.

For more information on SchoolhouseTeachers.com, head over to the Homeschool Review Crew blog where you can read an introductory post as well as over 100 reviews (some blogs, some Facebook reviews, and some video reviews).

Blessings,

ladybug-signature-3 copy

Knit Sweater for Scorpion

I offered to make a sweater for Scorpion a while ago, and finally finished it! 

0384CDD9-1487-4C99-BB8B-4D8B4D5B3E5C

The yarn is Lion Brand Fisherman’s Wool in the color Oatmeal. He wanted a blue sweater, though, so I used Wilton Royal Blue icing color to dye the yarn. 

The pattern is Flax by Tin Can Knits, with a small modification. Instead of knitting the sleeve with a garter panel, I added a cable instead. I let Scorpion choose the cable he wanted from a small sampling. To keep things looking cohesive, I added the same cable to the front and back of his sweater. 

Overall, it turned out quite well!

Do you like to knit cables?

Blessings,

ladybug-signature-3 copy

Crochet Sweater for Bumblebee

I’ve never crocheted a sweater, but I wanted a quick project to give me a break from the big blanket I’m making. (It’s almost done, so I will try to remember to post it next week.) After I made the Ruby dress, Bumblebee (2 years old) really liked it because of the super softness of the yarn. So I went to Michael’s and got another ball of it, but in a more masculine colorway and found a cute pattern. 

96D23931-ED08-4A57-97BD-A2522AEE8C64

It’s a standard raglan-style cardigan, but what makes it different is that this one has a hood! I thought that was so cute and knew I wanted to make it. The pattern is from Crystal at Bag O Day Crochet on YouTube and was really easy. I was able to make the whole thing in 3 days (starting late at night on Friday and finishing Monday evening), and that included having to completely redo the body because it was a bit too small. The pattern was great though – change the hook size, and the garment is resized; no recalculation needed!

Have you ever crocheted a wearable?

Blessings,

ladybug-signature-3 copy