Crochet Amigurumi: A Lesson in Gauge

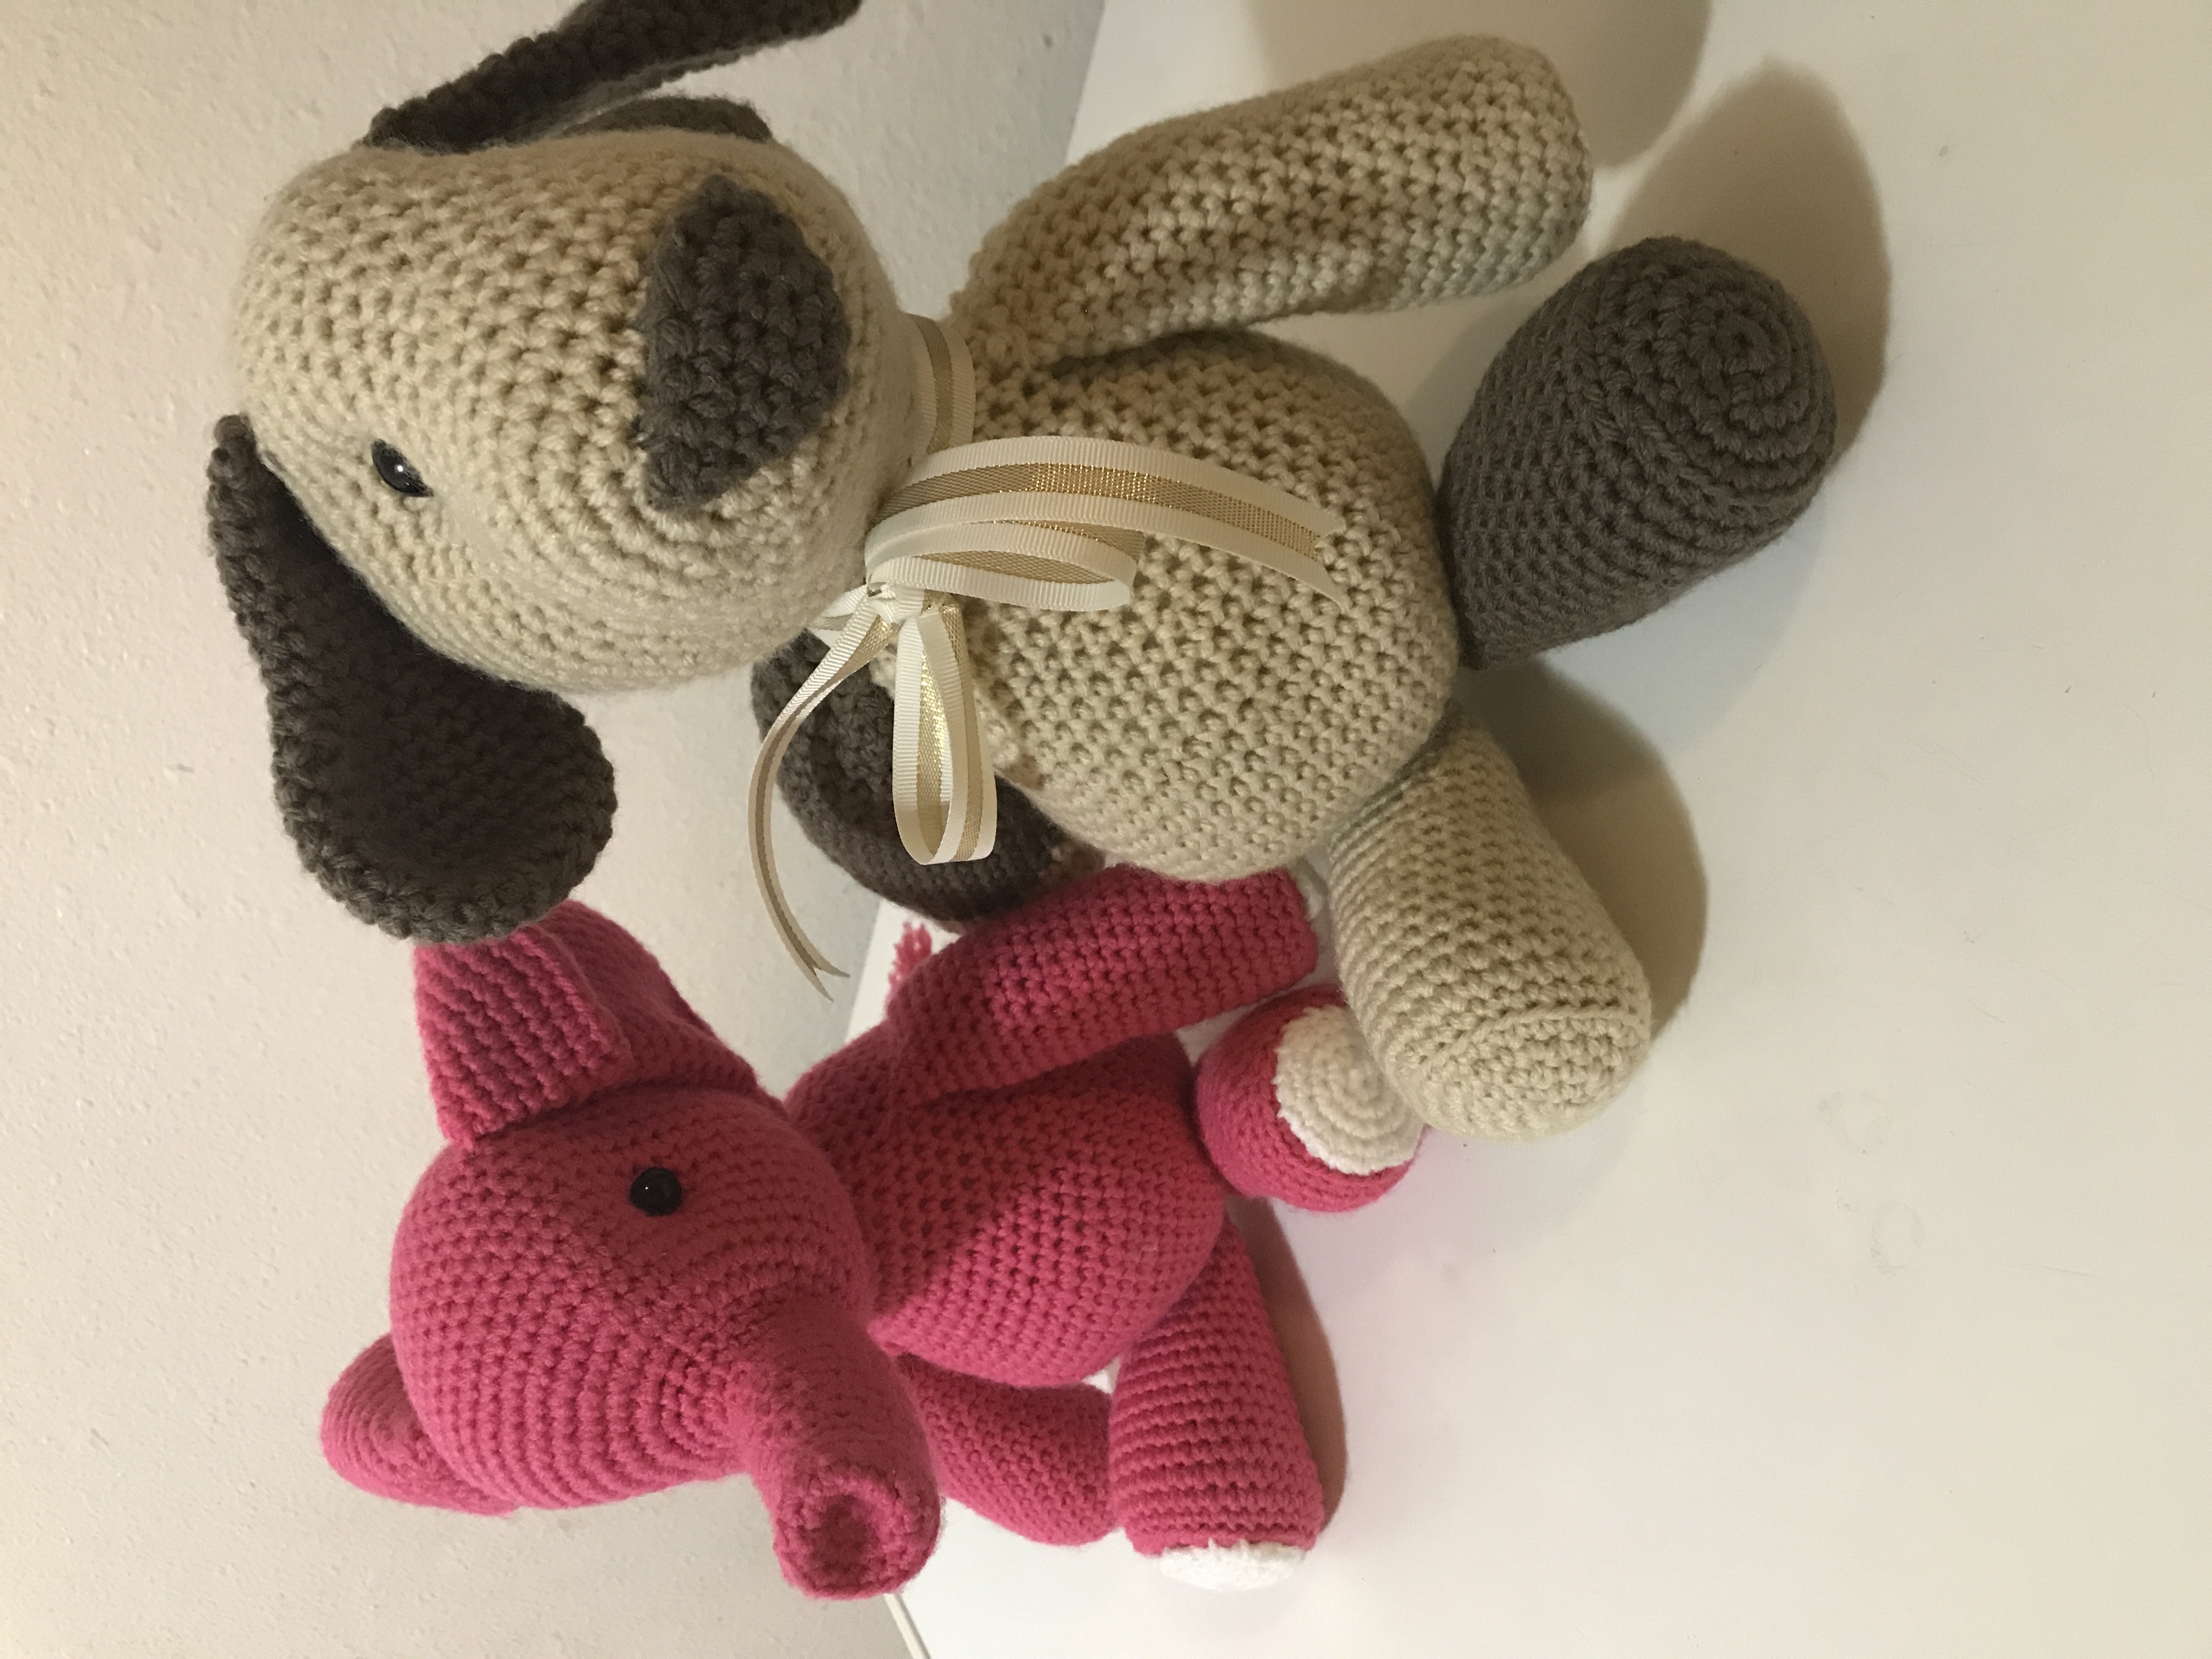
Because I knit garments, I know the importance of gauge. I don’t worry too much about it when I crochet because I use crochet almost exclusively for things where gauge doesn’t matter (toys and blankets). When I made a pink elephant a couple of months ago, using the same pattern designer as all the toys I made last year (Jess Huff), it felt a bit small to me. I’d given away all of the toys I made last year (it was really nice having gifts for my kids’ friends’ birthdays all year long!), so I couldn’t compare it to any of those. But just in case I was right and it was too small (maybe my gauge had gotten tighter over the past year), I made a dog with a larger hook size. For the dog, because Jess Huff doesn’t have a dog pattern, I used her “Benedict the Bear” pattern, but swapped the ears out for those from Sarah Zimmerman’s “Dash the Dog” from the book Crochet Cute Critters.

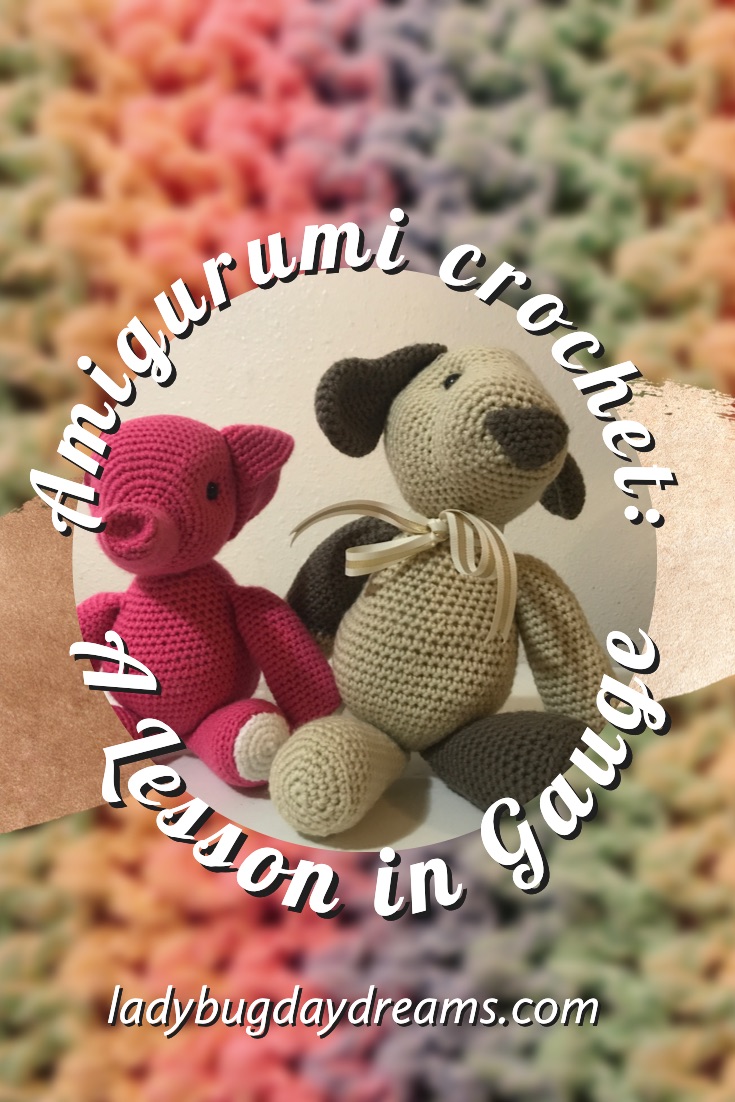
The dog felt pretty good as I was making it. The size was really nice – more what I thought I was expecting when I had been making the elephant. But when I finished him and then got the elephant out to compare the two, I was really surprised at just how big the difference was. I wasn’t so clueless as to expect them to be the same size, but the difference between an E hook (3.5mm) and an H hook (5.0mm) was drastic! And it really goes to show just how important gauge can be when you’re making something where it matters a whole lot, like a sweater.

A few things to keep in mind as you’re crocheting amigurumi toys, though. While a bigger hook will give you a bigger toy, which can definitely be preferable sometimes, it does that because it makes bigger stitches. This means that if you go too big (without sizing up your yarn too), you could end up with holes in your project where the stuffing can poke out. This is definitely not ideal, especially if you’re going to give the toy to a child. It’s best to follow the recommended hook size that the designer has listed in the pattern. Because gauge doesn’t matter for toys (as I mentioned before), it’s likely that the designer has chosen that hook size on purpose to work with the stitch count and make a nice-sized toy. I learned this by “overriding” a recommended H hook in a few patterns last year in favor of an E hook to make sure I had tight enough stitches. Those toys, while *fine*, were a whole lot smaller than I expected or liked. An H hook with size 4 yarn is fine for toys. The stitches won’t be too big (unless you crochet really loosely). I wouldn’t recommend going any bigger than that, though.

If you plan to give the toy to a young child (under 3), you should crochet or embroider small eyes instead of using safety eyes. While I don’t normally have trouble with my safety eyes, they’re not not foolproof. If your safety eyes do fall out, I’ve found that a dab of hot glue works wonders with reinstalling them. (Obviously they can’t go back in to a finished project.) Just put a little bit of hot glue onto the post of the eye and poke it back in. The glue will adhere to the poly-fil fibers and stay put quite nicely.

Have you ever been surprised by your knitting or crochet gauge?

Blessings,

Book Reading Trophy

When our teenagers were younger, we made the decision to reward them after they’d read their first “big book.” This was defined as either a biography or a novel, age-appropriate. Ballet Boy, who was 8 at the time, read a really old copy of Stories of Great Americans for Little Americans that we’d gotten at an antique store (I believe it’s a first edition from the late-1800s; you can get an updated copy from Amazon in paperback for $7.95 or on Kindle for free). Scorpion (then 6) read Charlotte’s Web. When they’d finished, we got them each a trophy that reflected their interests, which at the time were Ancient Egypt (Ballet Boy) and knights in shining armor (Scorpion). They still have both of them.

Now Grasshopper is (finally) starting to read more. He’s about 3/4 of the way through his first big book: Holes by Louis Sachar. He’s always been a huge fan of audio books, and has listened to all of the Wayside School books (except one… keep reading). He really enjoys Mr. Sachar’s writing, and when my husband asked me who Grasshopper’s favorite author was it was an easy question to answer. Will then proceeded to get onto the Barnes and Noble website and order a signed copy of the newest Wayside School book, Wayside School Beneath the Cloud of Doom. Grasshopper is so excited to get to read the book that he’s really pushing himself to finish Holes. And in the process, he’s gotten to the point where he’s reading everything he sees from street signs to billboards to cereal boxes. It’s really rewarding to see him finally care about his own literacy!

Blessings,

One More Story (review)

Disclosure: I received this complimentary product through the Homeschool Review Crew.

Reading aloud is a magical time for many families, but there are times when it’s just not possible. Those times are the basis for One More Story. They’re here to help get your kids some literature time when you just can’t for one reason or another.

One More Story is available as a website or an iOS (Apple) app. For ease of use, I downloaded the app to my iPhone and our iPad. This way there was no issue with trying to remember log in credentials every time it was time to use the program.

When you first open the app (after the very first time, when you have to log in), the bookshelf is the main screen. You can easily choose a book to read, or have read to you, and off you go. It’s really that simple.

There are currently 87 books available, and each one has original music composed by Robby Merken, who used to work for Sesame Street. There are 30 different narrators, so this keeps the books fresh. You’ll find many different types of books here, but they are all high quality stories. Some are well-known (The Snowy Day, Stellaluna, and Pete’s a Pizza, for example), and others are not (Kiss the Cow and Sidney Won’t Swim). All are good.

There are two options for using the app: Read Aloud or I Can Read. In Read Aloud, the app does all the reading to your child, along with the original music I mentioned before. You can choose to have the pages turn automatically, or do so manually. In I Can Read mode, there is no music or narration. Children do the reading all on their own. If they don’t know a word, they can tap on it and the app will read it aloud to them, which helps to build confidence in reading.

We had a lot of fun with this app. My little kids really enjoyed the audiobook aspect of it (they love audiobooks!), and having the original illustrations to go with the music and narration was a nice bonus from the typical audiobook they’re used to.

You can connect with One More Story on Facebook or Twitter.

Make sure to head over to the Review Crew website for more information and links to other reviews as well.

Blessings,

Mickey Mouse sweater

I’m finding myself following a similar knit/crochet schedule as I did last year! I spent the winter making blankets, then did a few toys in the spring (I have a post planned for showing off some of those in a few days), and now I’m working on kid sweaters.

Using the Strange Brew sweater “recipe,” just like I did last year, I made a sweater for Bumblebee, who is 2 1/2 now. I didn’t end up liking this one as well as other things I’ve made recently, but my son really likes it, so that matters a lot more than me liking it.

To create the design on the sweater, I first printed the Strange Brew planning worksheet from Tin Can Knits. I drew out the words first, because I knew I wanted those to wrap around the bottom and I prefer to knit sweaters bottom up whenever possible. When I finished knitting the words and the body, and attached the sleeves to begin the yoke, I took a pause to create the yoke design on my worksheet. In the tiny size of 1-2 years, there are only a few rows of yoke design allotted, divided into 3 sections. The shorts and the Mickey Mouse head were easy enough to sketch out, but the middle portion was a bit trickier. I wanted to do the gloves, but I just didn’t have the stitches available. Instead, I went with a paper-cutout-doll style design. What I mean is that I did a sort of “body” with the arms all connected the entire way around the sweater.

For this sweater, I used JoAnn Big Twist yarn in the colors Medium Gray and Varsity Navy. I really love this yarn for crocheting, but I didn’t love it for a knitted sweater. I’m not sure what it was about it, but it just felt… “cheap,” if that makes sense. But again, Baby loves the sweater, so I’m okay with it.

Blessings,

Cross Seven Musical Memory Tool (review)

Disclosure: I received this complimentary product through the Homeschool Review Crew.

It’s no secret that one surefire way to make memorization easier is to use music. Cross Seven has created a program that utilizes this fact with their Cross Seven Ventures – Homeschool Musical Memory Tool. My younger kids and I have been practicing some of the basics in a variety of subjects with this program the past few weeks.

Cross Seven is divided up into weeks, and from there into individual subjects. Each week has a series of short videos, and the videos give little songs to help children memorize different things. You can use the website for accessing the videos, or there is also a Roku channel so you can put it right on the TV, which is what we did. Each morning after breakfast, I’d turn Cross Seven on for a little while and we would work our way through the subjects I wanted my kids to work on memorizing. We focused primarily on geography, grammar, and science. There are loads of other subjects included, too, though: Scripture, history, Latin, math, hymns, and timeline. Grasshopper thought the Latin was rather interesting, but I didn’t push it too much because that’s not something we’re focused on in our family.

The songs, as I mentioned, are quite short. Each one is only 1-2 minutes long, which is perfect for small children. It gives them the important information without much else. For example, in the geography song that deals with the continents, it pretty much just lists the continents and oceans to music. There aren’t a lot of extraneous lyrics. This keeps things super streamlined.

We did the grammar songs as a supplement to our regular grammar curriculum, and the short songs helped Grasshopper (8 years old) keep track of the different types of words he’s learning – nouns, verbs, adjectives, et al. It really helped him to focus on the different types of words, as well as giving him hooks to hang information on (what a noun is, for example, not just its name).

There are also quizzes available, but I didn’t worry too much about those.

I found the Cross Seven program to be quite popular with my children. I was a little surprised, to be honest, because the songs are so very short and don’t have any “extra” information in them. It’s quite literally just listing the things to music. But it really works! Just a few times through each song and my 8-year-old was singing along. That tells me that the method is sound.

Make sure to read more reviews on the Homeschool Review Crew website, especially if you’re interested in learning more about the quizzes we didn’t utilize.

Blessings,


Benjamin Franklin (YWAM biography review)

Disclosure: I received this complimentary product through the Homeschool Review Crew. 

We are no stranger to the Heroes of History series from YWAM Publishing. I read two of them with my older kids when they were younger (C.S. Lewis and Jacob de Shazer), and now I’m reading a new (to us) one, Benjamin Franklin: Live Wire with Grasshopper (he and I also read Corie ten Boom last year). The biography reads like a novel, and that’s part of what makes the Heroes of History series so good. You’re getting great history without it feeling like a history lesson. 

The book, like all of the YWAM biographies, starts with a “chapter one” that would be better named a “prologue,” not a “chapter.” In the case of Benjamin Franklin, we first meet him during the famous kite-flying experiment when he proved that lightning was a source of electricity. In chapter two, we are thrust backward in time to the time of Franklin’s youth and then move forward from there.

In the book, we learn all about Benjamin Franklin’s troubled relationship with his father, and how he didn’t want to work in “the family business” (soap- and candle-making). We take a trip across the Atlantic with young Ben as he travels to London on official business with the guarantee of the governor of Pennsylvania, William Keith, only to find out that the governor was a swindler when he got there – Keith didn’t send Franklin with the paperwork required to purchase the printing equipment he was sent for. This setback left Franklin in London for over a year, scrambling to get the printing press so he could bring it back to America.

A few chapters later, we learn all about Franklin’s civic “duties” – how he developed and created the very first fire station, library, and hospital in the colonies. In his position as one of Pennsylvania’s VIPs, he met many inventors who inspired him to explore science himself. Both Grasshopper and I found these chapters (the science ones) quite interesting. It was fascinating to read about how, before they fully understood electricity, the scientists would put on “magic shows” where they shot sparks out of their fingers (and other places) to impress the crowds. One time, Franklin himself was planning a show in which he used electricity to kill a turkey for the town festival (they planned to eat the turkey at the festival), but something went wrong and he ended up electrocuting himself instead! He nearly died that day.

Benjamin Franklin retired from his printing shop in his 40s, and from that point forward he focused a lot on his scientific pursuits, as well as continuing to be a “mover and shaker” in the Pennsylvania colony. He was made the postmaster general, which gave him quite a bit of power. He personally guaranteed the bonds that were used to pay for the French and Indian War (though he was able to recover those funds from the government). And he went back to England.

This is the point where Grasshopper and I are now (we have 4 chapters left in the book to read). Because we’ve been reading about 3 chapters a week, we’re not quite done, but we should finish it up by the middle of next week, if not before.

In addition to the book itself, YWAM offers complete study guides for all of their biographies. Benjamin Franklin: Live Wire is no exception.  The unit study guide follows the same outline of the other unit studies, having students explore key quotes from the topic. In the case of Benjamin Franklin, there are a few quotes from he himself, as well as some from other notable scientists (Sir Isaac Newton, Aristotle), politicians (FDR), and authors (Ralph Waldo Emerson). On their surface, the quotes don’t seem to apply to the book, but when you discuss them and dig deeper, you can see the relevance.

There’s a guide for helping students create a display (poster-style) using the information they learned in the book. There are lots of reading comprehension questions, split up by chapter. And then there are options for expanding the study to include subjects beyond reading/literature and history. Overall, the study guide is a very good way to turn a simple book into a much more intense learning experience, especially for older children.

I am the only one reviewing Benjamin Franklin this time, but there are lots of other YWAM biographies being talked about on the Homeschool Review Crew website this week. Click through to find out more!

Blessings,

Easy No Bake Cheesecake recipe

I have grown to really enjoy cheesecake as an adult. I didn’t like it as a child, but it’s definitely one of my favorite desserts as an adult. I love the tanginess of cream cheese, whether it be in a cheesecake or a cream cheese frosting on top of a cupcake or even just as a bagel spread for breakfast or snack.

Baked cheesecake, while a lovely thing to eat, can be very difficult to get just right at home, though. I have a recipe from my mom that I’ve made before, but it’s so finicky that I wanted to find a no-bake version (plus, I don’t have any spring-form pans, and they’re a must for cheesecake baking). This is now my go-to cheesecake recipe. It’s always a hit, no matter who I serve it to.

No-Bake Cheesecake

A 9- or 10-inch graham cracker crust (store bought or homemade)
1 cup whipping cream
2 8-ounce blocks of cream cheese, softened
2 tbsp sugar, divided
1 tbsp lemon juice (orange juice works well too)

Pour the whipping cream into the bowl of an electric mixer and whip on high speed until soft peaks form. Add 1 tablespoon sugar and mix until the cream is lightly sweetened and the sugar is no longer grainy. Gently scoop the whipped cream into a small bowl and set aside.

In the same mixing bowl (you don’t have to wash it yet), whip the cream cheese, lemon juice, and remaining tablespoon sugar until well combined and smooth.

Gently fold (not mix) the whipped cream into the cream cheese mixture. You want to be careful here so you don’t knock the air out of your whipped cream. When the two mixtures are fully combined, gently pour the new mixture into the graham cracker crust. Cover and refrigerate for at least one hour. Keep refrigerated for up to 4-5 days.

Optional: serve with a fruit topping. Strawberry is always a hit in our house.

See? Much easier than a baked cheesecake!

Blessings,

History Comes Alive with Figures in Motion (review)

Disclosure: I received this complimentary product through the Homeschool Review Crew.

My third grader and I are learning about early American history this year, using a variety of living books for his curriculum. Since it’s mostly just a lot of reading, I was excited to see Figures in Motion come up as a review option through the Crew – it was the perfect opportunity to add something “fun” to the reading. (He likes to listen to me read; we snuggle up and read and he never, ever complains – and I rather like the 8-year-old snuggles too. But even so.) The Famous Figures of the American Revolution book was the perfect supplement for our reading!

Figures in Motion is kind of like paper dolls, but instead of dressing static images of people, students create movable “puppets.” Each page of the book has the famous figure divided up into multiple parts (body, arms, and legs – the limbs are usually 2 pieces each). For each figure, there is a page that is pre-colored and one that is just line art for students to color themselves. You cut out each piece and then attach them together using brads. The result is an historical figure that is a moveable plaything! It really is a fun product that adds a lot to a history lesson.

The paper in the books is very high quality – more card stock than paper, really. There aren’t “instructions” per se, but it was super easy to understand what needed to happen. On the back of each piece, there is a letter and the word “front” or “back.” Simply line up the letters, determine whether a specific piece needs to go in front of or behind the matching letter, and join with a brad. The result of such a simple product is amazing!

Our current history book is a biography of Benjamin Franklin, so I had both of the younger boys (excluding the baby) create a puppet of him. Grasshopper (8, and the official recipient of the history lessons) opted for the colored version, which left the white version for Dragonfly (5). I will say that I think 5 is a little too young for this product. He had a pretty difficult time coloring the page to his (admittedly high) standards. There were a lot of tears, and I didn’t even have him cut out the pieces himself!

In addition to the book itself, you need some mini brads to create the puppets (regular sized ones would work, but your puppets wouldn’t look quite as polished). A hole punch is also useful, but not strictly necessary – the brads can push through the card stock reasonably easily. Both of these tools are available from Figures in Motion, in addition to a wide variety of puppet books.

Included at the beginning of the book is also a short (1-2 paragraph) biography of each figure, so if you wanted to use this as a quick project rather than a supplement to another curriculum, you can still get some learning in there.

We had a really fun time working with Figures in Motion, and I will definitely be pulling this book out again and again as we learn more about the main players in the American Revolution over the rest of the school year!

Be sure to check out the other reviews from the Homeschool Review Crew; many of the Figures in Motion books are represented there, not just the American Revolution one.

Blessings,

Teaching Textbooks 4.0 (review)

Disclosure: I received this complimentary product through the Homeschool Review Crew.

For the past several months, my teenagers have been using the Teaching Textbooks Math 4.0 apps on the iPad for their math. The Teaching Textbooks apps are easy to download and sign in to, and each grade level gets its own app. If you’re short on space on your device this could be problematic, but otherwise I think it’s a benefit. There’s no trouble having students working on different levels having to sign each other in and out in order to do their lessons. Simply download the app, sign in using the parent account, add your student, then assign them a username and password. Each day, they have to enter their own password, but they shouldn’t need to sign in to the main account each time. (Ballet Boy had some issues and had to get my log in many times, but I don’t think that’s normal. Scorpion didn’t have the same issue at all.) Here are my boys’ thoughts on the program.

From Scorpion (Math 7):

Teaching Textbooks 4.0 Grade 7 is a program that starts with a video that explains the lesson. The videos are very clear, and last about 5 minutes. After that, there are the lesson portion, which is just a series of questions and problems to solve. If you get a question wrong, there is an option that says “watch solution,” which allows you to see exactly how and why you got the problem wrong. This helps you to remember in the future and get similar problems correct next time.

Topics that I’ve covered so far have been mostly the normal addition, subtraction, multiplication, and division. But I’ve also moved forward into some more advanced division as well. Later lessons have shown me ways to break up some of the harder division problems in order to solve problems quicker.

Math 7 is an excellent math program for any middle schooler (or a high schooler who is behind and/or needs a refresher course). I have tried a lot of different math programs, and Teaching Textbooks has worked really well for me personally. I like the “app” format because I spend a lot of time on my iPad anyway. It’s really easy to find what I need and move forward in the next lesson. It keeps my spot, so I never have to try to remember where to pick up. Signing in is super easy, too. The app keeps our family login all the time, so I just have to type in my student password each day. This makes it really quick to get going. I’m glad to have this math for my main curriculum.

From Ballet Boy (Algebra I):

Teaching Textbooks 4.0 Algebra I is a great program for people who learn like me. I’m normally terrible at watching a video and then doing questions. The thing I love about this program is it’s a lot more interactive than others I’ve done in the past. Each video walks you through the problems step by step but you have to type in the answers; it’s not just the teacher solving them for you. It then gives you about 20 questions and they run them the exact same as the ones you solved in the lesson so it’s more of the same instead of watching someone be good at math and then being given a page of homework and told to do it in an hour. All in all a great program. Five stars.

Back to Mom:

You can see that both boys have really enjoyed working on this program, and that’s really saying something because they each have different strengths. Ballet Boy is definitely a math kid. His main struggle has been finding a program that works for him, not the math itself. We’ve found that with Teaching Textbooks. Scorpion, on the other hand, has always been more of a literature kid – he’s struggled with math for as long as I can remember (which is why he’s 14 and doing 7th Grade math). But it looks like we may have found a good fit for him as well (famous last words, right?). I never have to harp on the kids to work on their math now, though. In fact, they like it so well that they wake up and dive right in. They’re always done with it by the time I see them for the first time in the morning.

We only ever had access to Teaching Textbooks 4.0, but other members of the Homeschool Review Crew are comparing the 3.0 version to the new 4.0 version, so if you’ve used Teaching Textbooks 3.0 and are wondering how the new version is different, I urge you to check out more reviews.

Blessings,

Perpetual Birthday Calendar

I really enjoy watching Dollar Tree DIY videos on YouTube, and Kelly Barlow Creations is one of my favorite channels. I was watching one of her videos recently, and the idea of a sign displaying all of the birthdays in the family seemed really cute. I knew it wasn’t something we would display, but I wanted to make it anyway. So I decided to make it to give to my grandmother-in-law. I went to the Dollar Tree to get the supplies, and my local store was out of some of the supplies Kelly had used, so I found alternatives. Also, she used a Cricut for her sign, and since I don’t have one of those I had to improvise on some of the other pieces too. Here is how I made my sign.

I started with two of the Dollar Tree signs that have the shape that looks kind of like offset boards. The way those signs are built, they don’t line up to perfectly when you try to put two of them together (I wanted to keep the up-down pattern intact), so I had Ballet Boy help me saw one of the planks off one sign. Then, with a little bit of puzzle solving, the signs lines up the way I wanted them to. I used the piece we cut off, as well as some popsicle sticks, to hold the two signs together (I hot glued the pieces onto the signs, going across the seam). With my sign built, I was ready to decorate!

I started by painting the sign white using Apple Barrel gloss acrylic paint. When the paint dried, I used a Sharpie to draw lines where the “planks” shifted because I wanted a fence-look. With the lines drawn, I used the dry brush technique to add another coat of white paint in order to soften the black lines. 

I added the words Family Birthdays next. “Family” is a metal word cutout from the Dollar Tree, which I painted with Apple Barrel Cool Blue. I used hot glue to attach it to the sign. I mixed my own purple using blue, red, and white paint to add the word Birthdays to the sign. Using a Sharpie I wrote the names of the months across the bottom of the sign, one month per plank. Then I painted the entire sign (including the metal word) with Mod Podge to seal the paint. Finally, I added a bit of ribbon to the two short sides to hide the rough edges.

I drafted Ballet Boy to  help me again at this point. He drilled one hole into the bottom of each of the planks with a month, and a larger one up near the top so I could install the pinwheel. 

I gathered up all the birthdays from the extended family, and took some decorative cardstock (from the scrapbook paper open stock at JoAnn). Using the planks on my sign as a template of sorts, I cut small rectangles from the paper and added each person’s name and day of birth (not the month) to one rectangle. I laminated all the rectangles using DT packing tape, and then organized them by month. I used a small hole punch to add holes to the top and bottom of each rectangle, then using embroidery thread I attached the papers to the bottom of the sign under the correct month (in order within the month). I added a bit of hot glue to the back of each rectangle to help keep the thread in place, and added a tassel to the last rectangle of each month. 

The last thing I did was to take some brown Kraft paper and cover up the ugly back. It used to be the fronts of the two signs, but now it was terrible looking because of those popsicle sticks holding the two boards together. I used a bit of hot glue to hold the paper on. Then I used cotton yarn (ch 13, slip stitch in 2nd ch from hook and in each ch across) to create two hangers for the back. Using copious amounts of hot glue for stability, I attached the hangers to the back of the sign. 

If you’re still here after all this, thank you for reading!

Blessings,