Month: April 2013
Homemade Baby Food
Hello everyone! Today I have something that may or may not apply to you, but it’s what I’ve got :).
About five months ago, when we moved out of the apartment and into the house, I started reading more blogs, and with the information I’ve gleaned from sites like this, this, and this, I decided to really embrace my housewife/stay-at-home-mom status. Seahawk is 9 now, and I’ve spent most of his life as a non-working mom. The difference between that and a stay at home mom is the amount of time spent on the house and kids. I’m sorry to say that I was quite selfish for a while, especially during my 2-year writing stint. It doesn’t do any good to dwell on the past, so I’m not going to. Instead, I’m going to look to the future and continue to be the wife and mom God intends me to be.
What does that mean for today’s post? I’m glad you asked :). Part of being a better mom (to me) means providing a healthier existence for my family, from homemade laundry soap (to avoid chemicals) and cloth diapers (to save the family money, as well as being environmentally friendly), to homemade baby food for Small Fry. The latter is what I’m going to talk about today (duh).
It’s really easy to make baby food, and less expensive than the jars or plastic tubs. Not to mention, there’s virtually no garbage associated with it. That last item alone is worth it to me. Well, that and the fact that I can use organic fruits and vegetables and control the ingredients used.
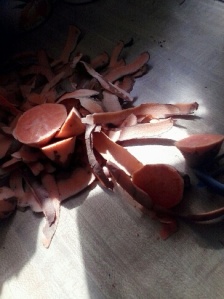
So, here’s what you do. First, peel (if necessary) your fruit or vegetable:
I made this on Monday and was using organic sweet potatoes (or yams, I’m not sure; I don’t like either, so I don’t usually buy them). After peeling them, I was left with a nice pile for our compost :).
Next, cut it into smallish chunks and place in your steamer basket. Add enough water that it won’t all boil off and burn during the cooking process – I speak from experience on this!
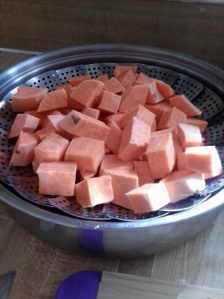
Steam the food until it’s fork-tender. These sweet potatoes took about 15 minutes. You can kind of tell from the picture that they changed color from a dull orange to a nice bright one:
In stages, so as not to overwhelm your blender (unless yours is better than mine and can handle it), puree the chunks until they’re the consistency you want. If you need to add liquid, use what’s left from your steamer; that way, you’re adding any nutrients that were lost in the cooking process back in. One word of advice, though: make the baby food thicker than you think you’ll need. You can always thin it out by adding breast milk, formula, or water when you feed it to your baby. By leaving it thicker, you’re prepared in case your baby advances to ‘heavier’ foods while this is frozen.
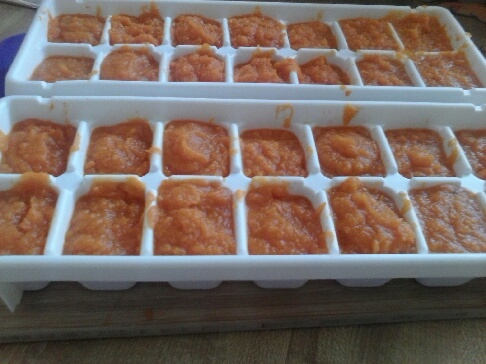
When it’s all pureed, put it into ice cube trays and freeze.
My three potatoes made more than enough to fill the two trays I have designated for baby food, so I just put the leftovers into Small Fry’s normal feeding jar and didn’t have to worry about thawing food for two days.
That’s it! Well, actually, there is one more step, but I forgot to take a picture, and that is to move the cubes to a ziploc freezer bag once they’re frozen. Thaw the food as needed for feeding your baby. A really young baby will probably only need one cube per feeding; Small Fry will be 9 months tomorrow and he’s up to 2, sometimes 3.
Picture of the Week
This was Monday, and I’ve been looking forward to today’s post all week so I could share this with you guys! Seahawk isn’t really sleeping, but Small Fry is. Using the song from Wednesday’s post, Seahawk cuddled his baby brother to sleep. He was so proud of himself!
Have a fabulous weekend!
Balloon Creations
Is there an Old Spaghetti Factory near you? Have you ever been there? There’s one not too far from us (the original one, actually), and we go there sometimes. They have amazing food and much more affordable prices than Olive Garden (although we indulge there too, sometimes; we all have a weakness for good pasta). At the one in Portland, if you go on a Friday or Saturday night, there’s a guy who wanders from table to table making balloon creations for anyone who wants one (not just kids). He’s absolutely amazing and super friendly, so we always let each kid get one (a small one, though – there are 5 of us and our car is an early 90’s Toyota Celica; there’s not much room in there for “stuff”) and tip the guy. (He’s self-employed, not part of OSF at all, so tips are all he gets on those nights.)
Here’s what the kids got when we were there last week.
Munchkin chose a train, and we were all pretty awed by this:
Seahawk chose a dinosaur. The kids’ favorite part of this was that the guy “kept a Sharpie in his pocket for drawing on them!” with.
A secret about me: I could never do these. I’m always too afraid the balloon will pop. Knowing that the balloons are designed to be twisted and manipulated this way provides me no comfort!
Calming a Cranky Baby
Every baby is different. There’s no doubt about that. Small Fry is not the same as either of his brothers were. Or maybe it’s just that hubby and I are different people since he’s a bit of a gap baby. Who knows?
In general, he’s a pretty happy baby, but like all of us, he has his moments – usually when he’s not had a good nap. There are times during those tantrums (for lack of a better word) that I’m not available to comfort him. Since I’m still his favorite person, this can pose a problem for the rest of the family. So we’ve found something that’s almost as good as me: this song.
9 times out of 10, this will calm him down. It’s not strictly limited to this particular song; anything Leigh Nash sings has a calming effect on him. I think he has a baby crush on her ;). But this one definitely seems to be his favorite.
Quilts, Quilts, and More Quilts!
Okay, just two quilts, actually.
I typically make a blanket of some kind whenever we have a new niece or nephew. So far, we have 4 nieces and 3 nephews. All but one have gotten quilts and the last nephew (born last September) got a crocheted blanket. Well, all but two… Our two-year-old niece (her birthday was April 1st – no foolin’!) somehow got looked over when she was born. Bad auntie! So I’ve made her this quilt featuring Sunbonnet Sue flying a kite. I was able to give it to her on Sunday, and her reaction was priceless. She immediately just wanted her mom to cuddle her up in it. What a way to warm my heart 🙂
This quilt was my first time using a free-form quilting style, and I must say: I loved it! Because there was no overlapping stitches, it was much easier to keep the fabric from bunching. I definitely see myself using this style again.
The second quilt I want to talk about today is my first attempt at a rag quilt. This one was made using some of Small Fry’s outgrown baby clothes. I seem to have forgotten to take a picture of the quilt by itself, but you can still see it in this picture.
My favorite block is underneath Seahawk’s foot, and it’s an emblem from one of Small Fry’s newborn shirts that says “Little Brother” baseball-jersey style. I put it in the center so it would have a place of prominence. My second favorite is the one right next to Seahawk’s knee. It’s a pair of Small Fry’s pants that he wore for months. It was really sad when I finally had to admit that they didn’t fit him anymore! They’re camouflage and oh-so-cute.
I just got this book from JoAnn a few days ago, and I seriously can’t wait to make these blocks!
There are 12, one representing each month of the year. I’ll definitely blog about them when I get started.
Homeschool: Hand Art Illusion
When I saw this idea, I knew it was the art project for us. Easy, creative, and used only supplies we already had on hand (namely plain paper and colored pencils). While the original used only circles for the concentric shapes, I let the kids use any shape they wanted.
Seahawk used rectangles:
Munchkin used hearts:
And I used circles and Small Fry’s hand:
If you think it’s easy outlining an 8-month-old’s hands, think again, lol. But it wasn’t the hardest thing in the world, either.
The black outlines is one way we deviated from the original post on this art project, but I found ours were too muddy to tell what they were without them. So if you try this with your kids, feel free to leave them off if you want :).
Homeschool: Human Body
For our homeschool science right now, we’re working our way through the major organs in the human body. I found this site that has some pretty good information on each one, as well as games if you can access it from a computer (which I never can, so we just use the information).
I bought a roll of brown shipping paper from the Dollar Tree and traced each kid life-size. The first day, I just did that and had them draw their face in. Starting on Tuesday, we’ve been adding 3 organs a day. As of today, we’ve got the voice box, lungs, heart, liver, stomach, spleen, kidneys, gallbladder, and pancreas done. With each one, they draw in the organ and then I read the information to them. I quiz them as we go to make sure they’re retaining the information – at least a little. I’m sure we’ll have to go over the topic again during their school career, but we’re at least building a foundation here.
Homeschool: State Study of Washington
Inspired by Confessions of a Homeschooler, I’ve been working through the 50 states with my kids. First up, we did Hawaii. We had dinner with my brother and sister-in-law that week, and the kids looked at all of their pictures from the three times they’ve been. The next week was Alaska (I’m going basically west to east with a few variations when needed). There is a couple from our church who live in Alaska about half the year, so we picked their brains on what life is like up there. The thing that stuck with all 4 of us the most? The fact that there are virtually no roads; you have to fly to get from city to city.
Our third state was the wonderful state of Washington. We started the week, as we always do, by having the kids trace the outline of the state from our huge wall map. We don’t have a wall big enough to display it (there are 2 that would work in the school room except for the fact that one has the windows and the other was painted to be a chalkboard wall by the previous tenants – and I’m not complaining! That wall is pretty awesome!), so we keep it rolled up and bring it out once a week for this activity. Once the state is pencilled, the kids go over their lines in ink and then bring it to me, where I write in the basic facts that I want to teach them within the outline of the state. They’re basically the same from state to state (except for Hawaii, because that was our first one and I didn’t really have a plan yet when we did it): Nickname (The Evergreen State), Motto (Alki), Capital (Olympia), Largest City (Seattle), Area (71,300 sq mi), Population (6,897,012), Highest Point (Mount Rainier), Lowest Point (The Pacific Ocean), and its Admission to the Union (November 11, 1889). Additionally, we put in the location of the capital, largest city, and highest point. In Washington’s case, we also included Mount Saint Helens.
Here’s Seahawk’s map:
And Munchkin’s:
I still owe them a baking soda and vinegar volcano to represent Mount Saint Helens. That’ll happen probably next week :).
We also worked on our “Fifty Nifty United States” song. Only three states in and they can already sing the whole thing start to finish! Since they mastered that so quickly, we’re going to work on the Presidents song that Confessions recommends starting next week.
I also plan to make a printout of the “Lower 48” and laminate it for each kid, cut the states apart, and attach magnetic tape to the back of each one to have them use as a geography puzzle. I haven’t been able to make it to Staples yet to get that done, though…