Dyslexia Gold (review)

Disclosure: I received this complimentary product through the Homeschool Review Crew.

Grasshopper was slow to read. He fought me tooth and nail for a long time. But finally, I told him it was “time.” He was able to read well enough that he had to read a novel out loud to me. It was slow going at first. For a really long time. But as he read every day, he got better and better. Now, he reads everything in sight. I don’t have to force him anymore. And he even (claims to) like reading!

To further his quick studying in reading comprehension, we signed up to review Dyslexia Gold. This is an online program that’s designed for students who struggle with reading, whether it’s due to dyslexia or for another reason. Grasshopper’s reading took off sometime between when we signed up for the review and when we actually started using the program, so the timing was a bit unfortunate for us. That said, he did learn quite a few things from the program, and I’ll tell you all about them!

The program has four main parts, but after a placement test Grasshopper was only assigned three of them. (The one he didn’t get was Reading Unlocked, which I reviewed last year with Dragonfly. We had amazing success with that program! Read that review for a more in-depth look at that program.) Let’s discuss each of the parts of Dyslexia Gold that we used in more detail.

Engaging Eyes is designed to help your child learn to focus. People with dyslexia often have trouble with their eyes, and that inability to focus easily leads to the words “swimming” in front of them. The Engaging Eyes vision training in Dyslexia Gold is done with a pair of 3D glasses. Students wear the glasses and then shoot the targets using the arrows and spacebar on the keyboard. They have to not only aim the shooter, but also make sure it’s on the same plane in order to hit their target. This game was the most fun for Grasshopper. In fact, he had so much fun with it that everyone else in the family gave it a try at one point or another!

Fluency Builder teaches a child who already knows how to read, how to read well. It has a total of 50 lessons, and each one focuses on a specific phonemic sound. It also teaches children to differentiate sounds that might be similar to an early reader (|f| and |v| for example). Each lesson is broken up into a variety of activities that really drive home the phonics aspect of reading. There is also a passage for children to read and answer comprehension questions.

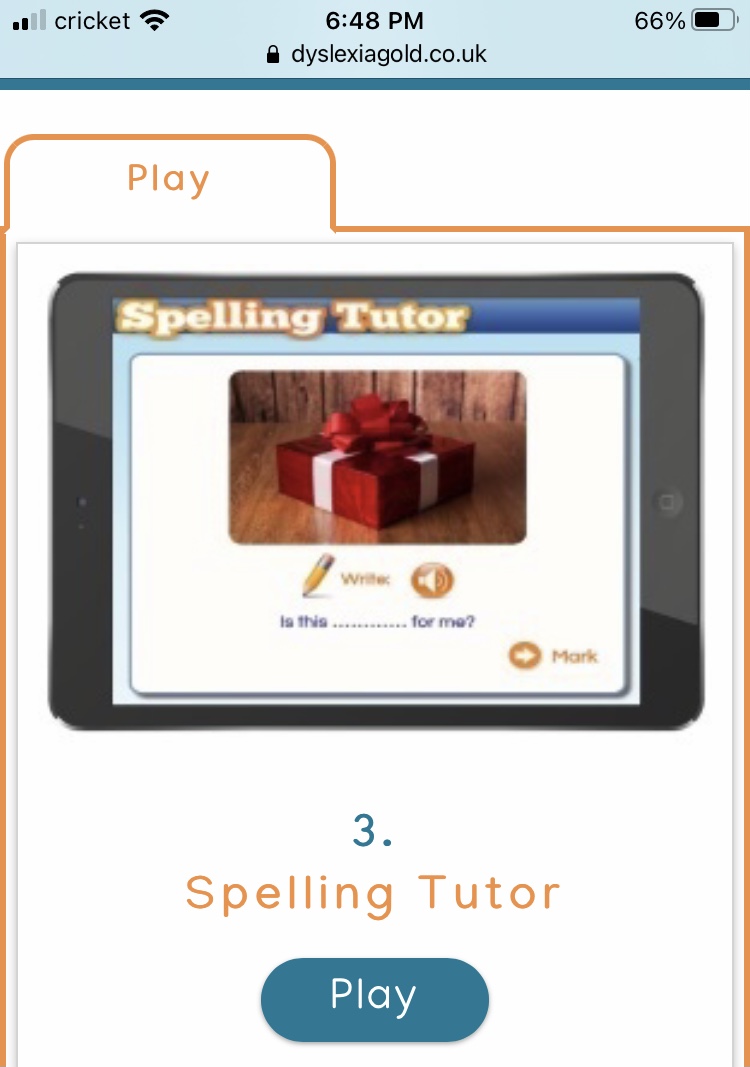
Spelling Tutor is where I saw the biggest improvement in my son. This part of the program has the child read a passage. Then they are to write the passage down, one sentence at a time. When they’re done, they click “mark” and are able to self-grade their work. If they get everything right, great! If they get anything wrong, that word goes on their “practice” list. The program remembers which words the student needs to practice more, and it gives those words to them many times over the course of the program. At the point the child gets a problem word correct, it moves down on the list and is shown less frequently.

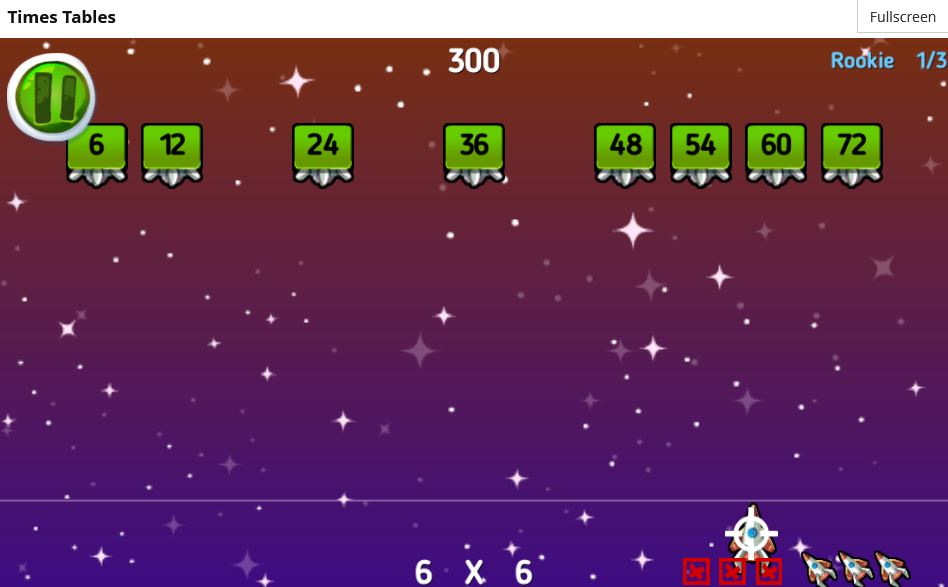
Dyslexia Gold also includes a Times Tables tutor, but we’re swimming in math practice right now, so we didn’t use that.

As mentioned, we didn’t end up “needing” the program as much as I thought we would when I agreed to review it. But Grasshopper had amazing success with the spelling portion, and I’m glad we had access to that to help him understand how to get better at spelling.

Make sure to read more reviews on the Homeschool Review Crew website!

Blessings,

Bible Reading for Kids (review)

Disclosure: I received this complimentary product through the Homesshool Review Crew.

Do you want your kids to love the Bible? Are you concerned about your ability to teach it to them? Then you should pick up a copy of Danika Cooley’s book Help Your Kids Learn & Love the Bible from Bethany House Publishers. In this nonfiction book, she tackles all sorts of issues parents have with the Bible, and specifically developing a Bible study routine with their families.

I’m not one for nonfiction; I am definitely a preferrer of novels. But Help Your Kids Learn & Love the Bible was an easy read, and I didn’t have any issues with the text of the book. I was able to easily read a chapter (or so) each day and get through the book readily.

The book is divided into three parts, each building on those that came before it. It starts with a reminder of sorts, that you (the parents) are the leaders in your family. What you say goes. But it also is a bit of a sobering reminder that if you don’t make the time for the things you claim are important to you (it seems that for most people, these are the Bible and the gym), then your kids pick up on that and those things won’t be important to them either. Being the leader is more than being the boss; it is also being the role model.

Part Two is called Faithful Reading. It gives a brief overview of what the Bible is (a “book of books”) and the men who wrote it. The author tells us about the development of the Bible – why the books we have are the accepted canon. In amongst all the “textbook” feeling stuff, though, readers are also told about ways to make sure they’re keeping the message of the Bible front and center when doing family Bible studies.

The final part is A Daily Walk, and this is the culmination of the other two parts. See, as the leaders in our families, we are responsible for teaching what we want taught in our homes. By reading the Bible faithfully, and understanding what it’s about and why it’s important to us, we encourage our children to do the same. With those two main criteria covered, we are ready for that “daily walk” with God. The author gives us guidance for reading the Bible with your children and ways to help your children “hide God’s word in their hearts.” She explains how to pray the word of God with your family, and even offers suggestions and encouragement for doing your Bible reading on the days you really don’t want to.

I really enjoyed reading this book, especially the bits and pieces of real life anecdotes sprinkled throughout. The author has two sons she writes about regularly in the book, and while the stories are from all ages of their childhood and development, I have sons in all of those ages so it was fun to read about how her children behaved and see some similarities to my own kids. If you’re wanting to start incorporating more Bible reading into your homeschool (or even just your family life), and you’re a bit unsure how to begin and whether you should “carefully omit” certain sections of the Bible (I’m looking at you, Song of Solomon) for children of certain ages, then Help Your Kids Learn & Love the Bible just might be a useful resource for you as you navigate.

Remember to head over to the Homeschool Review Crew to read more reviews of this book as well.

Blessings,

Fermenting Food with Fermentools

Disclosure: I received this complimentary product through the Homeschool Review Crew.

Last year, I was able to review the Starter Kit from Fermentools, and it didn’t go so well. I was able to technically ferment some vegetables, but they weren’t a family favorite, taste-wise. This summer, I’ve been making a lot of coleslaw (the traditional kind, not fermented), and I wanted to give fermented coleslaw a try. I’ve had some “sour” coleslaw in restaurants with fish and chips. When I saw the recipe for fermented coleslaw on the Fermentools blog, I suspected that that tart flavor I’ve enjoyed in restaurants might be a fermented slaw. I wanted to try making it myself! For this reason, I asked for another opportunity to write a review for Fermentools.

Fermenting foods is a great way to incorporate good bacteria into your intestinal tract (necessary for optimal “gut health”), and it’s gained a lot of popularity over the past few years (never mind the fact that it’s been a traditional way of preserving food for over a century). If you like sour things, like pickles and sauerkraut, or fermented things, like wine, then good news for you: you already like fermented food! But if you buy these foods from the grocery store, you’re missing out on all the good bacteria that you get when you ferment your own food at home. This is because in the process of canning to make food shelf stable, all that heat kills the bacteria. Killing bad bacteria is a good thing, but killing the good bacteria… not so much.

The Fermentools Starter Kit comes with everything you need to turn any size wide-mouthed Mason jar into a fermenting vessel. Just add the jar and the food! The starter kit comes in a nice small box that will fit easily into a standard mailbox when you order it. Inside the box is a little cloth bag with all of the tools: a glass weight, an air lock, a special lid that fits a wide-mouthed jar, a rubber stopper, and a rubber ring. Also inside the box, but outside of the bag, is a bag of specially formulated Fermentools Himalayan pink salt and an instruction sheet with two recipes. Let’s talk about how to ferment food using the kit.

The first thing you do is to choose your recipe. As I mentioned before, I opted for coleslaw. This meant chopping up some cabbage, shredding carrots, and getting started. I used green cabbage only because it’s what I had on hand already, but you could easily do a mix of green and purple. For a quart sized jar, I used about half a large head of cabbage and two carrots.

Once my vegetables were chopped, I sprinkled a tablespoon of the pink salt from the kit over the top of the mix (it was still just laid out on my cutting board at this point). I mixed it altogether with my hands and then pressed it into the jar. With the jar filled up, I then made a brine solution. I didn’t have any distilled water at the time, so I used the method on the instruction sheet to dechlorinate some tap water by boiling it for ten minutes and then letting it cool. I cheated on the cooling and added some store-bought ice to speed up that process. In the future, I will just buy a gallon of distilled water and not worry about it, but I’d already chopped and salted the cabbage at this point, forgetting that fermenting requires non-chlorinated water.

Making the brine with Fermentools is super easy. The salt bag has everything you need to know to measure properly. If you look at the front of the bag, it tells you how much salt you need for a specific amount of water (not for the size of your jar, so be aware of that when you measure) in grams. Flip the bag over and you’ll see a grams-to-teaspoons/tablespoons chart. Simply add the salt to your water, stir to dissolve, and your brine is ready.

Back to my jar of coleslaw. It was packed down now, so I slowly poured the brine over the mixture. My recipe recommended placing a cabbage leaf over the top of the mixture, so I did that and then added the glass weight. The weight is perfectly sized to fit inside the Mason jar, and its job is to keep the vegetables submerged in the brine during the fermenting process, assuring that all of the food ferments – none is above the brine being left unfermented. From here, you add the special Fermentools lid (it has a hole in the top) and rubber gasket, then secure it with the ring that came with your jar. Pop the rubber stopper into that hole, then add your air lock to the rubber stopper. Fill the air lock halfway with water (there’s a line right on there so you don’t have to guess; I used brine in mine) and place your jar in a dark place to ferment for the time specified in your recipe. The fermenting process varies based on the food in your jar; my coleslaw recipe said about 5 days. I forgot about it, though, and it ended up going 8 days before I got back to it.

Now the big question… did the fermented coleslaw taste good? Yes! I was a bit leery to taste it at first, so I just had a little bit. The recipe said that when the fermenting was over, to mix it with a bit of mayonnaise to complete the recipe, so I did that. And it was really good! I will definitely be making more fermented coleslaw in the coming months. And it gave me the confidence in tasty fermented foods that I didn’t get last year, so I want to try some other options. I learned last year that it’s best not to attempt to make something that’s not what it’s supposed to be. For example, I confused “fermented asparagus” with “pickled asparagus” last year, and I was disappointed. But going in with the right mentality this year, I was much happier with the results. If you already know you like fermented food and want to make it yourself to preserve those good bacteria, or you’re interested in trying something new, then I definitely recommend the Fermentools Starter Kit.

One last thing before I wrap up today. Last year, I gave my Starter Kit to my mom because I didn’t expect to use it again after our family’s disappointment in the asparagus. She made some fermented garlic, and I have a short review from her too.

I used your fermenting process to ferment some garlic. It was very easy. All I had to do was put the stuff together and put it in the garage for three months. After that, I put it in the refrigerator and let it cool down because I like my stuff cool, and then I gave it a try. I thought it tasted really good. Your product was very fun to use and very easy.

Make sure to click through to the Homeschool Review Crew website, too, and see what other families fermented. I know I’m excited to read those reviews!

Blessings,

Making Math Easy with CTCMath (review)

Disclosure: I received this complimentary product through the Homeschool Review Crew.

Grasshopper had such a huge success when we used CTCMath last year that I happily agreed to review it again to keep his subscription going!

What is CTCMath? In its most basic form, CTCMath is a program that teaches all levels of math from Kindergarten through Calculus. The program is split up into grade levels, and from there, units and lessons. There are also a few games to help with speed facts. Grasshopper has been working on third grade curriculum, which includes times tables. To help him with his times tables, he has been playing the Times Tables Shoot ‘Em Up game in addition to doing 1-2 regular lessons per day.

Let’s talk first about the regular lessons. Each one consists of a short video (2-5 minutes long), followed by a 10-question digital worksheet. Students know right away whether they’ve gotten the answer right, which is really nice. In the parent account, you set the “pass grade” for each of your students. We have it set to the default 80%. This means that if my son gets 80% or better on his worksheet, the program allows him to move on to the next lesson. If he gets less than 80% (which he never does – he’s borderline in tears any time he gets less than 100%), then he is prompted to answer more questions to encourage further understanding of the topic. Because the lessons are prerecorded videos, a student can always go back and watch it again if they’re unclear on what to do. We’ve had to do that a time or two. It’s really that straightforward! Grasshopper can easily get a math lesson done in 10 minutes, including the video. That’s why he often does more than one lesson per school day. I’m sure they’re harder when you get into the more advanced maths, but we haven’t been there yet.

Times Tables Shoot ‘Em Up is pretty much exactly what it sounds like. Answer the multiplication problem by shooting the correct answer. Before you begin, you can choose which times tables you want to practice, or do a mix. The answers are shown in a straight line across the screen in ascending order. The group moves slowly down the screen, and you need to answer all of the questions before they get to the bottom. Once you’ve made it through three rounds, the movement picks up considerably. Even Will and Ballet Boy took a shot at that level, and neither of them could get all the answers in the faster level despite knowing their times tables really well. The numbers just move too fast down the screen.

For more details, look at my 2020 review of CTCMath. You can also head over to the Homeschool Review Crew and see what other members think of this fantastic math program! As for us, Grasshopper is going to continue doing a couple of lessons a day through the summer, and then dive into 4th grade math in the fall.

Blessings,

Further Study of The American Revolution

Disclosure: I received this complimentary product through the Homeschool Review Crew.

I have reviewed quite a few products from Home School in the Woods in the past, and I’ve got the biggest one yet to share today. For the past five weeks or so, Grasshopper and I have been diving into Time Travelers U.S History Studies: The American Revolution. I knew this would be a well-written, intense curriculum, but I was amazed by just how in depth it went! Let me tell you all about it.

The Files

When you purchase a Time Travelers digital download kit (of which there are many!) from Home School in the Woods, it downloads as a zip file. It’s super easy to extract the files; just use the extraction wizard on your computer. I was super overwhelmed by the sheer number of files at first, but as I continued to dig around in the folders in preparation of teaching the unit, I really got a good feel for how they were organized. They are sorted into four sections, but I only ever used two of them: Menus and PDFs (and Menus was only used once or twice). PDFs in the main bread and butter of the program, and where you’ll spend most of your time.

When you open the PDFs folder, there are 6 subfolders, and most of those will get used quite often, with the exception of “covers.” You’ll only need that one for the initial printing (as its name suggests, it has the cover images for the lap book and notebook portions of the study).

Intro-Etc has things like the acknowledgements from the authors, a list of additional resources you can utilize while working through the study, and tips for using the study. But the most important thing in that folder is the lesson planner. For the first week, I referred to in on the computer, but after that I decided it would actually be better to have it printed out even though it felt kind of wasteful to me. But because it was a landscape oriented document, it was sideways in Adobe Acrobat, and that made it a bit cumbersome to read on the screen.

Lesson-Masters is the real meat of the product, and this is where you’ll do most of the printing for your students from. It has every single thing you need to complete the notebook and lap book for the unit study. I’ll dive more into these pages in the next section, “How we used it.”

Lesson-Projects is a very useful folder. It is divided up into lessons (there are 25 in this study), and it explains how to create each thing you do in the day. This is especially helpful in some of the more complicated lap book elements.

Lesson-Text is the reading portion of the study. Each day gets its own PDF, and each of those is 1-3 pages long.

Teacher-Keys is just what it sounds like: answer keys for the different pages.

How We Used It

I spent a bit of time just getting a feel for the study before I did anything else. I received the files in my email on a Thursday, and spent much of Friday and the weekend going over everything so I could understand how it all worked. By Sunday night, I had a pretty good idea, and then I did the first week’s printing. (I did all of the printing one week at a time; it was less cumbersome for me that way. You could, of course, do all the printing at once and store the pages until you need them if that works better for you.)

Each day, I would look over what projects were expected to be completed and would pull those papers out of our folder. I set everything aside, only giving Grasshopper one page/activity at a time. I’d usually find a simple one for him to work on while I read the lesson text aloud to him. I tried to stick to things like basic coloring or cutting for the lesson time so that he could focus on listening to me read.

Besides the lesson text, there are two main components to the study: the lap book and the notebook. You can choose to do just one of them, but we did both. Grasshopper is at that sweet spot where he’s young enough to still love doing lap books, but also old enough to benefit from notebooking. So I seized on that ability. The schedule clearly labels whether something is “notebook” or “lap book,” so if you’re only doing one of them, it’s easy to cherry pick the pages you need.

For his notebook, we just picked up a basic folder from Walmart (I think it cost me a quarter), and then I also bought a packet of file folders for the lap book because we didn’t have any. We’ve been keeping all of the completed notebook pages on the right side of the folder, and the week’s worth of printouts on the left. This relaxed organizational method might not work for others, but it’s been great for us.

One thing we’ve done differently from the suggested schedule is building the lap book. The schedule has your child create all of the mini books and store them in a baggie, then create the entire lap book on day 24. We were too excited for that! So we have been building the lap book as we go. It might end up slightly less “rigid” in the end, but that’s okay. Grasshopper is learning so much and having fun every single day.

Final Thoughts

I can’t recommend Home School in the Woods enough. A lot of their things can feel pretty overwhelming, but that’s because they’re so well written. I won’t lie: it takes a lot of printing. A lot, a lot. So if you don’t have access to a good printer (and by “good” I mean one that will give you more than 30 printed sheets per ink cartridge), this might not be the product for you (and believe me, I’ve been there in the past). But if you do have access to a good printer, you should seriously consider looking at the different Time Traveler kits. They have them for pretty much all periods in American history (up through WWII).

If you’re looking for something more “supplementary” and less “full curriculum,” allow me to suggest the Timeline sets. There are four to choose from, and they go from Creation to modern times. The timelines are a great visual for kids of all ages, too – in fact, Home School in the Woods has them listed as a K-12 product, which means you can supplement literally curriculum and make an awesome family-wide keepsake. You can choose from Creation to Christ (Beginning – 100 AD); Resurrection to Revolution (0 – 1799 AD); Napoleon to Now (1750 – modern day); and America’s History (explorers to 21st century).

Members of the Homeschool Review Crew have had the honor of reviewing a wide variety of products from Home School in the Woods (including all of the timelines I mentioned before, different eras of Time Travelers Studies, and more), and I highly recommend you check out their reviews! You won’t regret it.

Blessings,

Catching Slugs and Studying Language Arts (review)

Disclosure: I received this complimentary product through the Homeschool Review Crew.

Grasshopper has been having so much fun practicing his language arts lessons the past few weeks with Words Rock Online from EdAlive. Let me tell you a little bit about the game.

Words Rock is an online game, and it’s super easy to set up an account and log in. You have to go through the parent account the first time, where you can easily set up child accounts. I only set up an account for Grasshopper, even though the suggested age range is 5-15, and I don’t regret that decision at all. It took a few rounds of going back and forth between the student account and the parent account for me to get the settings *just right* for Grasshopper to be able to actually answer the questions each time, but once I did we only used the student account from then forward.

Playing the Game

When you first log in, you select either Start a New Game or Questions Only. We always played the game! There are  a number of avatars shown on the bottom of the screen to choose from. It seems to assign you a different one each time, but it’s easy to just click a different one that you want to use for that session. Grasshopper always chose the same guy. Then a little pop up appears, where you choose whether you want a Basic Game (smaller board with no “gadgets”) or an Advanced Game (bigger board with “gadgets”). The first few days, we did the basic game, but once we’d figured out the game and were quite comfortable with it, we switched to the advanced game and haven’t looked back since.

The game portion of the app (it’s technically a website, but runs like an app) is kind of a cross between Battleship and Minesweeper. The goal is to catch slugs, and in an advanced game there are 7 slugs taking up a total of 23 squares (the board is 10×10). When you choose a square, you are told whether the square you chose has no slug (50 points), is near a slug (50 points), contains part of a slug (100 points), or completes the capture of a slug (200 points). Each game consists of 4 players: your student and 3 computer opponents.

In the advanced game, you have the option of using helps. Each help costs a certain number of points, so you can’t use any on your first turn (because you don’t have any points yet). The helps are: scatter search, which gives you a cross beam of squares that you can choose instead of a single square (400 points); hint, which gives you a 3×3 area in which to choose, one of which is a guaranteed “part of slug” (50 points); restricted zone, which allows you to block off an area from your opponents’ future turns (125 points); and unlimited move, which opens the entire board to you (in the advanced game, you can only choose from certain unlocked squares which change each turn) (50 points). We found through playing the game that scatter search is more than worth the 400 points it costs to use, because you pretty much always get 800-1500 points back using that option. When we started using scatter search, Grasshopper’s scores went from 1500-1800 to 3000-4000 or more per game. It really made a big difference! And once he got the hang of the game, his goal shifted. Instead of aiming to win, he tried to get a better and better score each time (essentially beating himself). At the time of this writing, he aims to get 4000 points each time he plays.

After each turn, you go to the question portion of the game. Students must answer a language arts question chosen from quite a large range of topics and difficulties. They are given 2 chances. If they get the answer correct on their first try, the next round of slug finding earns them double points. If they get it right on the second try, they get 1.5x the points. Some questions are deemed “brain teasers,” and those earn even more points for the next round if answered correctly (2.4x instead of 2.0). If a question is too difficult, you can click the “too hard” button and get a new question with no penalty. We had to use that a few times, but not too often once I figured out the right settings for him in the parent-teacher portal.

Questions include things like “Click all the verbs in the sentence” and “Determine which words are opposites from the following pairs.” You’ll answer about 5-7 questions per game.

Once all 7 slugs are captured, the game ends immediately – no further questions are asked. You then see the bonus points being awarded. These are for things like “most slugs captured,” “most brain teaser attempts,” and “highest slug hit rate.” The player with the most points wins.

Final Thoughts

I don’t think there was a single day that went by (weekends included) that Grasshopper didn’t ask to play the “Slug Game.” He absolutely loved it, and I liked that he was getting some extra grammar practice in. Some of the questions required a lot of help, but most were just fine for him to understand and answer on his own. I absolutely expect him to continue playing the game each day for the entire year that we have access.

Members of the Homeschool Review Crew have been playing two other games from EdAlive this month, too. Click through to read reviews on Words Rock (language arts), Volcanic Panic (reading), and Baggin’ the Dragon (math).

Blessings,

Cross Seven Musical Memory Tool (review)

Disclosure: I received this complimentary product through the Homeschool Review Crew.

It’s no secret that one surefire way to make memorization easier is to use music. Cross Seven has created a program that utilizes this fact with their Cross Seven Ventures – Homeschool Musical Memory Tool. My younger kids and I have been practicing some of the basics in a variety of subjects with this program the past few weeks.

Cross Seven is divided up into weeks, and from there into individual subjects. Each week has a series of short videos, and the videos give little songs to help children memorize different things. You can use the website for accessing the videos, or there is also a Roku channel so you can put it right on the TV, which is what we did. Each morning after breakfast, I’d turn Cross Seven on for a little while and we would work our way through the subjects I wanted my kids to work on memorizing. We focused primarily on geography, grammar, and science. There are loads of other subjects included, too, though: Scripture, history, Latin, math, hymns, and timeline. Grasshopper thought the Latin was rather interesting, but I didn’t push it too much because that’s not something we’re focused on in our family.

The songs, as I mentioned, are quite short. Each one is only 1-2 minutes long, which is perfect for small children. It gives them the important information without much else. For example, in the geography song that deals with the continents, it pretty much just lists the continents and oceans to music. There aren’t a lot of extraneous lyrics. This keeps things super streamlined.

We did the grammar songs as a supplement to our regular grammar curriculum, and the short songs helped Grasshopper (8 years old) keep track of the different types of words he’s learning – nouns, verbs, adjectives, et al. It really helped him to focus on the different types of words, as well as giving him hooks to hang information on (what a noun is, for example, not just its name).

There are also quizzes available, but I didn’t worry too much about those.

I found the Cross Seven program to be quite popular with my children. I was a little surprised, to be honest, because the songs are so very short and don’t have any “extra” information in them. It’s quite literally just listing the things to music. But it really works! Just a few times through each song and my 8-year-old was singing along. That tells me that the method is sound.

Make sure to read more reviews on the Homeschool Review Crew website, especially if you’re interested in learning more about the quizzes we didn’t utilize.

Blessings,


Teaching Textbooks 4.0 (review)

Disclosure: I received this complimentary product through the Homeschool Review Crew.

For the past several months, my teenagers have been using the Teaching Textbooks Math 4.0 apps on the iPad for their math. The Teaching Textbooks apps are easy to download and sign in to, and each grade level gets its own app. If you’re short on space on your device this could be problematic, but otherwise I think it’s a benefit. There’s no trouble having students working on different levels having to sign each other in and out in order to do their lessons. Simply download the app, sign in using the parent account, add your student, then assign them a username and password. Each day, they have to enter their own password, but they shouldn’t need to sign in to the main account each time. (Ballet Boy had some issues and had to get my log in many times, but I don’t think that’s normal. Scorpion didn’t have the same issue at all.) Here are my boys’ thoughts on the program.

From Scorpion (Math 7):

Teaching Textbooks 4.0 Grade 7 is a program that starts with a video that explains the lesson. The videos are very clear, and last about 5 minutes. After that, there are the lesson portion, which is just a series of questions and problems to solve. If you get a question wrong, there is an option that says “watch solution,” which allows you to see exactly how and why you got the problem wrong. This helps you to remember in the future and get similar problems correct next time.

Topics that I’ve covered so far have been mostly the normal addition, subtraction, multiplication, and division. But I’ve also moved forward into some more advanced division as well. Later lessons have shown me ways to break up some of the harder division problems in order to solve problems quicker.

Math 7 is an excellent math program for any middle schooler (or a high schooler who is behind and/or needs a refresher course). I have tried a lot of different math programs, and Teaching Textbooks has worked really well for me personally. I like the “app” format because I spend a lot of time on my iPad anyway. It’s really easy to find what I need and move forward in the next lesson. It keeps my spot, so I never have to try to remember where to pick up. Signing in is super easy, too. The app keeps our family login all the time, so I just have to type in my student password each day. This makes it really quick to get going. I’m glad to have this math for my main curriculum.

From Ballet Boy (Algebra I):

Teaching Textbooks 4.0 Algebra I is a great program for people who learn like me. I’m normally terrible at watching a video and then doing questions. The thing I love about this program is it’s a lot more interactive than others I’ve done in the past. Each video walks you through the problems step by step but you have to type in the answers; it’s not just the teacher solving them for you. It then gives you about 20 questions and they run them the exact same as the ones you solved in the lesson so it’s more of the same instead of watching someone be good at math and then being given a page of homework and told to do it in an hour. All in all a great program. Five stars.

Back to Mom:

You can see that both boys have really enjoyed working on this program, and that’s really saying something because they each have different strengths. Ballet Boy is definitely a math kid. His main struggle has been finding a program that works for him, not the math itself. We’ve found that with Teaching Textbooks. Scorpion, on the other hand, has always been more of a literature kid – he’s struggled with math for as long as I can remember (which is why he’s 14 and doing 7th Grade math). But it looks like we may have found a good fit for him as well (famous last words, right?). I never have to harp on the kids to work on their math now, though. In fact, they like it so well that they wake up and dive right in. They’re always done with it by the time I see them for the first time in the morning.

We only ever had access to Teaching Textbooks 4.0, but other members of the Homeschool Review Crew are comparing the 3.0 version to the new 4.0 version, so if you’ve used Teaching Textbooks 3.0 and are wondering how the new version is different, I urge you to check out more reviews.

Blessings,

The Humble Calculator (Triad Math review)

Disclosure: I received this complimentary product through the Homeschool Review Crew.

I grew up using a Texas Instruments scientific calculator, and I’d be willing to bet many of you did as well. What I bet most of us don’t know, however, is the sheer amount of power that humble machine has. Enter Mastering the TI-30Xa Scientific Calculator: Augmented Intelligence for all 21st Century Students from Triad Math, Inc. In this course, which is a combination of video lessons, a work text with problems to solve, and the calculator itself, students learn all about the nuances and extraordinary power this calculator has.

The main dashboard

When we first got access to the course, I gave the book to Ballet Boy (17) and emailed him the login credentials for the video lessons. Then, he worked on the course independently each day. From my perspective, the course was very easy to navigate. When we logged in, it was easy to find the right course, and then to scroll down through the lessons. The interface kept track of where you left off, so it was a breeze to move to the next lesson correctly. I did the first few lessons with my son, and I found the teaching to be very clear and easy to follow. The questions in the textbook went well with the lessons.

A screenshot from the video for lesson 1

Each lesson consists of a pretest, the video lesson, practice questions (available as PDFs within the course or as a separate book, as we received), and a post-test. The post-test is identical to the pretest, except it’s taken after the lesson to make sure the student has learned the material. Each lesson also has a forum, but we didn’t utilize those. 

Here are Ballet Boy’s thoughts. 

I’ve been using the Texas Instruments calculator for a few weeks now and let me just say: this calculator is AMAZING! It’s the only calculator I’ve used that was actually useful for math. All calculators do math, of course, but I’m not in third grade so one that does more that multiply and divide is a welcome sight. I have yet to come across an equation or geometry problem that isn’t made easy with this tool. The calculator even does trigonometry with a few clicks of a button. It also has three memory banks for doing complex word problems. I have done entire math lessons without even scratch paper.

Additionally, the course has many video lessons and a work book that go with it to help you understand every button one step at a time. The videos are super easy to understand and follow along with. What I will say is when you’re watching them, “Dr. Del” is a lesson behind when he tells you what lesson number you’re on so that’s confusing at first, but only a small bug.

All in all I have no problems with the class, only praise. Highly recommended!! 

Make sure to head over to the Homeschool Review Crew for more information!

Blessings,


LeapFrog Academy (review)

Disclosure: I received this product free through the Homeschool Review Crew.

If you’ve had little kids any time in the last 20 years (maybe more), you’re likely familiar with LeapFrog® . I remember borrowing LeapFrog DVDs from the library 12 years ago when my teenagers were small, but I’d largely forgotten about them until the opportunity to review their website and app, LeapFrog Academy®, was presented.

LeapFrog® is a learning resource for kids ages 3-6. Even though I technically only have one child in that age range, I had three of my kids get accounts. Bumblebee is 2 1/2, Dragonfly is 5, and Grasshopper is 8. They have all been having loads of fun with the app over the past few weeks!

Bumblebee isn’t quite ready for much on this app. He’s almost at the 3-year suggested age, but because he was such a slow talker, we’re focused more on increasing his vocabulary and working on preschool milestones unrelated to reading (counting, colors, etc). Despite that, I tried working with him a little bit on the “regular” lessons portion of the app, but it was just too much. But that was okay! LeapFrog Academy® has simpler things like videos for just that situation. In fact, he’s watching the ABC song video as I write this review.

Dragonfly is currently an early reader. He’s been working through another reading app for the past several months and knows many sight words as well as loads of simple words. With this background, he was able to to have a lot of success with LeapFrog Academy®. But that’s not all this app has to offer! While my previous experience with LeapFrog® was mostly alphabet and reading, this time around I’m discovering that it’s much, much more than that! Besides reading, there are sections that deal with health, science, math, and more. It really is an all-inclusive preschool/Kindergarten supplementary curriculum.

Grasshopper was above the age range for this app, but I knew he would feel left out if he didn’t get an account, and I was right. He has also been working on the app using the first grade level (the highest it goes). It’s very similar to the Kindergarten map, but harder questions and games. He also has been loving it!

When you first open the app, you choose which child is working, and from there you can decide which section to work on (lessons, videos, etc). The app automatically assigns them a grade level based on their age – preschool, Kindergarten, or first grade. Grasshopper and Dragonfly worked pretty much exclusively in the map (which is the lessons portion of the app), and Bumblebee watched the videos, like I mentioned before. To be perfectly honest, I didn’t watch/help the kids every time they used the app, so I don’t have a complete understanding of the ins and outs, but I do know that it follows a treasure map-style progression. The character moves through the map when the child taps on the different parts of the path, and when they get to a lesson (delineated by a large icon on the map’s path), they have to complete it in order to move on. When they finish a single lesson, a bridge appears to allow them to move forward on the path. When they complete a map, they are given a new piece of their pirate ship. None of my kids have completed their pirate ships yet, but Dragonfly especially is super excited each time he gets a new piece.

My kids have been loving the LeapFrog Academy® app! They never argue when I suggest they work on it, and I love that they’re spending a portion of their screen time learning. I definitely recommend LeapFrog Academy® for kids this age. You won’t regret it!

Make sure to read more reviews from the Homeschool Review Crew too!

Blessings,