Homeschool Easy Full Year Curriculum (review)

Disclaimer: I received a FREE copy of this product through the HOMESCHOOL REVIEW CREW in exchange for my honest review. I was not required to write a positive review, nor was I compensated in any other way.

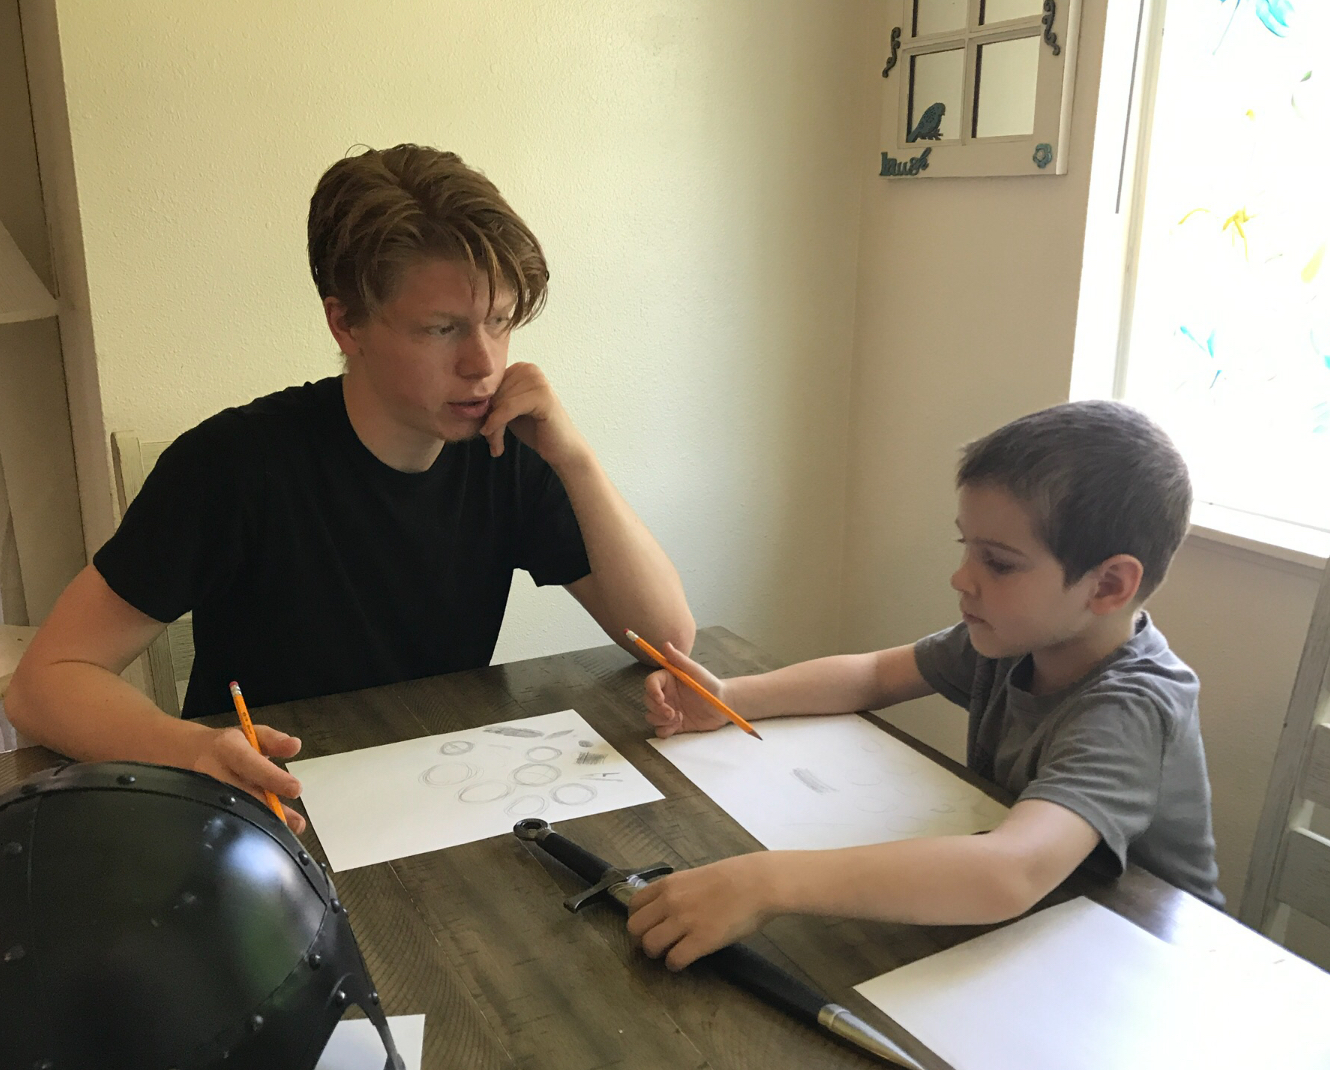
We have homeschooled our kids from the very beginning; none of them have ever attended a public (or private) school. For nearly that entire time, I have wanted to try a “everything provided, open and go” curriculum. So when the opportunity to review Homeschool Easy, I practically begged to be chosen. Homeschool Easy provides full curriculum for grades 1-5, so I chose the 3rd Grade Entire School Year Curriculum for Grasshopper (who is 8 now).

HSE big

When I first got access to the product, which is digital downloads, I immediately went to my computer and clicked the appropriate link. This took me to a folder which contained all of the worksheets needed for the whole year’s lessons. It was very easy to download them and place each subject in a folder within the “Homeschool” file on my desktop, and then to open and print each week. The 3rd Grade curriculum contains 32 weeks worth of lessons in the subjects of grammar, math, history, science, reading, book reading, and writing. We have been using all of them except math (because our current math curriculum is working so well I didn’t want to mess with it) and book reading (because Grasshopper is still building up to novel reading).
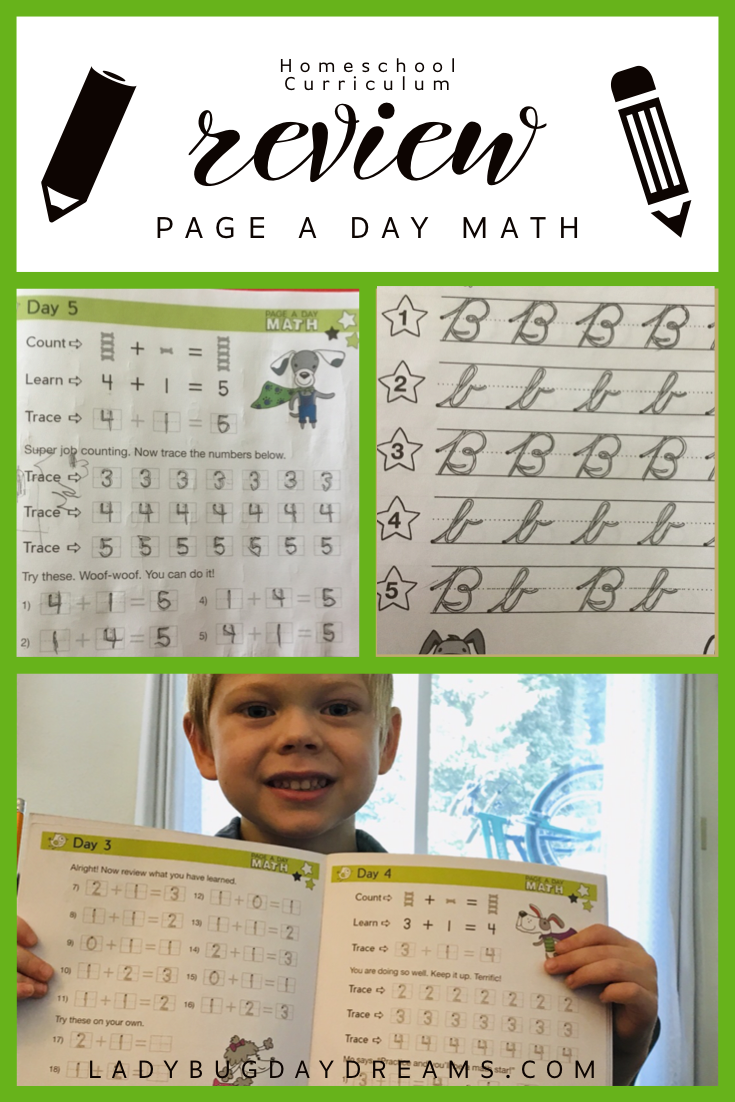
homeschool easy logoEach week, usually on Sunday evening, I get on my laptop and open the files I need. The various subjects are broken down into weeks; some of them are broken down into months and then weeks, but in the end the PDFs are all weekly. I open the weekly PDF and print out the pages. Then I write the dates we’ll be doing each page at the top, hole punch them, and put them into Grasshopper’s binder. After we’d been working on the curriculum for a couple of weeks, I asked him if he wanted me to organize the pages by subject or by date. He chose by date, so that’s how they’re in the binder right now. When we finish the school year, I’ll likely rearrange them into subjects since that’s more standard, but for now I want to keep things working for him as best as they can. It’s one tiny way he can have a bit of control over his school day.

The worksheets are very self-explanatory. It’s not completely hands-off on my end, but there are moments that are, and that frees me up to work with Dragonfly (4) on some of his lessons. Or to fix lunch, or deal with the baby, or assign things to the teenagers… but I digress. Let’s get back to the worksheets, shall we?

IMG-5561
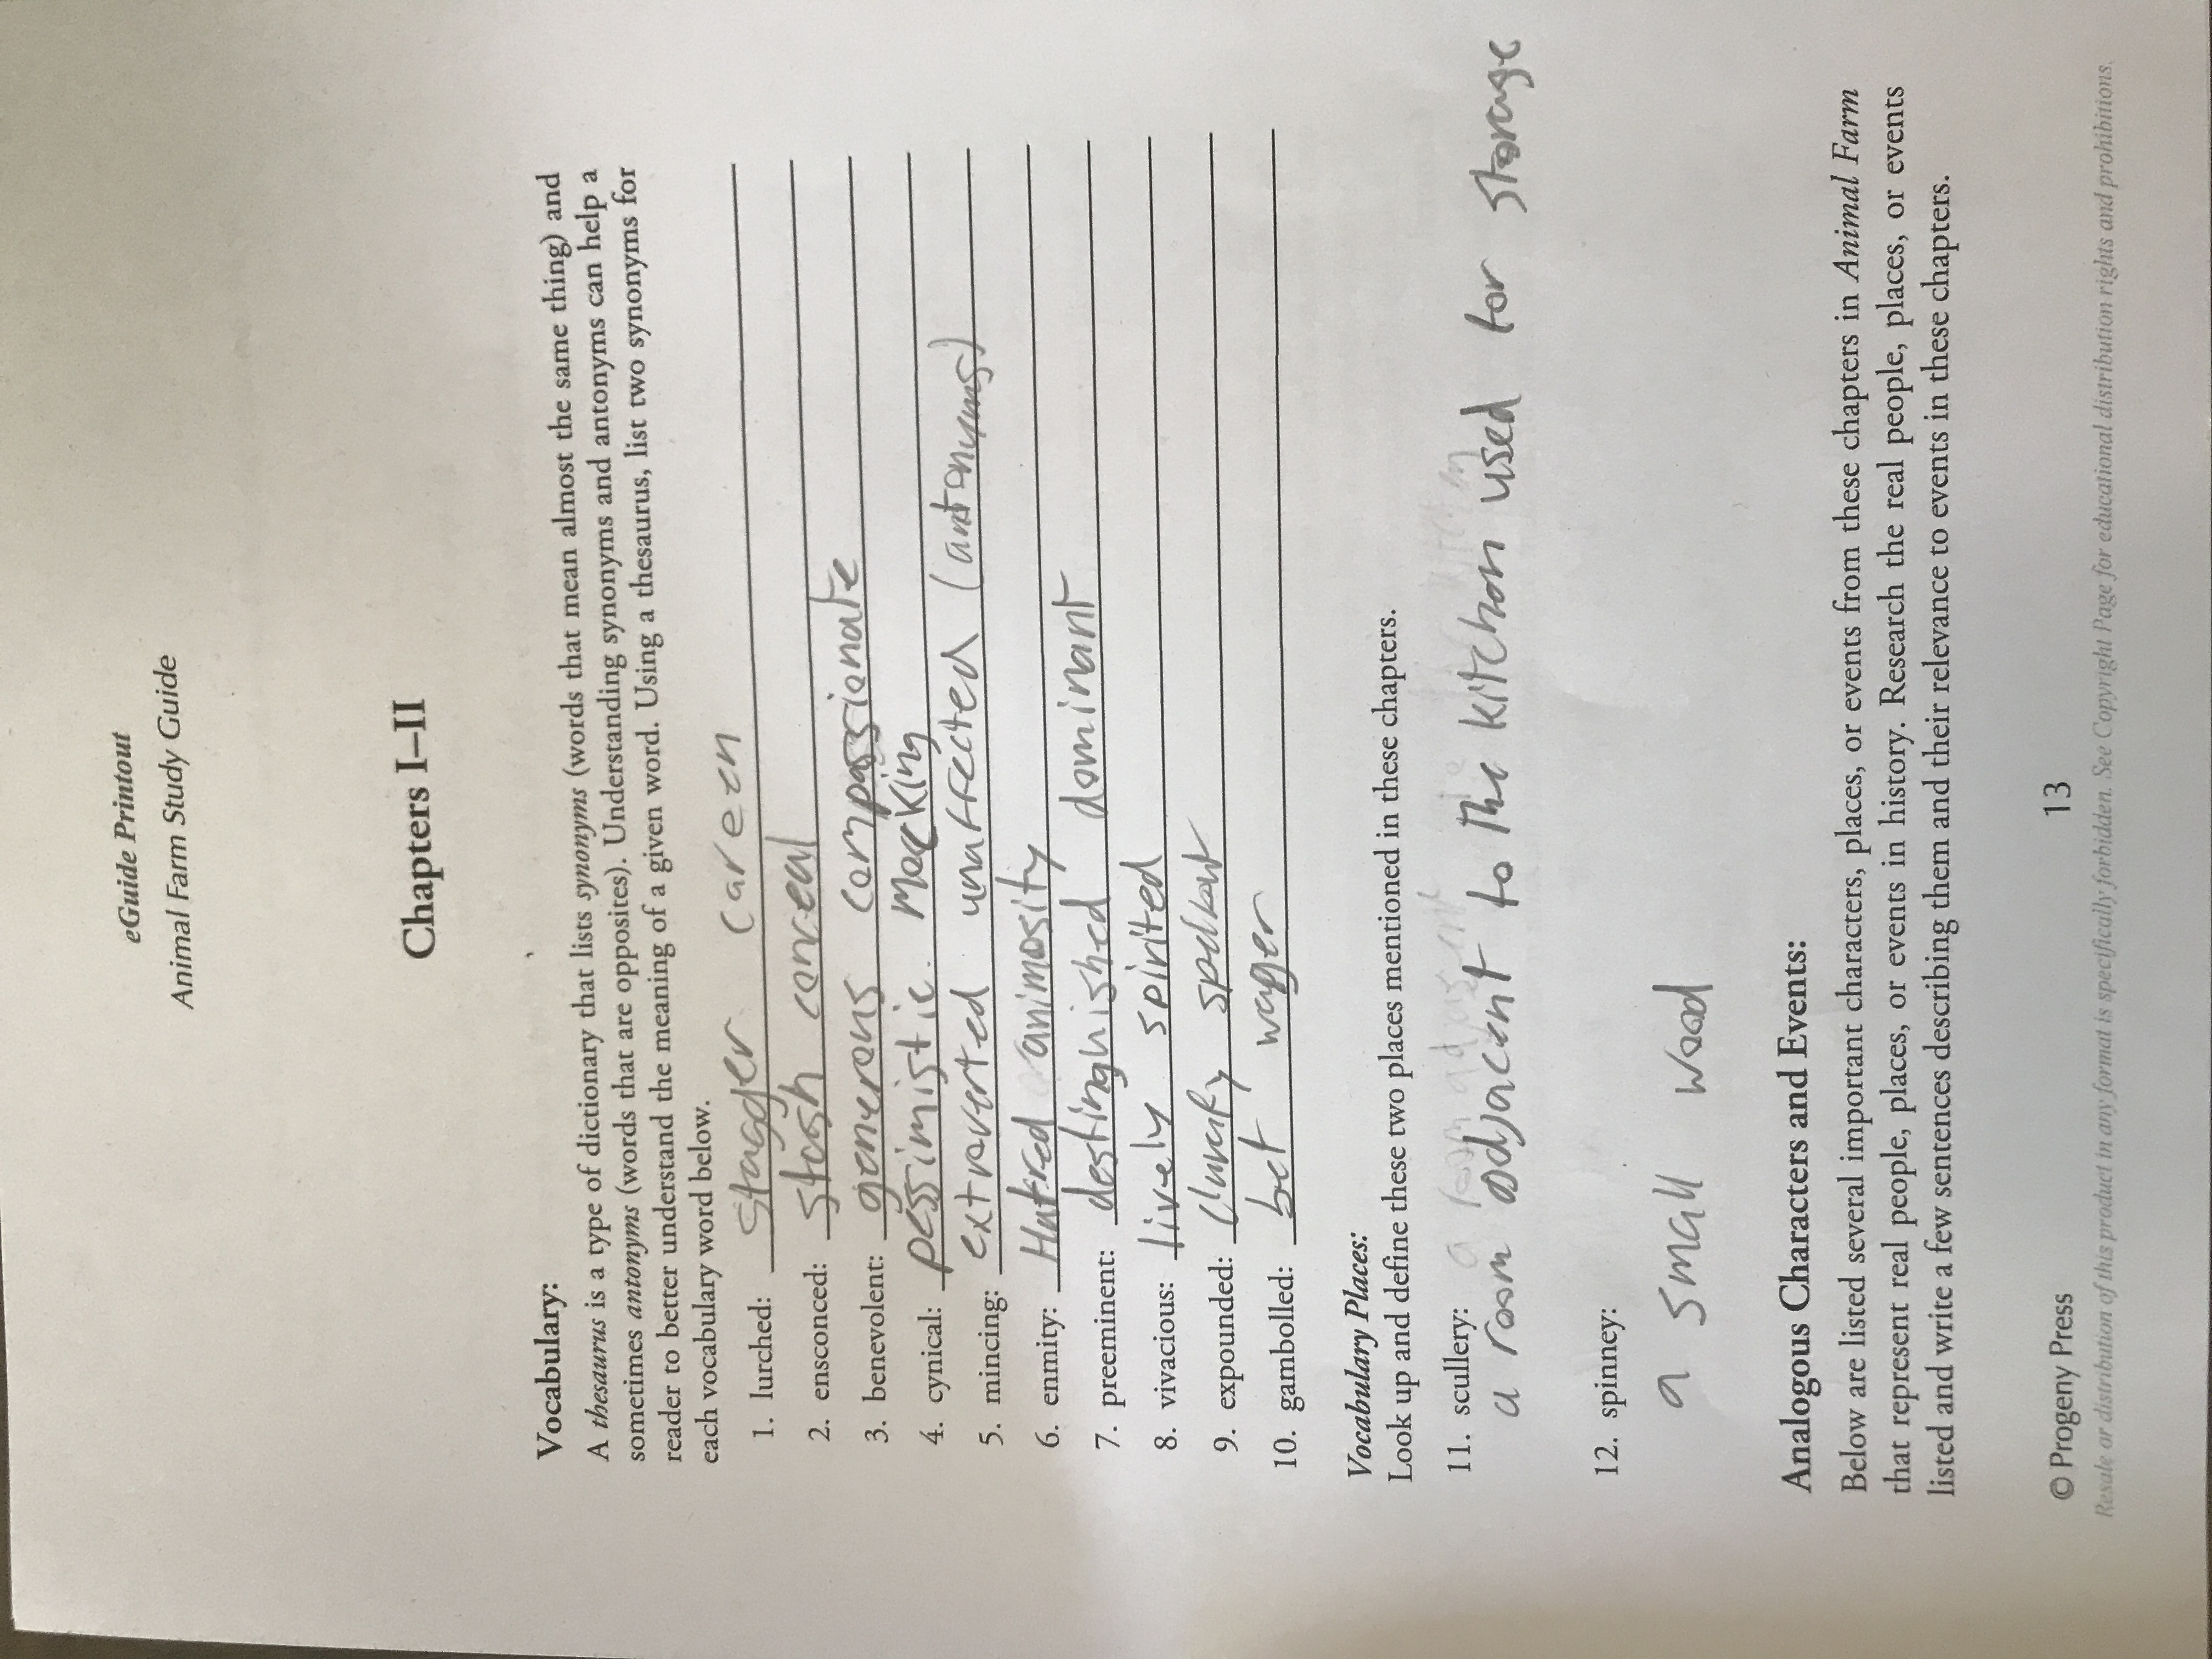
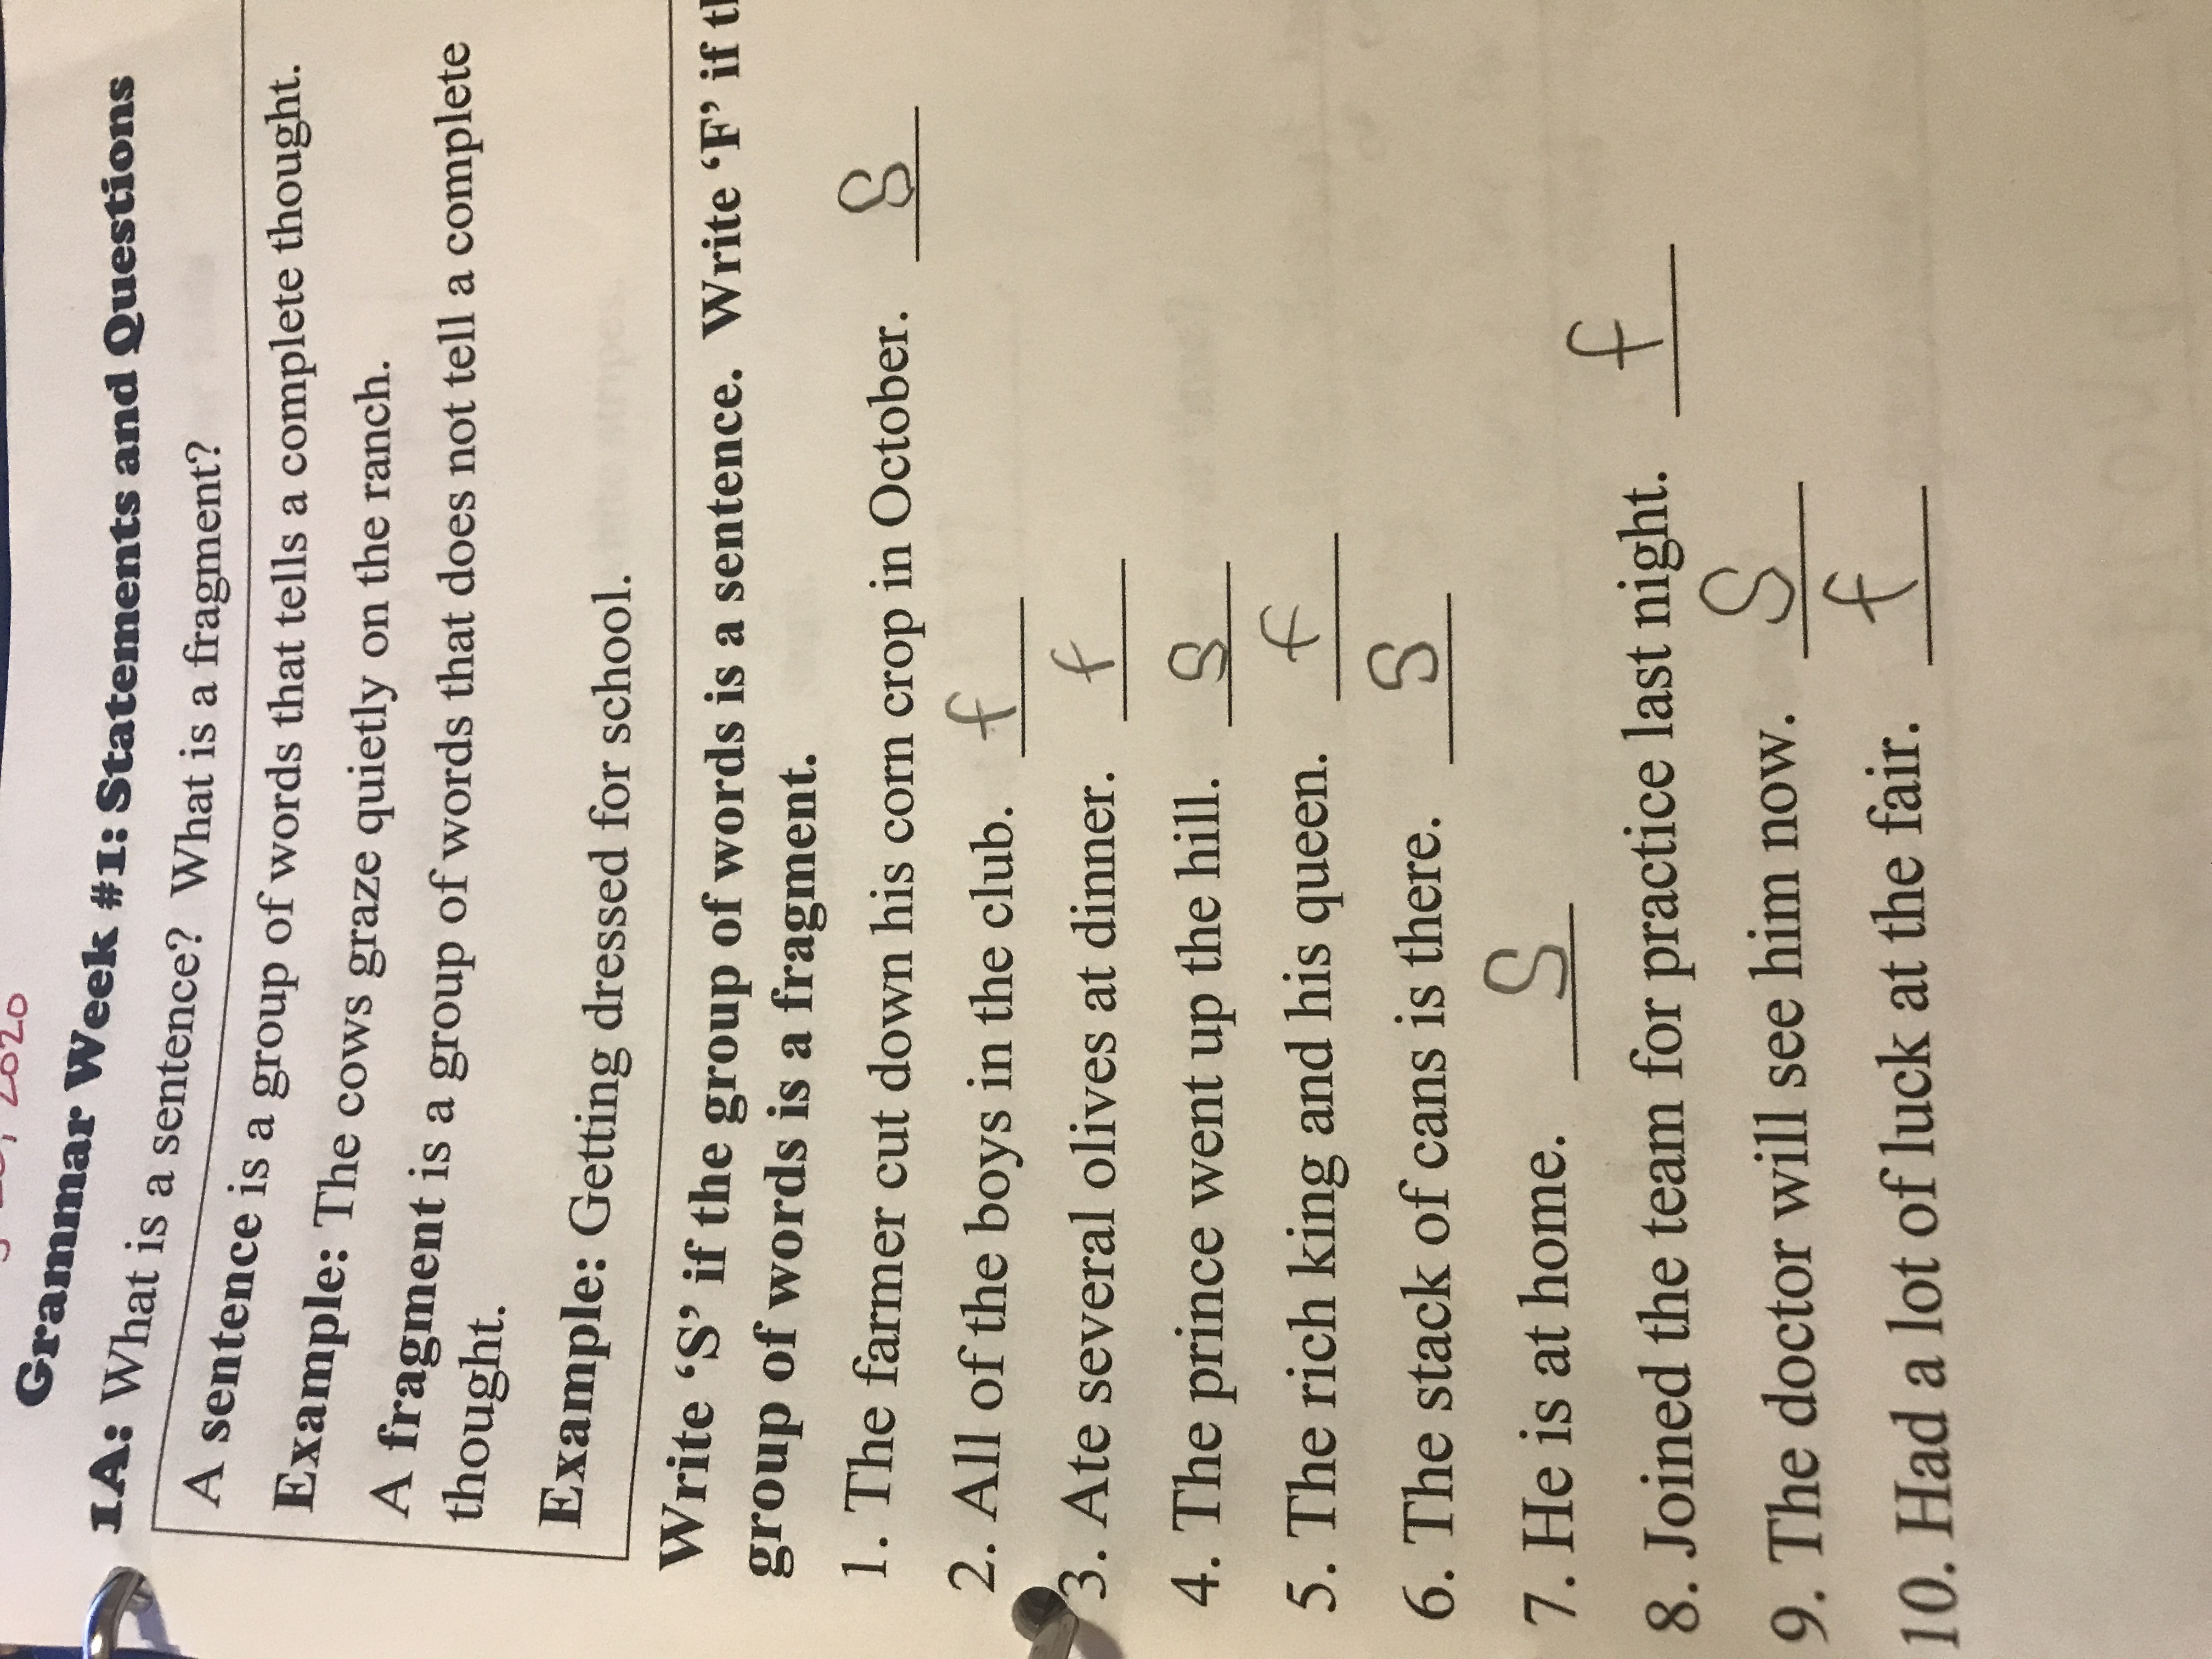
We usually start our day with Grammar. Grammar is my jam, and I love teaching it to my kids, so I’ve always done it first, even when the big kids were little. With many curricula, 3rd grade is the first time they introduce formal grammar (I don’t know for sure if that’s the case with Homeschool Easy because I haven’t seen the other years), so it starts quite basic. The first two weeks are all about different types of sentences (statements, questions, commands, and exclamations). It expands from there into word types, parts of sentences, proper comma usage, and more, but it starts slow. I support this method; the basics are super important, and it’s best not to rush them in something as important as grammar. Grammar is the most teacher-heavy of the subjects we did.

Third Grade history is all about America. The first month teaches Patriotism, and then it moves on to “normal” American history from there. The Patriotism lessons teach all about the flag, the bald eagle, the Statue of Liberty, and more. There’s even a short project assigned in which students research about their own state. In the second month, you dive right into the beginnings of America, starting with a bit of Native American history. The history lessons are each started with a video lesson which can easily be found on YouTube. After watching the video, there are questions to answer. I typically had Grasshopper watch the video on his own and then we worked together on the questions.

IMG-5563
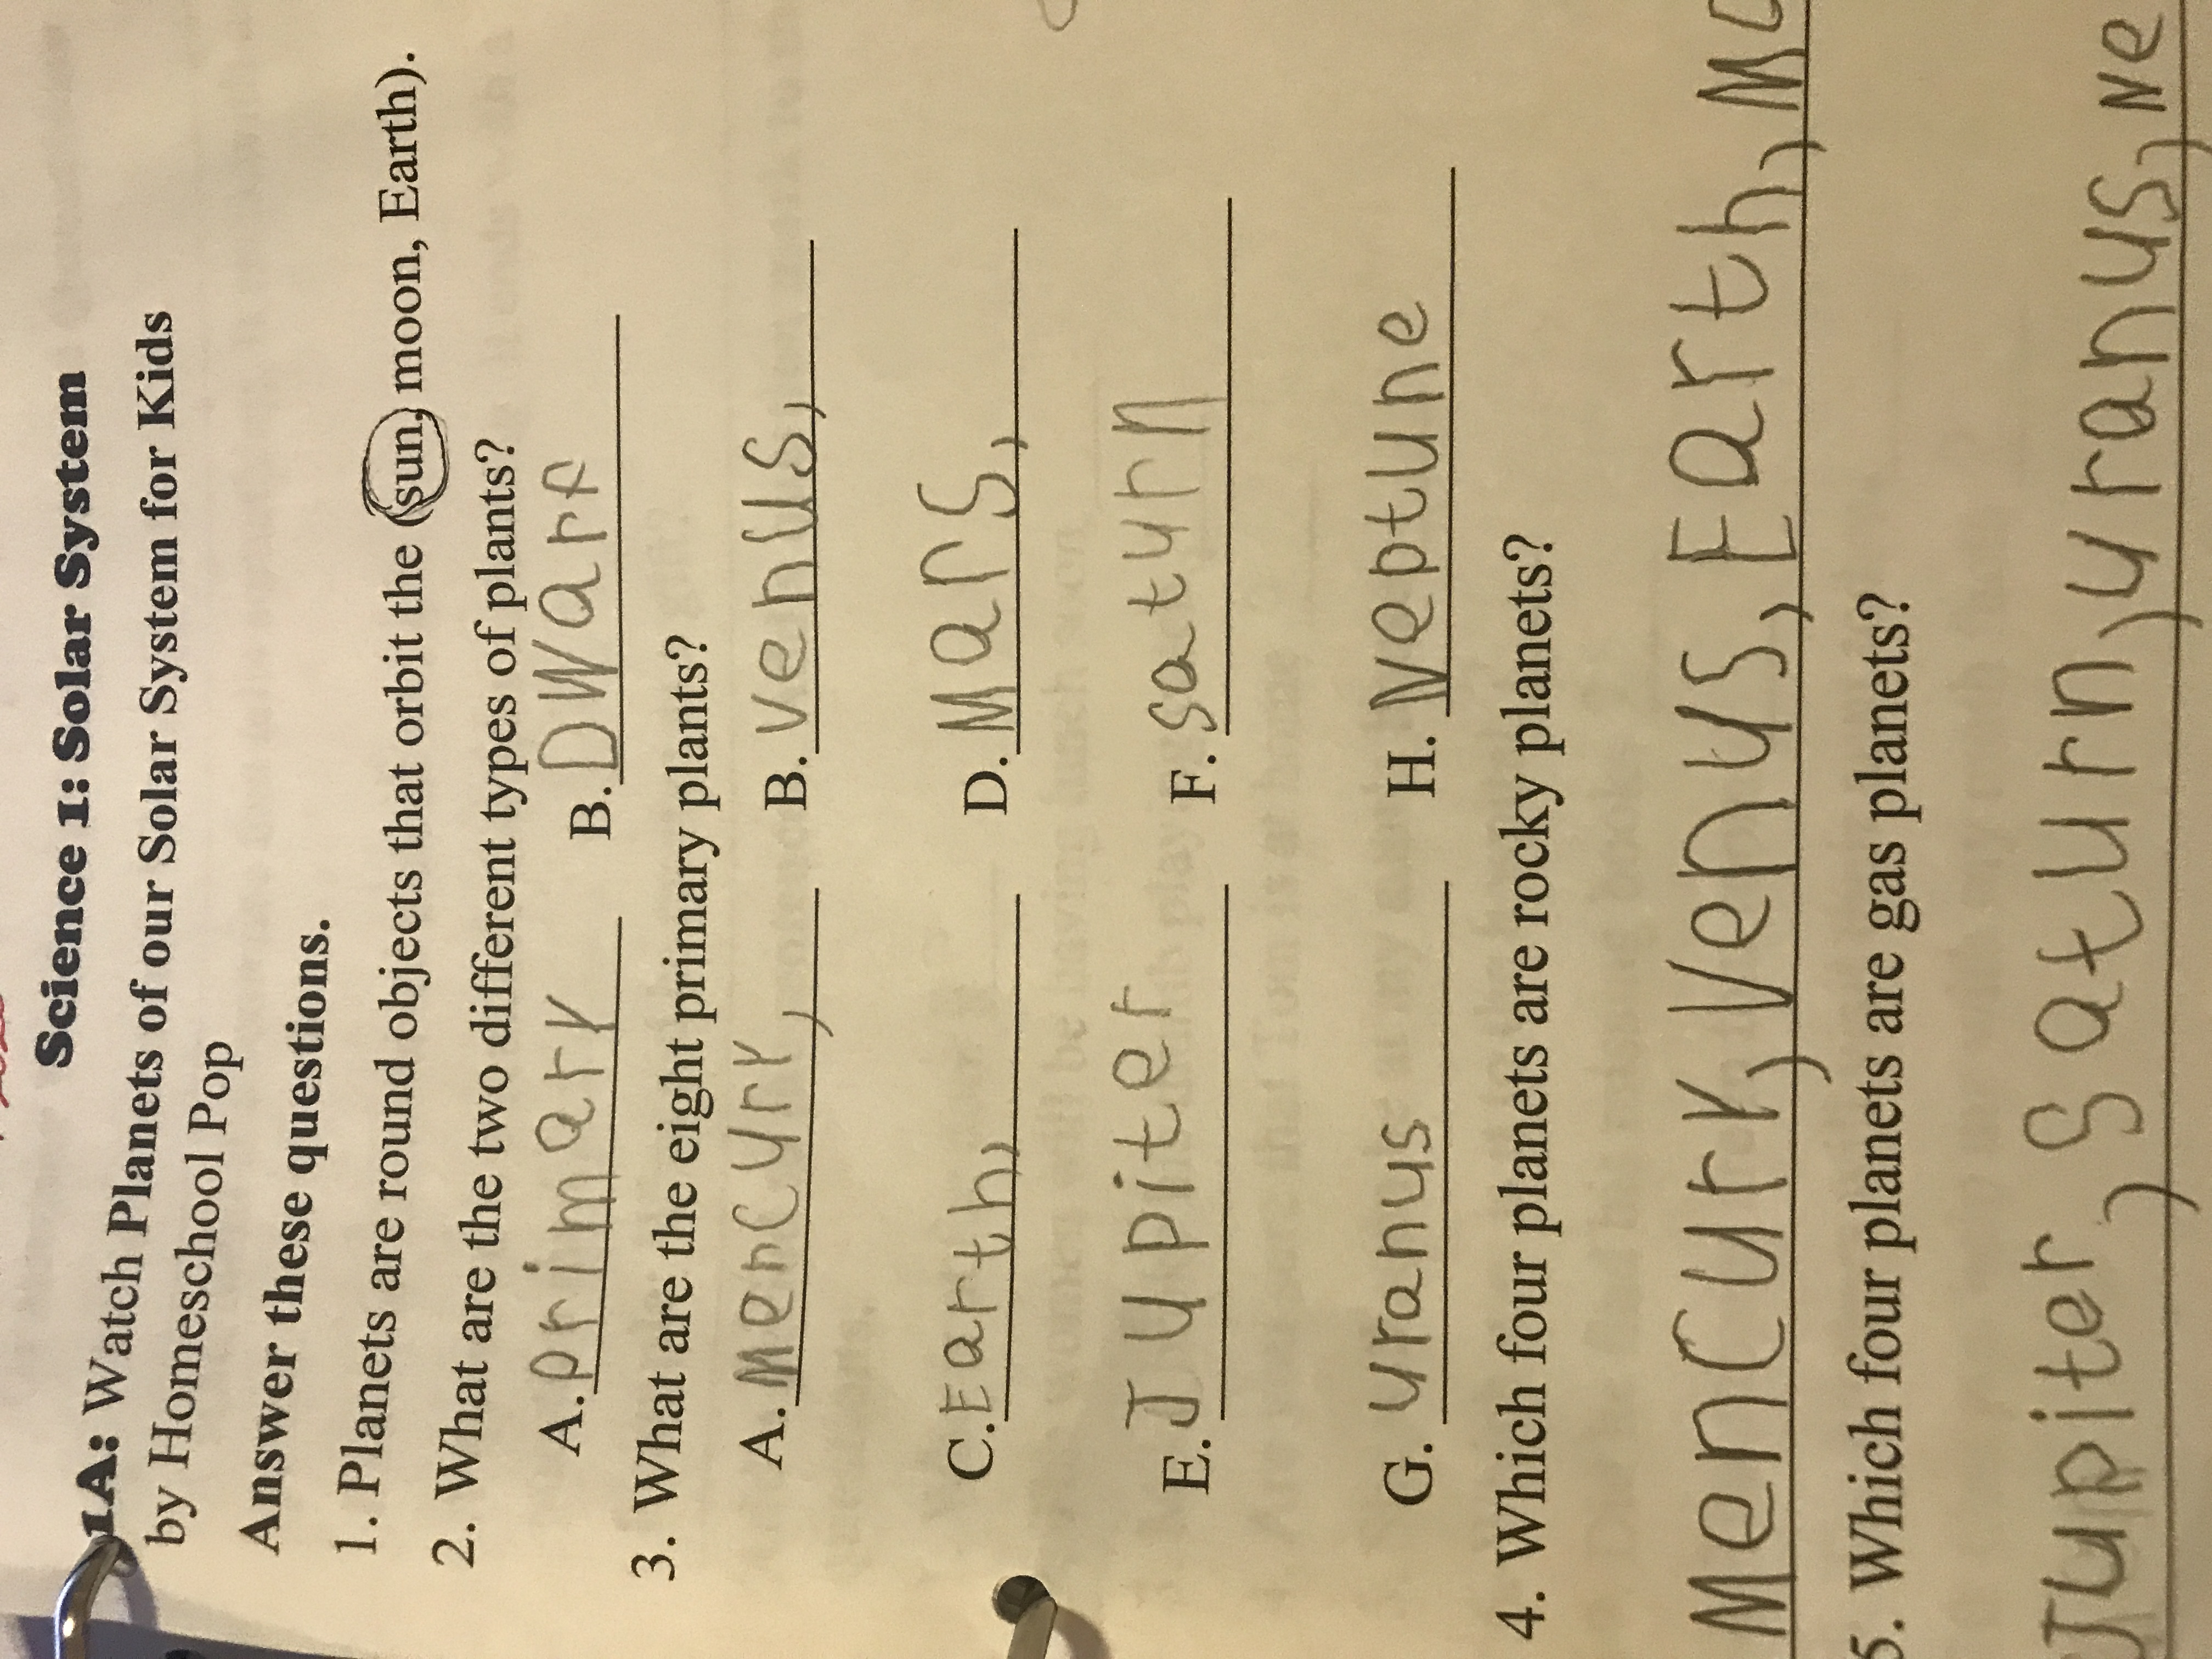
Science is much the same as history: watch a YouTube video and answer questions. The first three months are all about the Solar System, and my son has learned quite a lot about things through the videos that have been assigned. He’s gone over the order of the planets (which require a different mnemonic device than the one I was taught in third grade due to the demotion of Pluto), rocky planets vs gas planets, the approximate sizes of the planets, and a whole week on just the sun. When we finish the Solar System unit, there will be a month of Energy and Light, followed by 4 months to finish out the school year with Animals and Habitats.

Writing is done two days a week instead of five, and it consists of a writing prompt question (Did you enjoy your summer break?) and many lines for the child to write on.

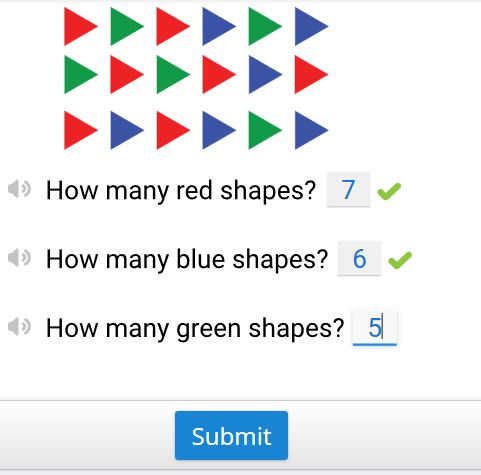
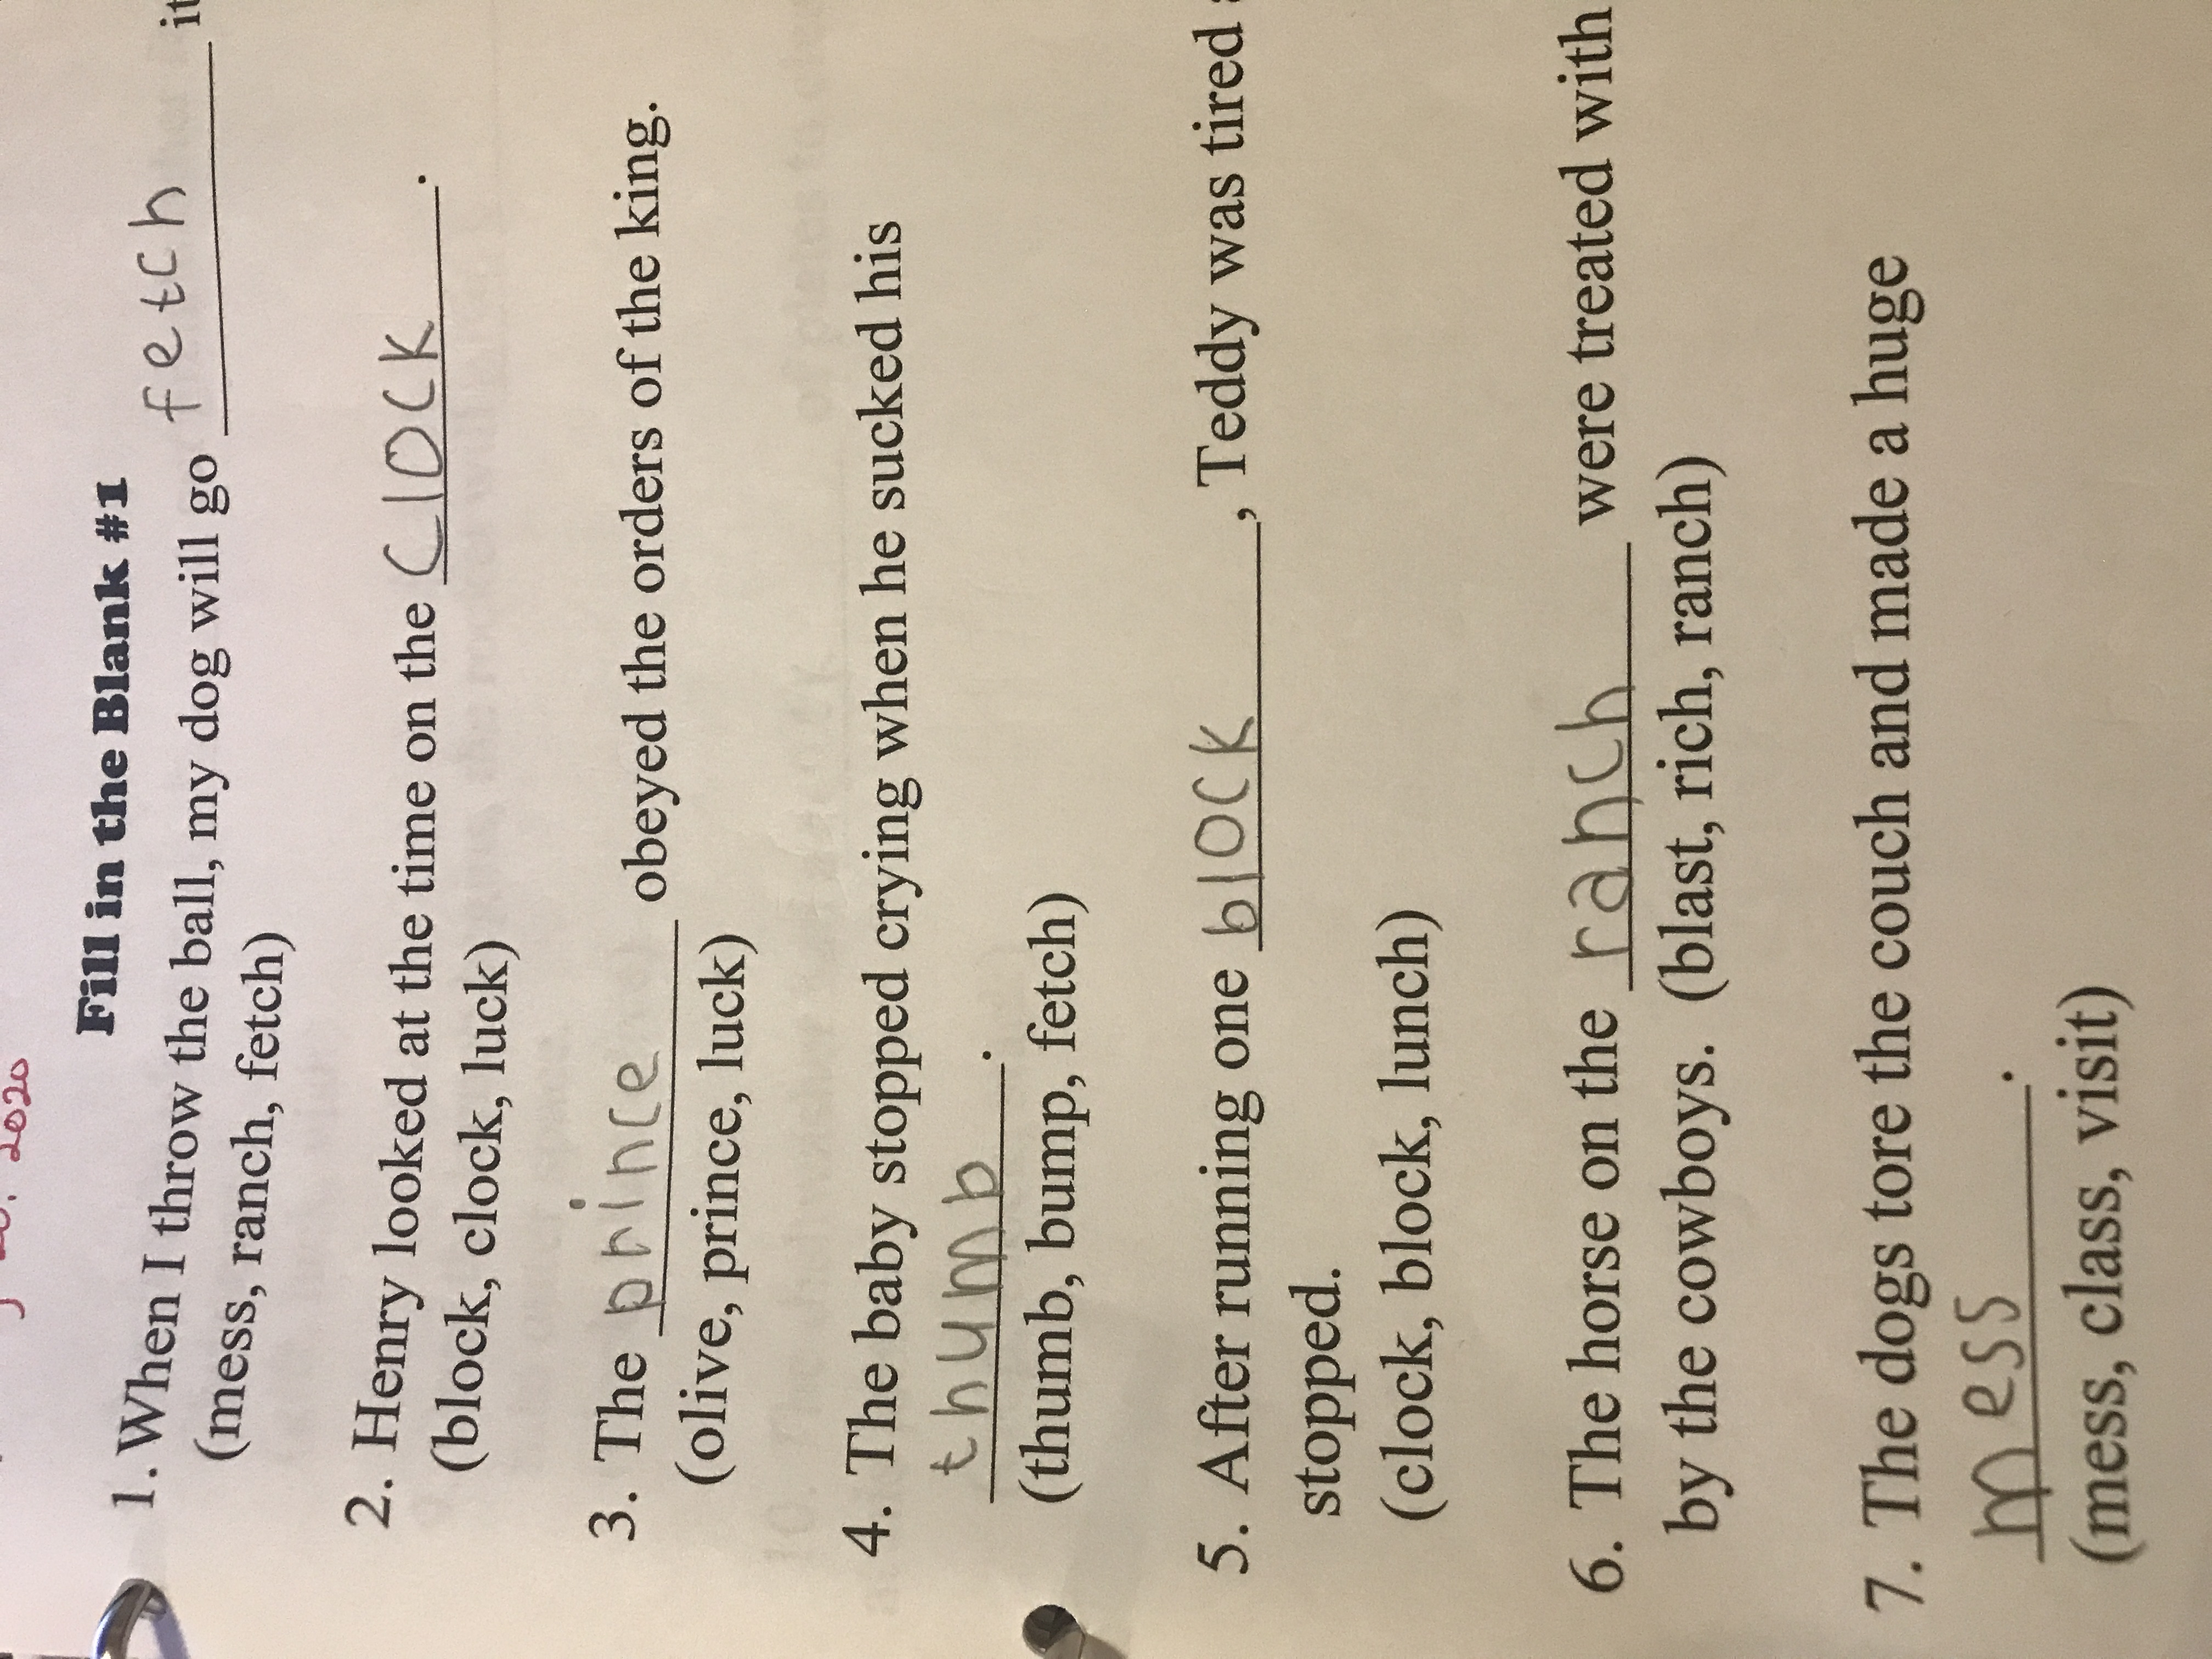
Reading is the most diverse of all the subjects in Homeschool Easy. Each week has a list of sight words, and they are used in various activities all week long. There are flash cards to print out and go over each day as well as the worksheets. Worksheet activities include fill in the blank, crossword, word search, and two days of comprehension.

IMG-5562The two subjects we didn’t do are Book Reading and Math. Book reading assigns two chapter books each month. Each day has the child read 1-2 chapters and answer a few comprehension questions.

Math is pretty basic, and honestly, looked more like second grade stuff than third grade stuff to me (with the exception of the multiplication unit). It would have been very easy for Grasshopper to whiz through most of those lessons without even breathing hard.

Overall, I’ve been pretty happy with the Homeschool Easy curriculum. I love not having to worry about what to teach. That, by far, is the most stressful part about homeschooling for me. It’s not the actual teaching – it’s the planning and the worrying about “is it enough?” With a full curriculum like Homeschool Easy, I don’t have to worry anymore!

Make sure to head over to the Homeschool Review Crew blog to learn more about Homeschool Easy. Check out a few of the other reviews while you’re there – my fellow members have been reviewing all five of the grade levels.

Blessings,

ladybug-signature-3 copy

Curriculum Review: CTCMath

Disclaimer: I received a FREE copy of this product through the HOMESCHOOL REVIEW CREW in exchange for my honest review. I was not required to write a positive review, nor was I compensated in any other way.

What if you could have one math curriculum for all of your children, no matter what age or skill level they were? With a 12-month Family Membership to CTCMath, you can have exactly that! Let’s take a brief walk-through on how it works.

IMG-6072

The first thing you need to do after you sign up is log in to the parent account. From here, you will set up a separate account (with username and password) for each of your children. This is really easy; all it asks for is your child’s first and last name, a username, password, and the score for which you allow your children to move on to the next topic (ours is set for 80%, which is the default). You can even have the program assign you a random username and password if you like. After that, most of the work is done on the student accounts, but of course you can log in to your parent portal at any time to check on your students’ progress. The parent dashboard shows you at a glance which students you have set up under you, their average score for all lessons as well as how many lessons they’ve completed, and the last 30 action items for all of your students (combined, not each). Action items are things like “Ballet Boy logged in,” “Scorpion viewed the counting to 100 lesson,” “Grasshopper scored 82% on the counting to 100 lesson,” etc. You also have the option of receiving a weekly update email which gives you all of this information right to your inbox each Sunday evening.

The student accounts are a bit different. Once you’re logged in as a student, it’s time to choose the lessons. I have 4 kids using the program right now: Ballet Boy (16) is doing Algebra 1; Scorpion (13) is doing Pre-Algebra; Grasshopper (8) is doing 2nd grade; and Dragonfly (4) is doing Kindergarten.

ctc 3You can see from this screenshot that there are many, many lessons. Each lesson belongs to a category, and you move through the categories one at a time. Each category builds on the last one, so it’s recommended to do them in order. This is Dragonfly’s dashboard, and I didn’t start him on the program right away, so he hasn’t completed as many lessons as his brothers.

ctc2Once you choose a grade level and category, the screen changes and you’re shown the list of lessons for that category. Simply click on a title to be taken to that lesson.

Each lesson consists of video instruction and an interactive worksheet of questions. The videos range from about 2-6 minutes long, and include narration from company owner and math teacher Pat Murray (a dad of 10 from Australia). The lessons use a sort of digital white board to show the concepts; Mr. Murray’s face never appears. He speaks the instruction and the images change as necessary to help with the explanation.

ctc 4For example, in this screenshot from the Kindergarten lesson “Counting and Colors,” he goes over the different colors for the children. The lesson then moves on to the “counting” portion, and he explains how sometimes you need to count only parts of a group. How many blue cars are in this picture? for instance. Once the child has finished the video (and feels like they understand the material), then they can move onto the questions portion of the lesson. As I mentioned before, this is mostly just a digital, interactive worksheet. There are questions related to the material just taught, and the child answers them. They’re told right away whether they got the answer right or wrong, and at the end of the lesson are given a score out of 100 (straight percentage system). If they get above the designated “pass” score, they’re given the option to move on to the next lesson. If they don’t, then they need to try again (and possibly go over the video once more too). When all of the lessons for a specific category are complete, students are awarded a certificate with a “medal.” There are four levels of medal: Platinum (if they get 100% on every lesson), Gold, Silver, and Bronze. I don’t remember the exact breakdown for when each medal is awarded, but it’s either at 5% or 10% marks.

ctc 5So what did we think of the program? Everyone but Scorpion has loved it. Ballet Boy has done a lot of hodge-podge curriculum when it comes to Algebra I, but I think (hope) we’ve found one that will finally get him to the end of the subject so he can move on to other math. Grasshopper and Dragonfly like it so well that they’re both doing multiple lessons per day, always hoping to earn a “gold medal.” I have full confidence that they will each get 2 school years done in the 12-months of our subscription. But Scorpion… Math has never been his strong suit; he’s more a literature guy through and through. And his scores in this program prove that. But that doesn’t mean it’s a bad program or that he’s not learning – I absolutely know that he is because his scores are slowly improving. I’m sure that with continued diligence working through the program, he will absolutely learn the material needed to get him through his 8th grade year and be ready to start high school next fall (2021).

I feel like I have barely scratched the surface of what CTCMath has to offer (which by the way, is a full, traditional [non-common-core] math curriculum from Kindergarten through Calculus), so please visit the Homeschool Review Crew blog to read more reviews and get more information.

Blessings,

ladybug-signature-3 copy

High School Literature (Progeny Press review)

Disclaimer: I received a FREE copy of this product through the HOMESCHOOL REVIEW CREW in exchange for my honest review. I was not required to write a positive review, nor was I compensated in any other way.

Every year that I’ve been a part of the Homeschool Review Crew, we’ve been able to review a Progeny Press study guide. Because I’ve done reviews for this company before, I knew what I was getting into and that made it easier to choose titles for a review this year. There were several options available, for kids from early elementary all the way up through high school. I’m not super concerned about my younger set getting good literature in at this time; they listen to loads of audiobooks all the time. When they’re a little older, we’ll dive into studying the books more, but for now, they’re being exposed to lots of different stories, and that’s good enough for me. One thing that was different this year is that reviewers were allowed to choose TWO study guides instead of just one. So for this review, I chose the Animal Farm Study Guide for Ballet Boy and the Little Women Study Guide for Scorpion.

73842750-5B71-426C-B71F-E7AEA889124D

Progeny Press, which is owned by Michael and Rachel Gilleland, creates study guides for popular novels, both classic and modern, from a Christian perspective. Their goal is to help parents teach their children to read with a critical eye… to dig deeper into their reading assignments and find things they might not otherwise notice, especially seeing Biblical aspects in mainstream books.

They sell their study guides as printed workbooks, CDs that are mailed to you, or digital downloads, which are available instantly for up to one year after purchase. The digital versions are editable PDFs, which means you can have your student type their answers right into the file (but they’re also printable if you prefer that).

Animal Farm Study Guide (Ballet Boy, age 16)

PP animal farm cover

In case you’re unfamiliar, Animal Farm is listed as one of Time Magazine’s Top 100 Novels of All Time. Written by George Orwell and first published in August 1945, the allegory tells the story of a group of farm animals who rebel against their human farmer. Their goal is to create a society where all animals can be equal, free, and happy. The idea is contrived by Old Major, a boar, but he dies just three days after bringing the idea to the rest of the animals. This allows the other pigs to take the lead from him, and before long, the pigs have decided that Animal Farm (formerly Manor Farm) is no longer a democracy. Napoleon, the main pig, immediately begins acting like a human, including working out trade deals with other farmers. This was expressly forbidden at the founding of Animal Farm, but he always has some excuse for why he’s justified in doing so. As time goes on, all the pigs become more and more human-like, wearing clothes and walking upright, and generally oppressing the other animals. The original seven principles that Animal Farm was founded on get boiled down to just one: Every animal is equal, but some are more equal than others. Napoleon eventually changes the name of the farm back to Manor Farm, and the “common” animals, as they look in at the party of elites through the farmhouse window, can no longer tell the difference between the pigs and the humans.

413B9715-37EF-4D00-A338-19C0F33BD2E3Ballet Boy has never been a huge reader, so for this review, I had him listen to the audiobook, which we got from Overdrive (the online library app that works in conjunction with your regular library card). He was able to listen to the book while working on other things, which works really well for his learning type – he’s always been an audio learner. When he’d made reasonable progress in the book, I asked him if he’d rather work on the study guide digitally or if he wanted me to print him a copy. He asked for a printed copy, so I printed the pages for a few chapters at a time, front and back. He worked entirely independently, with just a few questions here and there for me.

When I asked him about his experience with this study guide, he expressed to me that he enjoyed the book and didn’t mind the study guide. I think it was a bit better than that simple assessment, though. One of the times we had a bit of a conversation, he told me that he’d done some independent research (without being “asked to” by the study guide) about the history of Russia and the major players at the time the novella was written. Having him take that kind of initiative is really good, and a very big step in creating lifelong learners, not just students. And that, after all, is the point of school – and a major goal of most homeschoolers.

Little Women Study Guide (Scorpion, age 13)

PP little women cover

Scorpion was always a big reader when he was a little kid, but he’s found other interests lately. So for this review, I had him do a combination of audio book and Kindle book reading. Because Little Women is such a long novel, I had him do a few chapters of reading, then a section of the study guide. Progeny Press officially recommends that students read the entire book and then do the study guide, but with something as long as Little Women, that had the potential to be counterproductive. It wouldn’t be very helpful to be trying to work through parts of the study guide from the beginning of the book if you’d read a mammoth novel and couldn’t remember the details from the beginning by the time it was time to study.

PP little women worksheetI gave Scorpion the same option for working through the study guide – on the computer or a printout – and he chose to work on the computer. Like his older brother, he also worked on his own with only a few questions for me here and there. The study guide includes lots of vocabulary lessons, comprehension questions, and deeper thinking exercises – everything I expect and love about Progeny Press. Scorpion has traditionally really enjoyed these study guides, too, but he didn’t love this one as much as those that he’s used in the past. I think that because he’s a boy, he wasn’t that into the story of Little Women. I will probably have him do the Animal Farm study guide later this summer, and I expect to have a better attitude with that one.

Make sure to visit the Homeschool Review Crew blog for more Progeny Press reviews. This year, options were A New Coat for Anna (grades K-3); In the Year of the Boar and Jackie Robinson (grades 4-6); My Side of the Mountain (grades 5-8); and of course, Animal Farm (grades 9-12) and Little Women (grades 8-12).

Blessings,

ladybug-signature-3 copy

Maximizing Reading Potential (MaxScholar review)

Disclaimer: I received a FREE copy of this product through the HOMESCHOOL REVIEW CREW. I was not required to write a positive review, nor was I compensated in any other way.

For the past few weeks, Grasshopper has been using MaxScholar Orton-Gillingham Software from MaxScholar. I’ve written before about his reluctance to learn to read, and while he’s doing a lot better than he was before, I feel like he could still use loads of instruction and practice, so we signed up for this review.

When you first sign up for MaxScholar, there is a placement test you can have students take. If you’re confident in where your student needs to start learning, you can override that, though, and adjust their account (parent/teacher account and student accounts are separate, each with their own login information). Then when the student logs in, they can start the program straightaway. I had Grasshopper work through the placement test, even though it took a few sessions – it was really long!

Once the placement test is complete, it’s time to learn! Based on Grasshopper’s test results, he was given three options to pick from each time he logs in: Max Phonics, Max Reading, and Max Words.

maxscholar 1We have spent the most time in Max Phonics, just to cement the things he’s already learned. Each letter group in Max Phonics is taught and reinforced several ways, so that it’s a good fit no matter what kind of learner your child is (auditory, visual, or kinesthetic). There are different activities depending on what portion of the lesson your child is in. In auditory, they listen to the sounds and then have to choose the right “speaker” for the sounds they’re learning. In visual, they look at a grid full of different letters and choose the right ones for the lesson. Also in visual, there’s a game in which the student is shown a variety of pictures and they have to choose the ones that start with the letter/sound/blend they’re working on in that lesson. In the kinesthetic portion, children trace the letters using either the mouse (if on a computer) or their finger (if on a touch screen device). Once your student knows what they’re doing, these lessons can be done independently. After each sound or blend, there’s a little quiz that the student does to demonstrate mastery before being allowed to move on.

After they’ve gone through many different lessons (I had Grasshopper do 2-4 per day, 3-5 days a week), they hit a new type of lesson, and in this lesson they’re given a story to read. The program reads it aloud to the student, and then the student is instructed to read it themselves. I sat with Grasshopper during these lessons so he could read aloud to me.

maxscholar 2These “special” lessons also include some sight words, blending, and fluency sections. Because they were a bit more intense, when these lessons popped up, it was the only one we did in a day.

We didn’t spend a whole lot of time in the Max Reading section; after trying that first, it was quickly apparent that even the first story was a little beyond what Grasshopper was ready for. It was for that reason that I bumped him back to Max Phonics. You can see the different things covered (as well as a snippet of the story) in this screenshot:

maxscholar 3

Max Words is another section we used a little, but not much. In the lesson we did, Grasshopper learned about different types of syllables. This was done near the beginning of our time with MaxScholar, so I don’t remember enough to speak intelligently about it, unfortunately.


maxscholar 5In addition to the student account, I also received a teacher account so that I could monitor progress. I didn’t use it a whole lot, because I was always nearby when my son worked on his lessons. I looked a bit at the progress report, but it didn’t mean much to me as far as deciphering the information there. I found it easier to just keep an ear out during the actual lessons to monitor his progression myself, and to be on hand in case he needed help. I can see how the teacher dashboard would be really useful in a public or private school setting where the teacher is not the same as the parent, though.

I also received an account for Dragonfly (4 1/2), but after seeing Grasshopper go through it in the beginning, I opted not to use it with him. I decided it would be better to just continue with our other reading program instead, since he’s so young. What I was seeing with Grasshopper wouldn’t have been a good fit for Dragonfly.

Overall, we’ve been pretty happy with our experience using MaxScholar. Grasshopper likes using the computer/iPad, so he was always willing to work on lessons. I’m happy that he’s getting a firm foundation in regards to reading. It’s a win/win, and we will definitely continue using the program until our subscription expires in six months (yes, even through the summer this year).

Other members of the Homeschool Review Crew are talking about their experiences with MaxScholar this week. Make sure to click through to learn more!

Blessings,

ladybug-signature-3 copy

History of the US Life Saving Service (review)

Disclaimer: I received a FREE copy of this product through the HOMESCHOOL REVIEW CREW in exchange for my honest review. I was not required to write a positive review, nor was I compensated in any other way.

Today’s review is a guest post from Ballet Boy (my 16-year-old son), so I’m going to let him take it away.

2011CB65-E845-4467-85A1-2EED388A0CC7

The last few weeks, my friends and I have been talking over the idea of getting a boat and going on a grand adventure to the ends of the Earth. About a week after we started joking about this, the opportunity came up to review Exploring the U.S. Life-Saving Service 1878-1915: 17 Student Workshops with 120 Activities by Rebecca Locklear. Me being the boat lover that I am, I thought it sounded intriguing to say the least.

USLSS coverExploring the U.S. Life-Saving Service is a 117-page ebook and has a variety of different sections/topics (called workshops in the book) which cover different aspects of what the Life Saving Service did. The workshops are categorized by the amount of critical thinking required to succeed in the section. The ones that require more problem-solving are geared for higher age groups, but there are tasks for everybody (grades 4-12). Topics include things like

  • Hunting, fishing, and eating
  • Beach patrol
  • Rescues with boats
  • And even solving scenarios for yourself

IMG_20200616_232848_639My favorite of the topics given is Rescue Scenarios: Live or Die. The concept behind this assignment is you are given a card (which is a printable within the book) and on it is a limited amount of information about a given situation (the amount you would likely have if you were a real USLSS agent in that situation). You might be given the position of the boat to the shore, the weather conditions, whether your boat is on fire or not, or how many crewman you have. Your objective as the student is to use the information you’re given to solve the situation as best you can and try to save the lives of as many crewmen as possible using random items (around the house) to set up a sort of game board and reenact it and see if your boat would roll, how the waves would effect, how difficult it is to get to the boat in the first place, etc. And then, once you have developed a strategy that you’re comfortable with (through trial and error) you present to your teacher/parent and he/she will decide if your solution is acceptable, and then give you the historical situation and if you got the “answer” right.

Sounds like a piece of cake, right? I can tell you from personal experience that it is not as easy as it seems. My first inclination was “Well, if I was in a situation with a flaming ship, I’d want to use divers and cables and hoses.” But in the 1880s, where a lot of these situations came from, those technologies were not yet at their disposal. So solving with today’s technology may not be so hard (but it still is). But with their technology, it becomes near impossible, and for anyone with an analytical mind, this sort of problem solving simulation is fascinating – especially if you love boats too.

3862A415-7BDC-4F76-8C87-CB1E06F717A6For the lesson I chose in this section, I found one where the scenario was what to do when your boat is on fire. To simulate this, I made a few origami boats and then filled our kitchen sink with water. Once the boats were in the water, I lit them on fire. I figured, and Mom agreed, that I was old enough to use real fire instead of orange crayon. Doing this experiment really gave me a respect for the captains of the boats back then. It was more stressful than I thought it would be dealing with the fire.

IMG_20200616_232814_768Besides all the activities, there is also a lot of reading about the true history behind the shipwrecks (and other catastrophes) that are on the cards. Many of them take place in the Atlantic Ocean near Cape Cod, which I believe is where the USLSS was based. The reading can be done easily by an older student on their own, or in a group setting as a read-aloud. It is broken into sections by the different jobs of people on the ship. In a group setting, it would be easy to assign students to read aloud, and no one student would have to read a lot aloud. Each section is just one or two paragraphs. The reading is really interesting, especially considering my love of boats. But as much as I love boats, I would not want one of their boats! They are so primitive looking based on the photos in the book to look unsafe – definitely not the kind of thing I would want to sail right into a flaming shipwreck with.

My opinion of Exploring the U.S. Life-Saving Service 1878-1915: 17 Student Workshops with 120 Activities is that it is absolutely amazing. I would definitely recommend this to any study group that has even an inkling of interest in boats or the ocean. It’s generally enjoyable to read and every piece of information is refreshing and it’s topic that you see many books on. Who would have thought there was something before the coast guard?! I would also encourage you to check out Ms. Locklear’s email newsletter (click the link and the signup box is in the right hand sidebar). She sends out seasonal messages with blog posts and book news.

I am so excited to own this book and continue reading and learning from it. I will definitely be doing more of the activities in the future.

Make sure to check out more reviews from our fellow Homeschool Review Crew members over the next couple of days too!

Blessings,

Ballet Boy

Critical Comparisons

Disclaimer: I received a FREE copy of this product through the HOMESCHOOL REVIEW CREW in exchange for my honest review. I was not required to write a positive review, nor was I compensated in any other way.

The Critical Thinking Co.™ is one of my favorite companies for supplemental homeschool curriculum. They offer such fun books that teach kids to think in ways that they might not normally. Over the years, we’ve had the pleasure of reviewing a few of their books with the older kids, and this year, Grasshopper had the opportunity to give their stuff a try with Dare to Compare Math: Beginning.

AF7BD1A2-DB68-4CAA-8C37-8D9076620732Dare to Compare Math: Beginning is a consumable workbook, available in physical or digital formats ($12.99 each). The physical book, which I received, is for a single student’s use; the digital copy can be used for multiple students in the same household. It is designed for kids in second or third grade. Since Grasshopper is finishing up his second grade year, it was perfect for him. The softcover book has 92 pages and is the first in the Dare to Compare Math series (there is also “Level 1” and “Level 2”). It has 150 problems all together; after the problems are sections for hints, answers, and samples of other math books from The Critical Thinking Co.™.

19B973B1-B581-4D7C-AAF8-48388519E0DDEach page (for the first 50 pages) has three problems on it, and Grasshopper and I dived right in at the beginning. And I immediately had reservations. He struggled with understanding what was going on with these problems. But we continued on, and before long he was off and running. By the time he got to problems 125-26, he was saying how “fun and easy” they were.

There are a wide variety of types of problems in the book, but they are all based around the idea of comparisons. For many of the problems, the information given seems unusual, but when you stop and think it through, they’re not difficult to solve. (Of course, that’s coming from me, and I’m a little above the suggested grade level!) For example, you can see the word problem in the middle of the photographed page. It gives you the number of teachers and students for a given field trip, and your job (well, your student’s job) is to separate the information out and determine which school sent more teachers on the field trip. When I had Grasshopper write down how many students (S) and teachers (T) were on the trip from each school, it was easy to see and compare to find the right answer.

Some of the problems are more traditional math problems (Fill in the blank: ___+23=54). Some have multiple parts all using the same basic set of information. Some use charts or graphs for students to read and decipher. Some are supplemented with illustrations, which may or may not be necessary to study in order to solve the problem. And so on.

Overall, once we got over that initial “Oh no, what I have I gotten us into with this review” moment, Grasshopper and I have had a good time working through this book together.

The Critical Thinking Co.™ has a lot of options for students from PreK all the way through high school and beyond. As their name implies, they put a focus on teaching kids how to think rather than how to simply solve problems. I really appreciate this, which is why they’ve been one of my favorite companies over the years. This week, members of the Homeschool Review Crew are talking about a wide variety of their books (though not nearly all of them!), in a wide age range of student levels. I invite you to click through to learn more about this great company!

And if you’re interested in reading my past reviews, you can find those links below.

Blessings,

ladybug-signature-3 copy


My past reviews of The Critical Thinking Co.:

Sentence Diagramming: Beginning

Pattern Explorer

Understanding Pre-Algebra

Spelling and Math Practice to supplement any curriculum

Disclaimer: I received a FREE copy of this product through the HOMESCHOOL REVIEW CREW in exchange for my honest review. I was not required to write a positive review, nor was I compensated in any other way.

There are lots of curriculum supplements out there, especially for things like math facts and spelling words, and they have varying degrees of “fun.” For the past few weeks, Grasshopper has been working with Math Shed and Spelling Shed, and having a good time with both. Today, I’m going to talk briefly about both programs and what we thought of them.

655EC904-502F-4B5F-9373-46B07BBCA026

The first thing to know about these programs is that they work in sync. What I mean by this is that it’s the same website for both; when you log in to one, you’re logged in to the other as well. When I got the information to sign us up, I logged into the teacher portal and signed my son up for the program. (Initially, I signed up Dragonfly, too, but it turned out to be way too advanced for him.) I was given the option to sign him up using his real name or a nickname, and then they emailed me a username and password for his account. From then on, we just signed into his account.

Math Shed

39923E4E-D07B-44F4-A437-B9C740078A6FMath Shed has five options on the main screen to choose from, and it’s presented in a fun, space theme. In each The choices are: Number Bonds (these were called “fact families” when I was a kid); Times Tables; Powers of 10; Add & Subtract; and More…

Each selection is represented by a planet, and to work in the program, you simply choose the one you want your child to practice. In each category, a random smattering of problems are displayed, and the child has to answer them. In all the games, it’s “answer as many as you can in one minute.” For each correct answer, children are awarded a “honeypot,” which is the currency of the game. They can use those honeypots to “buy” upgrades for their avatar. Grasshopper loved earning the honeypots and changing his character out often!

C357FCA7-85E8-4F53-99EA-C10AD634F7A7We spent most of our time in the Addition and Subtraction section. (When he has learned his times tables and just needs more practice, we will switch to that section.) After you choose which area you want your child to practice, there’s a pop up that has you choose which area of addition or subtraction you want them to practice. As you can see from the screenshot to the right, the options are “10s,” “20s,” “100s,” “2 digits,” “3 digits,” or “4 digits.” Next to each category, you can see a +, a -, and a +/- button. This allows you to choose what types of problems show up – all adding, all subtracting, or a mix. Once you make that selection, the pop up changes, and you see options for “easy,” “medium,” or “hard.” When you choose “easy,” the child is given three choices for each problem. On “medium,” there are six choices, and on “hard,” there’s a calculator-type image in which the child must type the answer.

Spelling Shed

Spelling Shed is a beehive theme, and when you first log in there are options for “Stage 1 & 2,” “Stage 3,” “Stage 4 & 5,” and “More Lists.” Because Grasshopper is a bit slow in reading and words, we kept to Stage 1 & 2, which was plenty difficult for him.

2BE82082-1D50-4B82-B49B-BF7511211F32When you select a stage, there’s a pop up very similar to the one you get in Math Shed. In Spelling Shed, the options are “Play,” “Create Hive,” and “Bonus Games.” When you choose the option you want, there are then four choices of difficulty: easy, medium, hard, and extreme. We stuck with easy for my son. The “Create Hive” option isn’t one that we found very useful. I think it would pretty cool if you had friends who were also using the program, because it’s a way to make a kind of study group in which kids can play the game together and challenge one another.

71427A8E-E70D-48A9-B427-96CC4762A8ABIn the game (the “play” option), students are given a word, which can be seen on the screen and is also read aloud by a narrator (a woman with a very pleasant voice) in the program. They can study the word, and then click “go,” at which point they must spell the word using the letters given. It’s a lot like a word scramble, to be honest. Points are awarded based on the speed with which the word is spelled correctly, and later words are worth more points than earlier ones (though they’re not necessarily harder). At the end of the round, which is ten words, students are awarded one honeypot for each correctly spelled word. When you choose an alternate difficulty, there are more letters to choose from; at the “Extreme” level, words are simply spoken (not shown on the screen) and students type them out on a qwerty keyboard.

There are two Bonus Games in Spelling Shed. Bee Keeper is essentially Hangman, and Missing Word is “choose the correct spelling.” We didn’t spend too much time in those because on the few occasions that we did, Grasshopper got frustrated at his lack of success.

Final Thoughts

Math Shed and Spelling Shed are pretty good programs for supplementing what your child is learning. They wouldn’t be good for teaching, but they’re not designed for that. If you have a child who is super into technology (rather than books or worksheets), this would be a really good program. It gives you the “flashcard” method in a really fun way.

Other members of the Homeschool Review Crew are discussing their experiences with Math Shed and Spelling Shed this week, so make sure to click through and read about their experiences too.

Blessings,

ladybug-signature-3 copy

Pursuing Art

Disclaimer: I received a FREE copy of this product through the HOMESCHOOL REVIEW CREW in exchange for my honest review. I was not required to write a positive review, nor was I compensated in any other way.

I live in a family of artists, literally. My husband does graphic art and comics for a living, and our older boys are following closely in his footsteps by doing illustrations for some new stories we’re working on. The younger set also want to begin learning all about art, so this review from Artistic Pursuits Inc. was well received. Because I’m not much of a “traditional” artist (I knit and crochet, of course, but that’s not so helpful in something like this), I delegated the teaching of Art for Children, Building a Visual Vocabulary to Ballet Boy (16). He and Grasshopper (7) spent several days working on art class together.

F7DAEFF2-71F3-4C6E-9933-B8D353A45F9E

Art for Children, Building a Visual Vocabulary is part of an 8-book set, and each book has 18 lessons. The entire course is designed to take four years, giving your student a complete elementary-level art history education. Each book comes with a DVD and a Blu-Ray with video lessons to go along with the text lessons of the book. We don’t have a player for either of those, so my kids used the book alone and didn’t have any trouble with it (but again – artists).

6DF68DCF-2B33-48B5-9F66-AF30B1C3EDC1The book has a focus of building an understanding of the elements of art, rather than just looking at pictures. Students are given lessons in landscapes, still life, animals, figures, and portraits. Rather than going through in order, we ended up selecting lessons based on the supplies we had on hand. (Yes, they’re artists, but we work mostly with pencil and/or pen and ink in our family.) This meant that the kids dove in to the still life lessons.

From Ballet Boy:

2009465F-4A4C-4D5A-837F-6DB4154FB0E7To start off the still life lesson, they provide examples of images that capture the essence of what still life is supposed to do, which is to capture your imagination and fascinate you with everyday items. It casts normal household things in a new light that draws you in, holding your interest. For example, they show a van Gogh painting of a table covered with various sized, colored, and shaped dishes. They explain to you something that you don’t even notice that you’re noticing. That is the focal point, the thing the artist wants you to see. In this case, he wanted you to notice a chipped dish, and so all of the dishes on the table are arranged in such a way as to draw you into the painting. All of them are angled the exact way to catch the light just right to make it so that you focus on exactly what he wants you to, like a magician. The art of still life is not, therefore, in drawing what you see, but it is in capturing the attention of the viewer and making them see it through your eyes and feel it the exact way you want them to.

12121422-6B69-4DEB-8E5A-5E4812297032The way I taught this to my little brother was, as I was going over the information, he was really confused. I had to make him learn to take what he was looking at tell his own story through the items. I had to demonstrate to him how to make the art “make itself” – how he could feel something when he was drawing and let the drawing show him where he should draw the next line. You can never fully understand still life until you know how to put feeling into your lines. To do this, I had him draw a triangle. Then I made him draw another one. Then I had him throw in a square for good measure. As he saw what was happening, I could see his eyes light up. What was happening was a mosaic of shapes, all with that feeling in them – the feeling of confidence in what you were doing. Knowing where the next line needed to be. He filled a page, every square inch, with shapes and shadings. Then I made him look at what he’d drawn very carefully, for at least five minutes. When he was able to see the outline of a horse hidden away in those lines, I drew a line right down the middle of his page and on one side (his choice) I drew a tiny circle and colored it yellow. I said, “Everything on the yellow side is in the light. The other side is in the dark. Color it black.” He did, and he ended up with a very stylized, elegant horse drawn in a cubist style.

Since then, he’s been doing cubist drawings of everything, so I figured we’d take a stab at putting that feeling into another style of art. He and I worked together to create this still life of a NERF gun. He truly has begun pursuing the artist in himself!

C928175C-2CFE-4561-9626-9551DE0C8311

Other members of the Homeschool Review Crew have been working with a variety of books from Artistic Pursuits Inc. and reviewing them this week. Click through to learn more!

Learning Math, one page per day

Disclaimer: I received a FREE copy of this product through the HOMESCHOOL REVIEW CREW in exchange for my honest review. I was not required to write a positive review, nor was I compensated in any other way.

DCF33324-6AE0-445E-8BB2-9704B0B2A9CD

Basic math skills are so important for kids. Starting strong when they are young really makes a difference, especially if they’re excited to start learning. That’s why I was super interested in the idea of the PreK Math Starter Kit from Page a Day Math for Dragonfly (4 years old). We had (and are having) such great success with him reading that I wanted to take advantage of his eagerness to start learning more, and this kit was the perfect thing. Page a Day Math was so generous to us reviewers, however, and didn’t limit us to just one product for one child. In addition to the PreK Math Starter Kit (physical books), I was able to get downloadable copies of their other Math Starter Kits for Grasshopper (7 years old), and some of the handwriting books for him as well.

What is Page a Day Math?

Well, just like it sounds, these books are designed to help your kids with their math facts – with just one worksheet per day. Dragonfly, as mentioned before, has been using the PreK kit, and Grasshopper has been using the Multiplication Starter Kit (he’s pretty strong with his addition and subtraction facts already) and I Can Write in Cursive! My first cursive writing book.

How We Used It

B05E8DDE-CC2E-4A30-ADE7-509CA57F9AB1Page a Day Math Kits are designed to be a math fact supplementation system. It works with any math curriculum you’re already using, because its goal is simply to drill the math facts into kids so they internalize them over the long run. We received a physical set of the PreK kit and digital versions of the others. The first thing I did was to go over their website and look for the kits I wanted. Once they were purchased, I downloaded them to my computer (zip files) and then was able to extract them and print out the books I needed. I printed the pages on both sides so that it would feel more like a book, and then put the sheets into a folder for Grasshopper. Of course, none of this was necessary for the physical books that came in the mail.

Each day, I would have my kids do one page of math. It’s mostly tracing numbers and solving problems. In the PreK level (for ages 3-5), you start the day by teaching your child one math fact (0+1=1, for example). Go over it with them a couple of times, then they start tracing the numbers. You can see an example of what I mean in the photograph at the top of this post. There are three sets of numbers to trace (on the first day, it’s 0, 1, and 2; on the second day, 1, 2, and 3; third day, 2, 3, and 4; and so on). Then they trace math facts. As you continue through the books, more math facts are introduced. It’s very slow and methodical, so it’s never overwhelming for the child. At such a young age, it’s important to keep things very simple, and Page a Day Math does a great job with that – just one new problem each day. And then lots and lots of tracing. I love that there’s so much tracing involved here because it really helps kids to learn what each number looks like and how to write it. Such vital skills!

DFC761C1-E642-4409-A5BD-C08061167615The PreK Starter Kit consists of 10 books, and each one has 2 weeks (14 lessons) of instruction. It starts very simply, as I described above. As more problems are introduced, they are added into the “review” section of each lesson (the back side of the page), but the front side is primarily dedicated to the new addition fact. By the end of the tenth book, students are adding up to 10+10=20.

The Multiplication Starter Kit is very basic as well, starting at the very beginning of the concept (0 x 1 = 0). It mixes in addition and subtraction, too, so there’s no loss of skill while learning a new one. It is mostly tracing, just like the PreK kit, but the main difference is that students are expected to write in the answer themselves. (In the PreK kit, it’s traced all the way through.) The Multiplication Kit has 12 books with 14 lessons each, and by the end of the kit students are doing all standard times tables through the 12s.

The handwriting books are basically the same as the math books, but with letters instead of numbers. Grasshopper is pretty good at writing in print at this point, so he was excited to begin learning cursive. I started him with the basic book, which teaches the uppercase and lowercase cursive alphabet, one letter (two sides of the page) per day. While he’s enjoying this, I think he’ll be even more excited to work on it when two things happen: first, when he gets his cast off (next week!); and second, when the letters start connecting into words.

What We Think of it

Each day when I ask Dragonfly if he wants to do his “number tracing,” I get a very enthusiastic “Yes!!” He calls the main dog mascot, Mo, his “best friend.” It’s really cute. We keep a pencil in the box with all of the workbooks so it’s always ready to go. He insists that his pencil must be “needle sharp,” so sometimes we have to sharpen it for him before he begins, but it’s always in the box so we can find it. I have never once had even an iota of hesitation from him over it. And he is learning. I love watching him make the connection between just counting and reading/recognizing numbers. He gets excited when he realizes what he’s seeing, and it’s magical to watch. I know it sounds like he’s my first kid when I gush like this, but the fact is that it doesn’t matter that he’s the fourth – watching your child learn (every child), is the most gratifying thing in the world.

Grasshopper, on the other hand, is much like his oldest brother. He likes to learn, but he doesn’t like formal lessons. That said, he liked tracing the letters in the cursive lessons. I am convinced that if it wasn’t for his broken arm, he’d be more engaged in the lessons. Even though the cast is on his non-dominant arm, he still has to hold it at an awkward angle in order to hold the page in place.

Page a Day Math is a fantastic product, and I’m so glad we’ve had the opportunity to review it. It will definitely keep a prominent place in our lessons through the summer. Both boys will be using these workbooks for many, many more weeks.

Blessings,

ladybug-signature-3 copy


Over 50 members of the Homeschool Review Crew are reviewing Page a Day Math this week. Make sure to click through to read their thoughts, too.

Fermenting Food (Fermentools review)

Disclaimer: I received a FREE copy of this product through the HOMESCHOOL REVIEW CREW in exchange for my honest review. I was not required to write a positive review, nor was I compensated in any other way.

C05F4AA1-565F-4435-B543-83F1633DBEF3

I don’t have much experience with fermented foods, but I’ve read that they’re very good for you (due to all the probiotics produced during the fermentation process). So I was curious about the idea of using the Starter Kit from Fermentools to give fermenting a try.

The Fermentools Starter Kit was designed to be able to turn any wide-mouth Mason jar into a fermenting vessel. You provide the jar, food, and  distilled water; Fermentools provides the rest. The kit includes:

  • a glass weight specifically designed to fit inside a wide-mouthed jar
  • a stainless steel lid
  • an airlock
  • two rubber stoppers (one with a hole and one solid)
  • a rubber canning stopper
  • a 1-lb bag of Himalayan powdered salt
  • an instruction guide, which includes a recipe for basic saurkraut

4A57384D-776A-45FF-AC6B-E2524C434AE9When I first opened my kit and read the instruction guide, I didn’t fully understand all the terminology used (“airlock,” for instance), so I found a couple of helpful videos on YouTube to get me started. Then it was time to go to the store, where I bought some wide-mouth jars (I don’t can as much as I wish I did, so I only had a single regular-mouth jar on hand) and asparagus. I’d read that asparagus ferments really well, and I was able to get a fantastic deal on it at the store. I got home and started it right away. From what I’d read, you don’t need to add other stuff to the ferment if you don’t want to, so I opted to try just a very, very basic recipe. I prepared a 2% brine solution using the salt provided with the Fermentools kit and distilled water, poured it over my asparagus, added the glass weight to the top of the jar (this is to keep the food below the level of the brine for proper fermenting), lidded my jar, and waited.

BEB1F8DF-78C7-4355-A707-C6BC07F46EECTo prepare the brine, all you need is non-chlorinated water (so no tap water) and the salt included in the kit. The salt is super finely ground so that it will dissolve in cold water. On the bag of salt, there’s a table to help you figure out the proper solution you need/want. On one side of the bag, it tells the number of grams you need based on the amount of water you’re using. On the other side, it gives an approximation gram-to-tablespoon ratio, so it’s more user-friendly for an average home cook.

Fast forward one week, and I took my jar out of the cabinet where I’d stashed it. (You’re supposed to keep the fermenting jar somewhere dark.) I was surprised to see that things were a bit bigger than they’d started. In fact, there was a bit of liquid coming up out of the airlock, which surprised me. It probably shouldn’t have, because upon rereading the instruction pamphlet, it says to leave extra space for this in your jar. But that was okay. It didn’t leave a mess in the cupboard or anything. I popped open the jar and gave each of my kids a piece of asparagus. I expected them all to love it because we love pickles in our house. And the teenagers did like it okay. But the younger crowd didn’t like it at all. I liked it okay, but it wasn’t my favorite thing ever.

I didn’t want this review to be a fizzle, so I tried my hand at fermented cucumbers. You know, because my kids like pickles. But because of quarantine, I didn’t have a lot of “off the wall” ingredients on hand (like fresh dill), so I again went with a very basic recipe: thickly sliced cucumbers and brine. I followed the same steps as I had for the asparagus, but this time I used a 3.5% brine solution. A few days later, Grasshopper and I tried the cucumbers. He didn’t like those, either. And frankly, I didn’t love them either.

So, thus far, our fermenting journey hasn’t been super successful. I’m not at a point where I’m considering giving up yet, but I probably will take a break until I can get my hands on some of those more unusual ingredients. I really do want to have a fermenting success story, but that hasn’t happened yet.

I do know, however, that some of my fellow Homeschool Review Crew members have done great things with the Fermentools Starter Kit, so go to the blog there and read some of those reviews. I know I plan to, just to see where I went wrong!

Blessings,

ladybug-signature-3 copy