Math and Algebra (review)

Disclaimer: I received a FREE copy of this product through the HOMESCHOOL REVIEW CREW in exchange for my hones review. I was not required to write a positive review, nor was I compensated in any other way.

Scorpion is a tough kid to teach math to. He struggles a lot, and I often feel like a bit of a failure when I realize some of the things he doesn’t know well that I think he should be able to do quickly and easily. We’d been using another online math program, and he was doing reasonably okay with it, but he wasn’t advancing as quickly through the lessons as his brothers were. So when the opportunity to review MathandAlgebra.com came up, I thought, Maybe he needs a different approach. So I applied for the review on his behalf.

math and algebra 1MathandAlgebra.com is another online math instruction system, and is put out by Math Essentials. It uses the same teacher, Richard Fisher, and a very similar format. The main differences are that A) there isn’t a physical textbook and B) it’s got a wide variety of levels in one program (there are 4 courses, to be exact: basic math, advanced math, pre-algebra, and algebra). Let’s talk about the system for a few minutes.

When you first log in, you’re taken to what’s called the Group Leader console. This is basically like a teacher dashboard. Options to look at here include My Students (a list of the students registered on your account), My Account (where you can monitor payment info and orders), My Dashboard (where you can see how far into each course you or your student are), My Courses (where you can select a course to work on), and My Profile (where you can adjust your username, password, and contact info). Everything except for My Courses is basic enough that what I put in parentheses is all you really need to know about them.

Our Course

math and algebra 3As I mentioned, Scorpion (age 14) is the student I had work on MathandAlgebra.com. Because I could tell based on our previous math experience with him this year that he had a lot of holes to fill, we started with Basic Math. This turned out to be the right course of action for him; it’s challenging him enough that it’s not a waste of time, but it’s not so challenging that he’s getting overly frustrated.

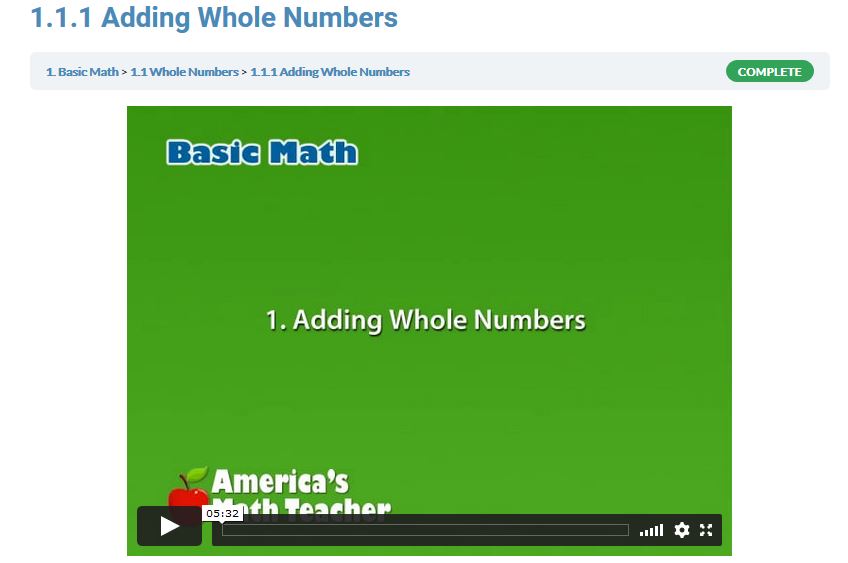
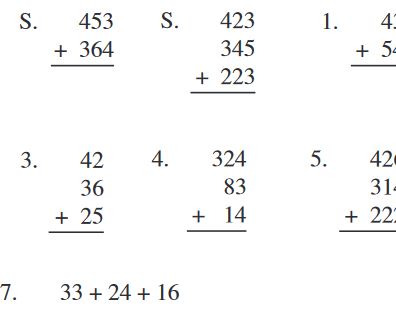
Each lesson starts with an instructional video taught by “America’s Math Teacher,” Richard Fisher. These are all fairly short, running in the 4-10 minute range. When the video is over, students then scroll down and download (really just open, though, not truly download) the corresponding worksheet. This is a series of problems that correspond with the lesson being taught. Work is done on a separate sheet of paper. When the student has solved the problems, they (or you) can then refer to the answer key to correct their work. The answer key can be found on the same page as the video and the worksheet download. It’s a download link identical to the worksheet one, except it’s labeled “key.”

Basic Math has 85 different lessons, all following the same format as what I described in the previous paragraph. The lessons are broken down into units:

  • Whole Numbers
  • Fractions
  • Decimals
  • Ratios, Proportions, and Percents
  • Geometry
  • Number Theory and Algebra
  • Integers
  • Charts and Graphs
  • Probability and Statistics
  • Word Problems

Each unit has a different number of lessons, usually in the 8-12 range. And then at the end of each series of lessons, there is a quiz. At the end of the entire course, there is a final quiz.

IMG-6797
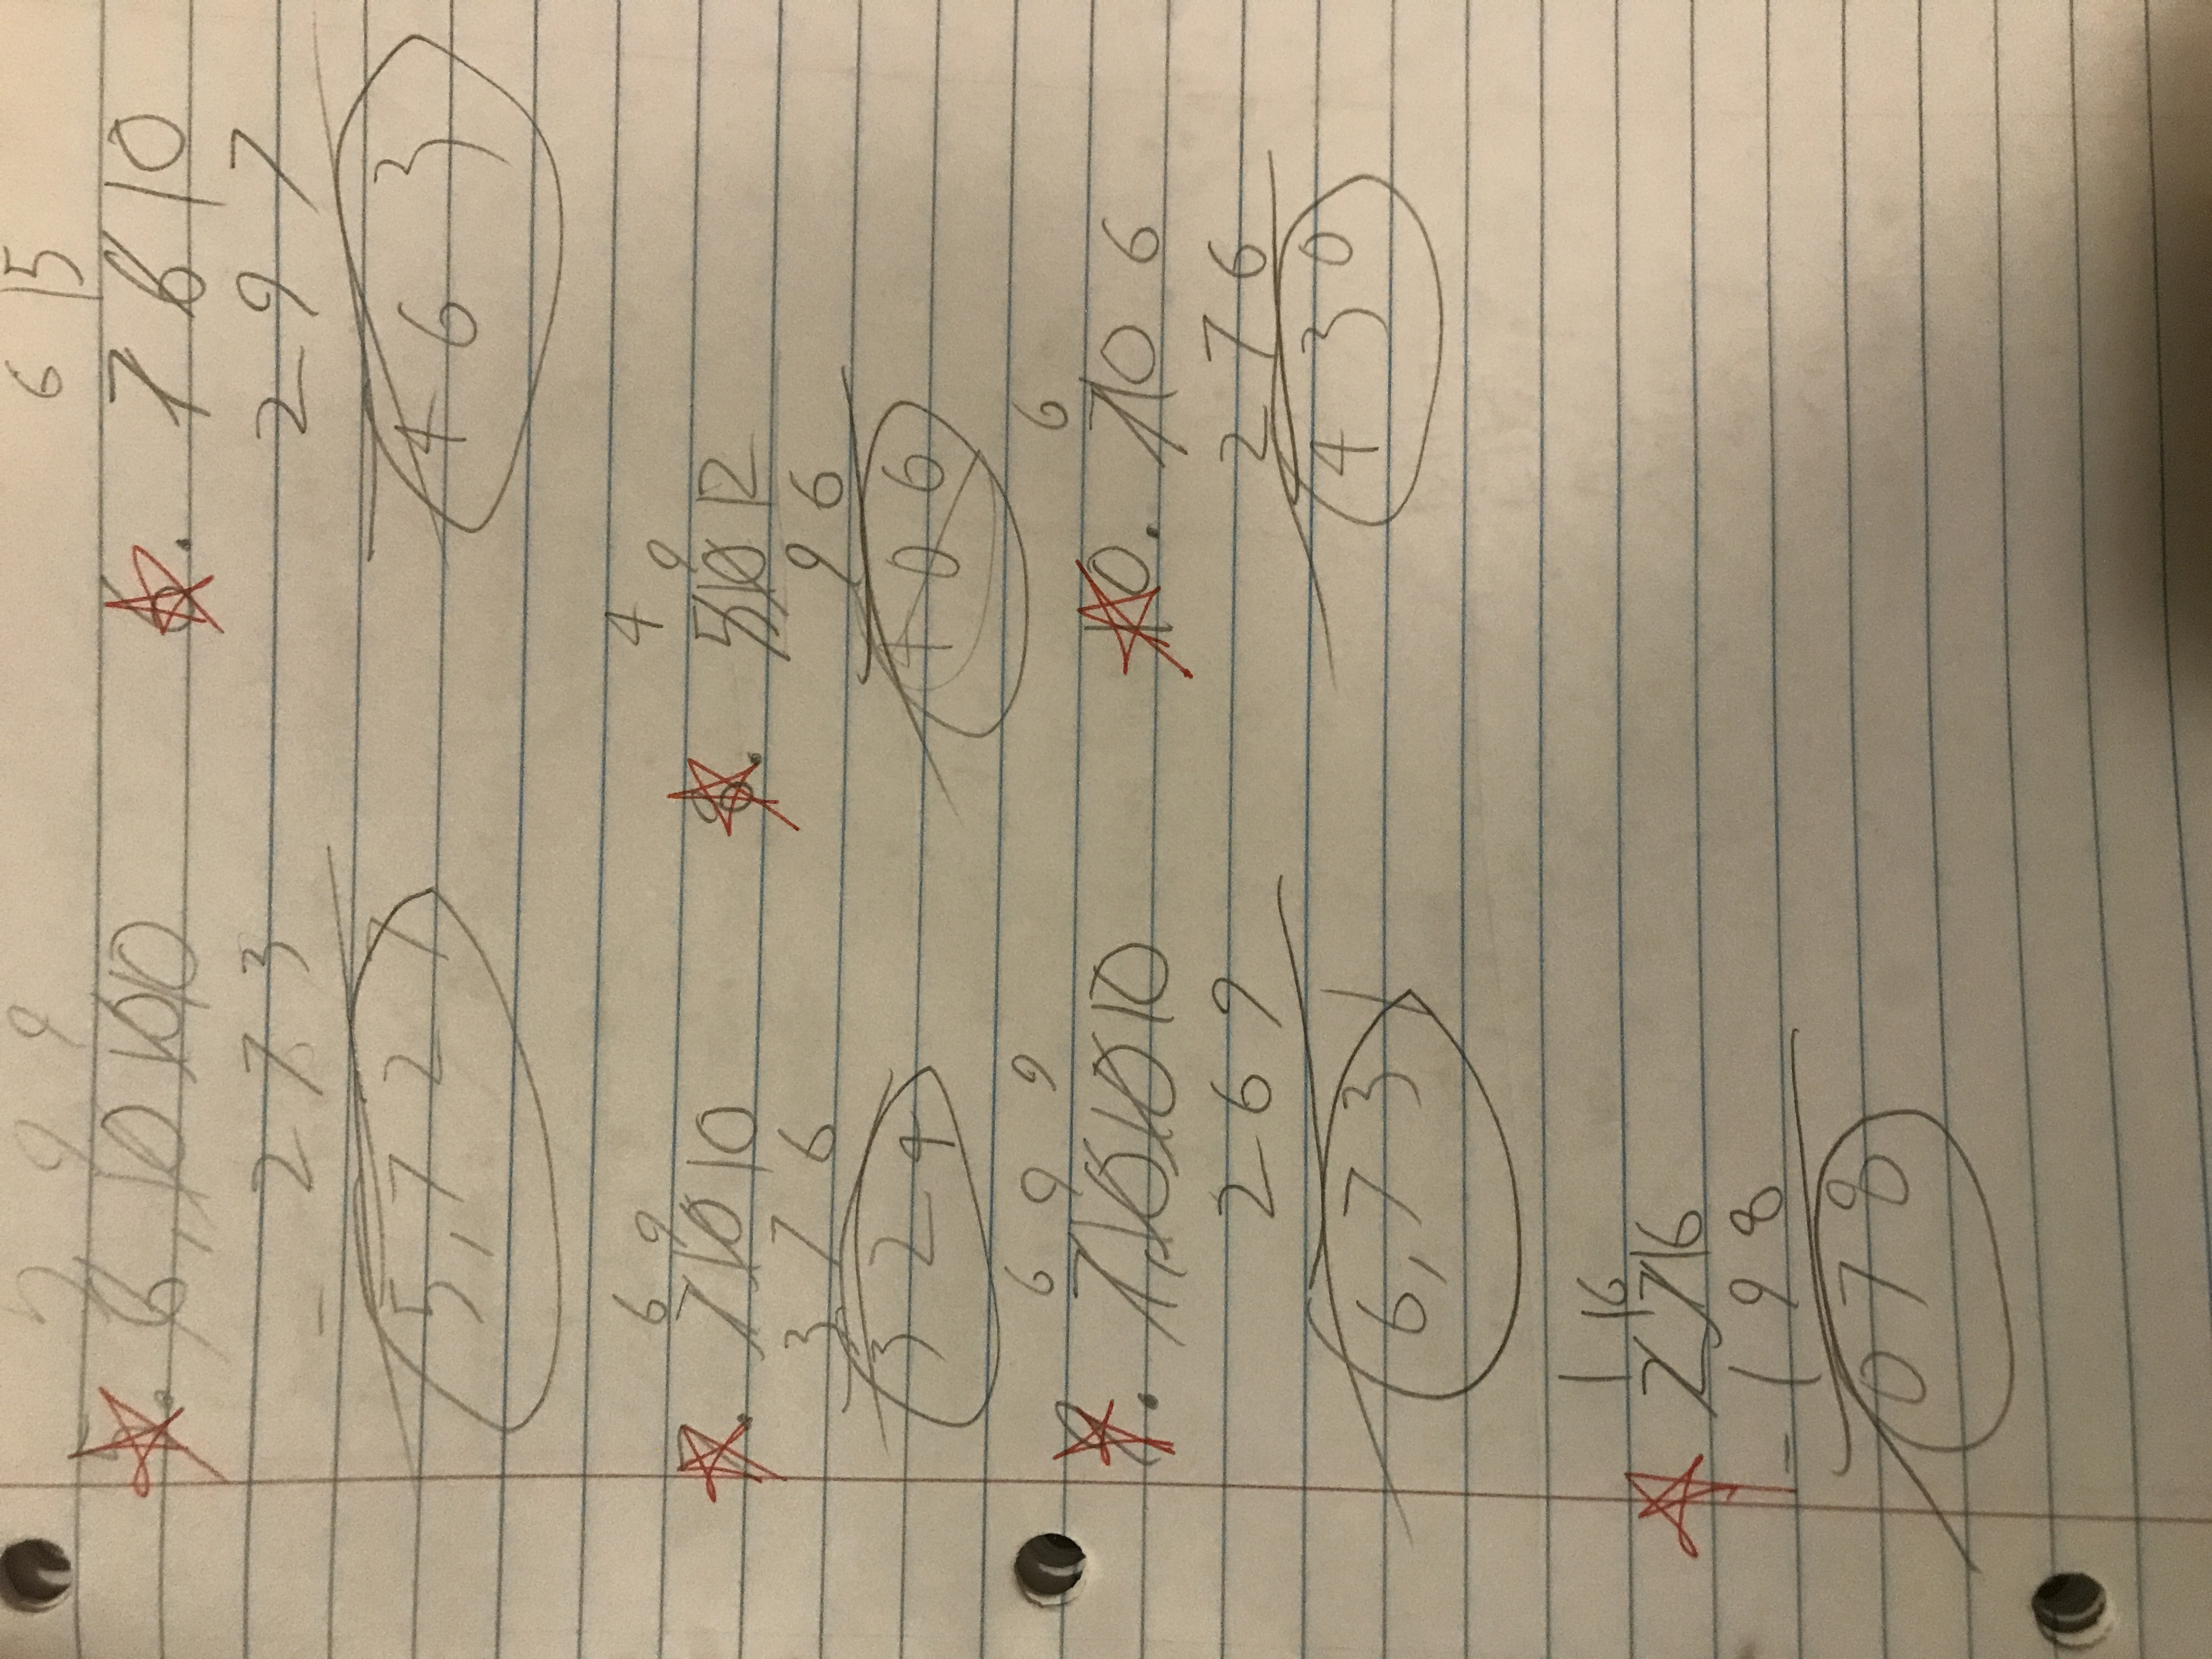
Scorpion worked on this as his main math curriculum over the past month, and I’m happy to say that I can see drastic improvement in his work. There have been a few lessons in which he got 100%. I don’t think that’s ever happened with him, so this is fantastic news! Literally the only thing we had an issue with was the whole “doing the worksheet on separate paper.” His handwriting isn’t the best, so it was sometimes tricky to correct his work – I had to really pay attention to where he’d written each problem in order to make sure I saw his actual answer. It didn’t occur to me to just print out the worksheets until I started writing this section – if it had, that would have been a lot better for us! Now that it has become something I’ve thought of, I will definitely be doing this for him from now on, because I really do want him to continue with this program. Did I mention that he’s gotten 100% on some of the lessons?!

Make sure to head over to the Review Crew blog to find out more about MathandAlgebra.com!

Blessings,

ladybug-signature-3 copy

Happy Birthday, Ballet Boy!

My oldest son recently turned 17! He is such a joy to have around, and I’m glad he’s mine.

4E5E6385-1E45-47C6-9DB8-16D7ACB499C4

We celebrated his special day by having a few close friends over for dinner and a murder mystery party. I found one online that was very simple to put together – just print and read, basically. It was a huge hit with his friends!

Happy birthday, Ballet Boy! Here’s to many, many more.


Ruby Dress pattern

I posted about the Ruby dress I designed and made last week, but I hadn’t yet written out the pattern. Well, now I have, so I wanted to post it here so other people can have the opportunity to make this cute little dress!

D3796C25-22B1-4F42-ABB3-5ED1D2440896

Full disclosure: I tried to find people to test knit for me and didn’t get any takers, so this pattern hasn’t seen anyone’s eyes but mine until now. If there are any mistakes (which I don’t think there are, but you never know), please feel free to let me know so I can adjust them.

I did not include a pattern for the flower because I didn’t write one. Any crochet or knit flower (or even a decorative button or felt/silk flower) will do. You could even leave the dress plain, but I think the flower adds a little “something special.”

Here is the pattern.

Ruby

Knit Toddler Dress

Size 12-24 months

Gauge: 18 stitches and 26 rows using larger needles in stockinette = 4 inches

Yarn: Worsted or chunky, whatever you like to get gauge. I used Caron Latte Cakes in the color Strawberry Flambe, which is labeled as a “chunky 5,” but felt reasonably thin (worsted) to me.

Needles: Any to get gauge, plus one set a couple sizes smaller. I used size 8 for the ribbing and size 10 for the rest. Interchangeable circular needles are preferred because of the rapidly increasing skirt. It starts small (a 16” or 20” cord will do) but increases to double its size, so you’ll need up to a 40” cord before you’re done. You’ll also need a cable needle as well as a set of DPNs in the smaller size.

Construction: Dress is knit top down starting with the collar, which is worked in rows. A button is added at the end to close the opening. Then it uses raglan increases for the shoulders. Once the sleeves and body are separated, you’ll knit a couple of inches. Then a garter stitch band is knit, followed by the skirt, which increases rapidly for the open, flowy feel. Cables are knit in the skirt between the wedges of increase.

Using smaller needles, cast on 68. Turn work.

Work 1×1 rib (k1, p1) for 1 inch. Work in rows, not in the round.

Increase round: Place marker and join for working in the round. Increase 4 stitches evenly as you knit one round.

Marker setup: Knit 12 (back left), place marker, knit 12 (left sleeve), place marker, knit 24 (front), place marker, knit 12 (right sleeve), place marker, knit 12 (back right).

Setup round 1: *knit to one stitch before marker, yarn over, knit two, yarn over* Repeat from * to * until one stitch before last marker (8 stitch increase). Be careful not to increase at the beginning of round marker.

Setup round 2: knit around

Repeat these two rounds a total of 8 times. You should have 144 stitches on your needles.

You will now work even (no more increasing) until your yoke measures approximately 5.5 inches from the cast on.

Separate body and sleeves: Knit to first marker. Place all stitches between first and second marker (the sleeve) on hold using waste yarn or a stitch holder. Using backward loop method, cast on 4 stitches. Knit to next marker, then repeat the process of placing sleeve stitches on hold. Knit to beginning of round.

Bodice: Knit every round until work measure approximately 2 inches from the underarm.

Waistband: Work in garter stitch (knit 1 round, purl one round) for 8 rounds, or until your belt measures 1 inch.

Increase for skirt: KFB (knit front and back) into every stitch

Marker setup: Knit 10, place marker, *purl 2, knit 8, purl 2, place marker, knit 20, place marker* Repeat from * to * around. Knit last 10 stitches. This establishes where your cables will go, as well as the increase points of the skirt.

Round 1: Knit to first marker, *purl 2, C6B, purl 2, yarn over, knit to one stitch before next marker, yarn over, knit 1* until last increase marker. Knit the last 10 stitches (being mindful not to increase at the BOR).

C6B: Move three stitches to cable needle, hold in back of work, knit 3 stitches, knit 3 stitches from cable needle.

Rounds 2-3: Work as established, knitting the knits (and YOs) and purling the purls all the way around.

Repeat Rounds 1-3 until your piece measures about 17 inches from the shoulder to the bottom (or 1 inch shorter than what you want the total length to be). You may need to switch to a longer cable as you go.

Switch to smaller needles and work 1×1 rib for 1 inch. Bind off.

Sleeves: Pick up sleeve stitches from waste yarn using DPNs (or magic loop if you prefer) in the smaller size. Knit one round.

Work 1×1 rib for 6 rounds. Bind off. Repeat on other sleeve.

Weave in ends and block your dress. Then find a pretty little girl to put it on and share your pictures with me on Instagram @ladybugdaydreams!

I am working on developing this dress in larger sizes, so stay tuned for that – though it will likely be quite a while. If you’re a knitter who’s interested in helping me out by making this dress in other sizes, contact me and we’ll work something out!

Blessings,

ladybug-signature-3 copy

My Teaching Library (review)

Disclaimer: I received a FREE copy of this product through the HOMESCHOOL REVIEW CREW in exchange for my honest review. I was not required to write a positive review, nor was I compensated in any other way.

When you’re homeschooling a wide age range of students, I don’t think you can have too many subscriptions to homeschool help services. This is why I was open to reviewing My Teaching Library when asked. I knew that there would be plenty here that we would be able to use. For this review, I’ll be talking about the Download Club, to which I received a one-year membership.

My Teaching Library is a site that has a huge range of resources for kids PreK-12, and this makes it different from other services, and makes it different from what I thought it would be. I expected it to be mostly worksheets, but it’s so much more than that! You can browse their offerings by age/grade, subject, or newest resources. They have options for all your regular subjects (math, language arts, etc), but also some that can be harder to come by, like foreign languages (American Sign Language, French, or Spanish). In addition to standard things you’d use for your students, they also have classroom posters, printable diplomas, games, flashcards, and more. Let’s dig a little deeper into what we used in our home.

91E580DD-E153-467B-89E0-873C9AEA46C9I was immediately drawn to the French curriculum. We used to use Rosetta Stone to learn French, but that was on an old computer that has since died, and we haven’t put it on my new laptop yet. And besides that, sometimes paper things work better for younger kids. So I downloaded from the French archives: animal names, family vocabulary, months of the year and days of the week, basic weather terms, number words 0-20, and the colors poster.

MTL 1Some of the items were flashcards and others were posters. All follow the model of “show, don’t translate,” though. The animal flashcards, for example, name the animal in French and offer a picture. None of them have the English name for the animal. The same goes for all of them. The main difference between the posters and the flashcards is that the flashcards have definition lines to cut; the posters are a series of images with a common border.

One thing that threw me off a little bit at first was that when you click “download,” the files don’t go to your computer straightaway like a normal download. From the point you click download, they go to your downloads folder within the site itself. You have to then go to your account screen, then to downloads, and download “again,” at which point it will go onto your computer. I think I would prefer to have it be a traditional download instead; I don’t see the purpose behind having to go to a different page to download the files properly. Or at least give the first “download” a different name, like “add to your dashboard” or something.

The Download Club is available for $45 a year, or for $225 you can buy lifetime access. It allows you unlimited downloads to every single one of their worksheets, flashcard sets, and unit studies. If you’re not sure you want to commit fully to that, you can also buy things a la carte. The French PDFs we used range from $1-$3 each. They have full textbooks available in many subjects (including upper grades science and math) for a wide price range. There is quite literally everything you could possibly need available for one price – and it covers ALL of your children! What could be better than that?

I am super excited about all of the different options available on My Teaching Library. This will definitely become something I go back to again and again for resources.

Make sure to head over to the Homeschool Review Crew blog for more reviews.

Blessings,

ladybug-signature-3 copy

Wisdom Wonder Project (review)

Disclaimer: I received a FREE copy if this product through the HOMESCHOOL REVIEW CREW in exchange for my honest review. I was not required to write a positive review, nor was I compensated in any other way.

6CD64D1A-1390-4CA7-8E1C-F2EABB98910C

Wisdom Wonder Project is a subscription based, classical education curriculum for kids preschool through 2nd grade. What started as a group of parents who couldn’t find a classical school near them and therefore started their own has become a full curriculum for younger students available for purchase worldwide. For the month of September, Dragonfly and I have been using their Little Wonders Preschool set. This is for kids in preschool or kindergarten.

How It Works

Wisdom Wonder Project is, as I mentioned, a subscription product. You can choose a monthly subscription or an annual one. Each month, you go in and download the curriculum to your computer; there’s no need to log in every day. Little Wonders is a three-piece set: literature, Little Masters (art), and block play. 

Kindergarten literature is just what it sounds like… Each month, your kit includes everything you need for your child’s first literature lessons. There are four books highlighted each month, which gives you a full week to spend with each one. With each book, you read the book each day and then do activities based on the book. For example, with Harold and the Purple Crayon, there are loads of activities involving purple things (making purple play-doh that is lavender scented, buying purple fruits and veggies from the store and eating them, etc).

4AACE4A3-0E9C-4BC6-9E44-39A438681A88I had a hard time getting hold of most of the books for this month of study (almost none of them were available in my library system), but I was able to find A Sick Day for Amos McGee, and we read that a few times. Dragonfly really had a lot of fun with the sandpaper coloring activity in that unit. Because I had an ebook version of the story instead of a hardcopy, I had Scorpion (14) draw an elephant for Dragonfly to color. (The curriculum instructed you to photocopy one of the pages for this activity.) We had some sandpaper on hand, so we popped that underneath the drawing and let him color away. This gave his elephant a “real feel” texture, which he loved.

Little Masters is the art curriculum, and it’s titled such because each month focuses on a “master.” September is Alexander Calder. The packet includes a brief biography, and it’s there that I read that he is credited as the creator of the mobile. For this reason, the main focus of the month is learning about shapes. One of the activities in this vein was to let your child help make a sandwich of his choice – Dragonfly chose peanut butter – and then cut it into the shape of his choice. We first talked about the shape of the bread (rectangle), and then he chose to have it cut into triangles, and he shared one of them with his baby brother.

The third component is Block Play. This includes another book, and after reading it, you use physical things (beyond paper and pencils) to create aspects of the book. For example, you’re instructed to help your child build a skyscraper, or create a road. Basically, it gives your child a chance to wiggle a bit and explore with their hands while still learning.

I loved the idea of the Wisdom Wonder Project, but I wish they used more mainstream books that were easily found at the library. That made it difficult to really get into the curriculum as well as I wish we could have. That said, I will continue to download the kits each month (I received a yearlong subscription), and we will use the ones that are readily available to us.

Wisdom Wonder Project also has curriculum for kids in 1st and 2nd grade, as well as a video math program using Singapore Math. Click through to read more about that on the Homeschool Review Crew blog.

Blessings,

ladybug-signature-3 copy

Mystery Project

I recently quit Instagram. Probably temporarily (I didn’t delete my account, but I did remove the app from my phone), but for now it’s gone.

Before I did, however, I saw a post from a mom-owner business called Pixel Hooker. They create corner-to-corner (sometimes abbreviated C2C) crochet “graphgans.” A graphgan is an afghan created using squares of color (made with double crochets) to make a picture, usually done in the C2C style. The post was advertising a promotion they’re running, in which you download the free pattern and make the blanket. There’s no picture of the blanket included (unlike most other graphgans). Instead, it’s a row by row list of the colors to crochet. The reward for completing the mystery blanket is one free pattern from their store. 

I’ve always wanted to try making a graphgan, so I bought the yarn needed and started making the blanket. It’s one of three projects I have going right now, so even though it’s been a couple of weeks, I’m not done yet. But here’s what I’ve got so far.

6B8BB669-B027-4349-97A7-4C6DF80EFD6F

Any thoughts on what it might be? For a while I was thinking it was going to be a bee, but now I’m not so sure. I’m excited to finish up and see! Stay tuned for the reveal when I finish. And make sure to check out Pixel Hooker; they’ve got some amazing patterns that I’m excited to try out in the future!

Blessings,

ladybug-signature-3 copy

Bumblebee’s Birthday

My baby turned 2 this weekend! We had a small get-together with the grandparents and a couple of friends, and it was (mostly) great fun. The exciting moment of the day was when the kids went outside to play only to come running in with bee stings a short while later. Turns out they were wasps, not bees, and a couple of the kids had them trapped inside their shirts. As I’m sure you know, trapped bees are angry bees, and as soon as they were freed they started chasing down everyone inside. Many of us ended up with multiple stings (I personally got 4 on my foot). We were able to kill all the wasps inside within just a few minutes (though it felt longer), and my husband went outside and sprayed the nest so that wouldn’t happen again. All in all, much more exciting than we anticipated!

But back to Bumblebee (an ironic nickname, considering…). He’s 2 now! He is definitely my most difficult child. I’ve heard stories for years about kids who climb all over things, get into the fridge, and generally cause trouble. I’ve never had a kid like that before, though, until now. It can be exhausting at times, but he’s so sweet the rest of the time that it’s worth it. 

Here are a few pictures of him over his two short years of life 🙂

IMG-1593

Bumblebee and me enjoying our first skin-to-skin after his birth while I get stitched up from the c-section.

IMG-1598Moments after birth

IMG-2089At 6 months old, meeting Grandpa (my dad, who passed away this past January) for the first time. Bumblebee’s middle name is my dad’s first name, so they’re namesakes.

IMG-2836First birthday cake. He wasn’t terribly interested because he was super tired; we’d had a busy day at the waterpark that day.

IMG-3912About 17 months old; his first buzz cut (it’s par for the course now)

IMG-5617New clothes for his 2nd birthday. He looks so grown-up!

IMG-5637Instead of cake, we did fruit salad for dessert on his birthday. Ballet Boy (16) made the dump truck out of a watermelon.

Blessings,

ladybug-signature-3 copy


Project Bag (sewing craft)

I’ve been knitting a lot lately (as I’m sure you’ve noticed!), and in order to bring my projects along wherever I go to always be able to work on them when time permits, I’ve just been stowing everything in either a paper bag or a little basket I have. The basket actually works really great for working on stuff at home, but it’s a bit too big to comfortably fit at my feet when riding in the car, for instance. When my paper bag tore last week, and we didn’t have any others that were at least a little bit cute, I decided to make one out of fabric. I’ve developed quite a fabric stash over the past few months, but lost my interest in sewing when I had two or three projects in a row not work very well for me. (I’m still glad I have the sewing machine, but I don’t really see it becoming my main crafting outlet any time soon based on the difficulties I had.) So I poked around into that stash and found two fabrics that I really liked and that each had quite a large piece that I hadn’t really cut into yet, and made this bag.

932E1F27-AAA0-4BC3-BE41-67BF9439967C

I used this tutorial from The Spruce Crafts, but modified it slightly. Here’s what I did. Unfortunately I don’t have “in progress” pictures, so hopefully my words combined with the pictures of the finished product will be sufficient.

CED7CFDD-FBE6-430E-AC26-ACF17AD6AF53First, I made two straps instead of one. And I made the straps double sided. So instead of cutting one piece from the lining fabric only, I cut two pieces of each fabric, each 2.5″ x 12.5″. Then I sewed them together on three sides (both long sides and one short side), right sides together. I turned them right side out and pressed them flat. Then I top-stitched around the edges to get a nice flat pair of straps. (Also, I didn’t use any interfacing because I didn’t have any on hand. The bag would be more stable with it, but I find that it stands up just fine with the fabric alone.)

I opted to use just one fabric for the outside of my bag instead of a printed top and plain bottom. To accommodate, I cut the pieces for the outer in the same dimensions as those of the lining (12.5″ x 13″). So I had four pieces of fabric the same size. I cut out two of the corners from each piece just like the tutorial says. I’d never made boxed corners this way before, but I rather liked it. There was a lot less guesswork as to how high up to sew this way.

When the lining and the outer were both completed, I sewed the straps to the right side of the lining. I didn’t measure or anything, just eyeballed the first one. Then I lined the second one up with the first so that they would be at the same position on either side of my bag. With the lining right side out and the outer wrong side out. I tucked the lining into the outer, making sure that the straps were tucked down in between the two pieces. With everything in position, I sewed around the top, making sure to leave a 3-4 inch hole for turning the bag. At this stage, it’s really important to pay attention to the stitch lines for where you sewed the straps on and sew the top of your bag below that level in order to keep your straps looking nice when you flip your bag. I thought I’d done okay at this, but I noticed the next day after making my bag that it’s not perfect. I might go back and rip some stitches out and correct it, but I haven’t decided yet.

D87BE3BB-4EA6-42BC-BB1A-BF3EA2CF82C5Turn the bag right side out through the hole you left. Press the top, then top stitch all around.

That’s it! (Obviously this isn’t a comprehensive tutorial – make sure to visit The Spruce Crafts for that. This is just my modification of their design.)

I couldn’t be happier with my new yarn project bag (except for the imperfect straps sticking out). I really like the fabrics I chose, and the size is exactly right for holding two cakes of yarn – exactly what I need for my current project!

Blessings,

ladybug-signature-3 copy